How to play Minecraft together over a local network or the Internet. How to create a local network between two computers? How to play locally with a friend

if you love computer games and a local network is already established at home or in the office, then you definitely need to find out how to play local network.
The principle of creating games on a local network is the same for most.
Let's look at this very principle using the example of one of the most popular games over the past decades - Counter Strike.
Checking the network
Before playing games over a local network, you should make sure that your computers are connected to the network.
Standard operating system tools will help with this.
Open any file manager and see how many cars are in the folder network.
IN computer networks belong to groups called MSHOME or WORKGROUP.
If they are in the net, you can start the game.
Creating a server
You need to launch it and choose a person who will create a new game. His computer will be the server.
In the main menu you need to select a section A new game.
After which a window will appear where you can set the necessary options for the future game.
Here you can set a password, protecting yourself from unexpected access to the game by unnecessary participants.
Everywhere you can set a limit on participants.
Launch the game and wait for it to load completely.
Connecting to the server
For other players, in order to get into the game and connect to it, you need to find the item in the main menu Server search(Find Servers) and left-click it.
This is where all newly created games on the local network are displayed.
Then we find exactly the game that was created on the main server and click Join.
After this, the data will be loaded and the rest of the players will join.
conclusions
It should be borne in mind that games that have a multiplayer mode are often created according to a similar principle.
Therefore, if the computer acting as the server finishes the game, all other players will also disconnect.
Main computer can change game settings directly during the game, but for this you need to know special commands written in the menu Console.
To play any game over a local network, you must first configure this network. In this article we will tell you how you can set up a local network in different operating systems, as well as between them.
In order to connect 2 computers in one room into a local network, you don’t need anything else except 1 RJ-45 cable, connect the 2 computers with a wire and set up the network.
Let's consider several connection options:
- Setting up and connecting 2 or more computers to a local network on Windows XP
- Setting up and connecting 2 or more computers to a local network on OS Windows Vista
- Setting up and connecting 2 or more computers to a local network on Windows 7
- Setting up and connecting 2 or more computers to a local network between Windows XP and Windows 7
- Setting up and connecting 2 or more computers to a local network on OS Windows 8.x
- Setting up and connecting 2 or more computers to a local network on Windows 10
There can be from 2 to 254 computers on a local network, I think this is enough to play with friends :) The network address should not start with 127.*.*.*, because reserved for testing and not available for use. Otherwise, you can use any IP addresses, but we recommend starting your addresses with 192.168.1.1, as this is the standard for small local networks.
To connect more than 2 computers to the network, you will need one of the options:
1. Additional input for a network card. (apartment, office)
2. Use a "switch". (apartment, office, entrance)
3. Use a router. (apartment, office, entrance, house, street)
A little more detail about each option:
1. Not everyone can insert another network card into the computer; there must still be room for it in system unit, and if you connect laptops, then the option is a failure.
2. A switch is an additional device with which you can connect different quantity computers in the network depending on the switch model, usually from 4 to 48. You can use a scheme of several switches, connecting them in series, thereby increasing the number of computers in the network.
3. Router or (router). The ability to network computers both wired and wirelessly, depending on the router model. Great advantage of this device The point is that you only need to configure it once, and connect computers to it, and the router will distribute the settings to all computers on the network automatically, regardless of the installed operating system.
Greetings friends, I finally got around to writing an article “How to play Minecraft online with friends.” Quite an interesting question that almost every player in the Minecraft universe faces. Therefore, I will tell you some of the easiest ways to play with a friend. All of our methods below are free! How to play Minecraft online for free.
And so we went:
The attachment:
- Each method works in the licensed version of Minecraft as well as in the pirated version.
- Each method works on all versions of the game including early ones (1.0.1, 1.1, 1.2.5, 1.3.1, 1.3.2, 1.4.2, 1.4.6, 1.4.7, 1.5, 1.5.2, 1.6, 1.6. 2, 1.6.4, 1.7, 1.7.2, 1.7.5, 1.7.4, 1.7.10, 1.8, 1.8.1, 1.8.8, 1.8.9, 1.8.7).
- More than 5 working ways for Online Games with friends in Minecraft
How to play Minecraft with a friend using Hamachi
First you need download Hamachi for all gaming PCs which will be used for playing online. Next, you need all players to have identical versions of the Minecraft game.
With the help of hamachi we will create virtual server, where you can play with friends. For those who create a server, you need to do:
- Open (create) a new room in Hamachi.
- Do not write anything in the IP server field (leave it blank).
- Start the server.
- Send the received IP Address to the friends with whom you will play.
For those who are connecting:
- Enter the same room with the server (which was created by 1 player).
- Connect using the provided IP address from the room creator.
- Note: to play online, all players must have the same version of Minecraft.
How to play Minecraft with a friend over a local network
This method is suitable for those who do not have internet. To do this, you respectively need an Ethernet cable (connect them between the PC).
On Windows 7:
- Go to the Start menu - Control Panel - Network and Sharing Center - Change adapter settings (in the left column).
- Find the local connection and right-click and select “Properties”.
- In the window that opens, uncheck the “Internet Protocol 6 (TCP/IPv6)” box.
- Below you will see “Internet Protocol 4 (TCP/IPv4”) - click on property.
- Check the box: Use the following IP addresses and enter the following data:
IP address: 192.168.0.1
Subnet mask: 255.255.255.0
Default Gateway: 192.168.0.2
- Next, check the box: Use following DNS server and write:
Preferred DNS Server: 192.168.0.2
Click on the button - OK. Ready! The guys are done.
How to play Minecraft with a friend online
An easier way that does not require any programs.
- Open Minecraft.
- We create new world and select in the menu (ESC) - “open for the network”.
- We select all the settings that you chose when creating the world.
- Click on: “Open the world to the network” and in the chat you can see a partial address of your world.
- Next, you need to find out your IP address and enter IP:Port instead of zeros.
- We already saw the port in the chat, it looked like this: 0.0.0.0:51259 (the last 5 digits are different for everyone).
- Then, instead of Zeros, we write down the IP address and give it to a friend. It should look something like this: 95.56.216.145:51259.
How to play Minecraft with a friend on a server
Well, I think one of the most simple ways. To play with a friend online, select from our Minecraft server monitoring any free server or the server that you like best and you can play with a friend and with other players. Well, or choose any free (less popular) server and sit there with a friend.
Another way:
Play Minecraft with friends online
If you want to play on two PCs without using the Internet, instantly transfer files from different devices without USB drives, then you need to know how to create a local network between two computers. This technology of connecting two PCs has been used for quite a long time, and even today it has not lost its relevance.
Local network example
A local network is a group of interconnected devices: PCs, televisions, printers, usually located no further than one room. The devices use shared memory and servers, thus complementing each other. This connection allows you to create a gaming area for several PCs, easily and fairly quickly transfer any data, print documents if one common printer is installed, and do much more. Connecting devices today most often occurs using a router, but other connections can also be used, which you can read about below.
Creating a connection
Creating a connection is quite easy, and different ways: via a router or cable. Setting up devices for both methods is quite similar. The difference lies mainly in the connection method: via cable or via Wi-Fi.
Communication via Wi-Fi, which is used much more often today, can be much more convenient, but connecting two PCs with a cable will cost less if you have not yet installed a router for some reason.
Connection via cable

The oldest type of communication between two machines. All you need to do is connect network cable RJ45. The cable must be a crossover cable, although regular straight cables can often work for modern computers. Still, when purchasing, it is better to check the type of cable with the seller. When you add the ends of the crossover cable, the colors of the ends of the wires will differ - this is its main difference. Also, the connection requires network cards on both devices, but today they are already installed. It is only worth noting that if LAN card is already busy connecting to the Internet, you won’t be able to use it.
This connection was just used before to play. But it may be convenient for someone today, especially if you still have operating system Windows XP, which struggles to support wireless connections.
After connecting the cable itself, you need to know how to set up a local network between two computers:
- Control Panel, select the item related to network connections.
- We select what we created there, right-click on it, select “Properties”
- Next, depending on “Windows”: for Windows XP select Internet Protocol (TCP/IP), for Windows 7/8/10 - Internet Protocol version 4.

- Manually enter the IP address: 192.168.xxx.xxx. You can enter the last six digits yourself, the main thing is that they are not repeated on different devices.

- On Windows 7, you will also need to go to the Network Control Center, there, through the “Settings” item, select “Private” for our network.
- Then in Control Center, enable general access access files, network discovery, and disable password access protection.
After this, you also need to set up sharing. This is done so that PCs can exchange any files. The methods vary on different OSes. On WindowsXP:
- Chapter Network connections, go to “Tools”, select “Folder Options”.
- “View” tab, check the box next to “Use simple file sharing.”
- Next, go to the “System Properties” window: RMB on “My Computer” - select Computer Name.
- Click “Change”, select “Is a member” of the working group. We come up with a common group name for both PCs.
- My computer, right-click on the hard drives (for example, Windows (C:)), in the “Access” tab, click on the link, set the sharing permission.
That's it, access to the files on the selected disks is completely open. With Windows 7/8/10 we proceed as follows:
- Control Panel, then Folder Options.
- Check the “Use Sharing Wizard” checkbox.
- The following steps will be the same as for XP.
Connection via router

This is the most convenient way, since it allows you to connect not only two, but a larger number of computers or other devices that support Wi-Fi. You can play over this connection without lengthy settings.
IP addresses for such a connection will be set automatically. For use shared files you will only need to share files, and then add two computers into one working group, as described above.
Now, to transfer files, you just need to enter the computer name using the address bar: \\name\. You can also do this through the Network Connections section. It is also worth securing your personal or especially important files so that no one can access them from a nearby computer. To do this, it is best to specify drives that do not contain information important to you. For example, a disk containing data accounts users, it is better not to make it open to everyone, or, using the settings menu for files and folders, limit access to them: RMB on the desired folder, then select the sharing settings there.
Playing on a local network
So, we managed to connect two devices to the same network without the Internet, allowing them to exchange files. How to start playing on a local network?

For this, as a rule, no additional settings no need to do it. We just turn on the game and, if you can play over a local connection, select the appropriate item, and then play over the one we have already created.
Connection to a shared server may vary for different games. You will need to enter the IP or PC name somewhere. For Minecraft, Counter Strike, for example, you will need to create a server. But as a rule, everything is done quite simply.
Hamachi
This happens quite rarely, but sometimes a game does not allow you to play over the Internet, but allows you to play it over a local network. Don’t despair, even if it turns out that your friend lives far from you.
The Hamachi program allows you to emulate a local connection and thus connect a PC to it via the Internet. To do this, you just need to download the program, register, and then create a new connection, give it a name and, if necessary, a password. After this, you can easily use this network to play.
As you can see, connecting computers into a local network is a fairly easy process. It won’t take you much time, and you can connect two PCs, and then play with your friends, both being away from them and being in the same room with them.
The methods for creating a connection are suitable for all Windows, from XP to Ten.
The game has long since introduced the ability to create local server in your own world, while everyone who is on the same network will be able to connect to your server. In general, everything is simple, but there are many limitations, everything is described in detail in this article. Select the desired type of setting from the contents and follow the steps described.
Setting up a server when you are on the same Wi-Fi or Lan network with another player
If several computers are not far from each other and are on the same network: Wi-Fi or Lan (connected via cable), then this setting will suit you.
Windows: On the computer where the server will be opened, open Start and enter it into the search cmd, open this program:

In the window that opens, enter ipconfig, press enter. We are looking for your local IP, which starts with 192.168.*.* , in the example it is 192.168.1.47 (you will have a different one!), copy it.

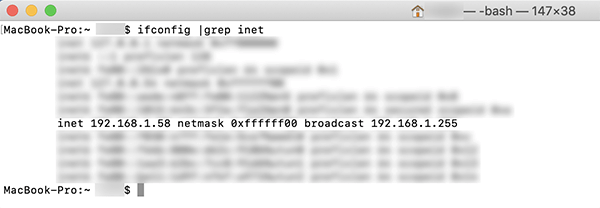
MacOS: To find the local IP, open the Terminal, you can enter this program into the Mac search and find it, enter it in the window ifconfig |grep inet and look for an IP that starts with 192.168.*.* , copy it.
version with TL icon
We go into our world and into the menu Pauses (Esc) click 31790 (you will have another one).

Now on another computer, which should connect to your server, you also need to open the version with the TL icon (plus, the version of the game must be the same as on the first computer), go to Multiplayer ( Online game) , open .
Now enter in the IP address + port field that we received earlier, in the example this is 192.168.1.47:31790

Setting up a server when playing online with another player using Hamachi
If you physically cannot be on the same network with another player, the computers are far from each other, then you can create a special network using the Internet with using Hamachi.
On both computers we do the following: Create a Hamachi account and download their program (after clicking on the link, the Download button is in the center).

Now open TLauncher and select the version with the TL icon and launch the game (it’s also better to log in to the site under your account). If you select without the TL icon, you will not be able to connect to the server without a Mojang license.
We go into our world and into the menu Pauses (Esc) click Open to Lan, a message about the successful opening of the server will appear in the chat, as well as the server port, in the example this is 60000 (you will have another one).

On another computer Click “Connect to an existing network”, enter the network name and password you created earlier. If the connection is successful, your friend's computer will be visible in the Hamachi window.

Then it is also necessary open the version with the TL icon (plus, the game version must be the same as on the first computer), go to Multiplayer, open Direct connect.
Now we enter into the field the IP address from Hamachi (the computer where the server is open) + the port that we received earlier, in the example this is 25.1.80.229:60000 . If everything is ok, then the connection to the server will occur! You can now play on the server with a friend.

Setting up a local Minecraft server with mods
After you have set up a server for playing in one WiFi networks(Lan) or using Hamachi, you can install mods and play with them with your friends. The instructions are very simple.
We install exactly the same mods on all clients so that everything is identical, plus the Forge version itself must be the same, for example, ForgeOptiFine 1.12.2. Don't forget that the version must have the TL icon!
Now we create and connect to the server using absolutely the same instructions above, depending on your network. Done, you can play with mods in Minecraft!
Possible problems and their solutions
- When connecting to the server, the following message appears: “Invalid session” or “Check your username.”
Solution: You must run the version with the TL icon (otherwise you need a game license), if you run this, check if the checkbox (in the launcher) is checked in “Account Management” -> “Use TLauncher skins”.
- When connecting to the server, the following appears: "Io.netty.channel.AbstractChannel$AnnotatedConnectException: Connection time out: no further information"
Solution: the game could not find information about such a server, which means the network setup was not done correctly. Try disabling the antivirus and firewall on the host computer or configuring it correctly.
- When connecting to the server, chunks are loaded and immediately thrown out of the server (connection disconnected).
Solution: The network setup is correct, but the antivirus and firewall are interrupting the connection. Disable them or configure them correctly.
When connecting to the server, the following appears: 1.14.2: Bad packet ID 26; 1.13.2: Bad packet ID 27; 1.7.10: Stuck on Logging in... or "received string length longer than maximum allowed"
Solution: your nickname is longer than 16 characters, please make it shorter.
 Order 343 mail. Order by Russian post. Consequences of failure to appear in court when summoned
 How to put a password on a folder on a Windows computer without and with programs
 Pluton – Free Bootstrap HTML5 One Page Template
 History of ZX Spectrum: Myths and reality New Spectrum
 Voice assistant Siri from Apple Siri functions on iPhone 6s
 How to roll back to a previous version of iOS?
 Unlock iPad in four days