How to quickly install an old version of Skype. How to return the old version of iOS? Finding an old version of Skype
When switching to a new version of an OS from Microsoft, it is quite natural to want to do this smoothly and consistently. If you are accustomed to the interface and functions of the seven, and want to take a closer look at Win 8.1 or 10, without deleting the seventh version that has already become familiar to you, this can be easily done. After all, based only on reviews, screenshots and opinions of other users, making a choice for yourself is sometimes not so easy. It’s worth looking at the new OS with your own eyes, and then deciding whether it’s right for you or not. If the new system turns out to be too heavy for the hardware configuration of your PC, or you simply don’t like it due to the presence of unnecessary functions or an overloaded interface, you can at any time return back to the operating system that has already become familiar (say, seven) without reinstalling the OS.
How to install new Windows without deleting the old system that has already become familiar to you? This will be discussed in this article. Having two systems on one PC, every time you turn on your computer, you can choose which system to boot. This approach is very flexible and convenient. You don't need to worry about the fact that your favorite file manager or game does not work in 10 even in compatibility mode, and it is unknown whether it will run in it in the future. Just download Win Seven and freely use those applications that are not supported by the developers in the new OS, and in the top ten you can work with new programs.
Let's assume that your current operating system is Seven. It is worth noting that the instructions described in this material are suitable for any of the Windows systems, starting with XP (XP, Vista, 7, 8/8.1, 10), that is, you can install any configuration. It is important that the second installed OS is a newer version than the active one. That is, if the computer has seven, you can install 8/8.1 or 10, but not Vista. If you install a second earlier system, all information in the MBR record will be deleted. boot files And boot sector, and you will only be able to work with the second, that is, the previous operating system. In this material we will describe the process of installing Windows 10 in conjunction with 7.
Installation procedure instructions
Before the installation process, you need to make sure whether there is an unoccupied logical device (D, E, etc.) on your hard drive. If you installed in system unit two hard drives, you can install a second OS on an additional one HDD, specifying a blank non-system partition during installation as a place to store system files. If you don’t have a second hard drive, we’ll create another, new partition. This can be done using special external applications (AOMEI Partition Assistant, Acronis Disk Director Suite), and regular means. We use the second option - to do this, open the “Run” form by pressing the Win + R key combination, or using the “Start” menu.
Enter the command “diskmgmt.msc” in the text field that appears and click OK.

The Disk Management Manager will open in front of you. Let's create a new partition D. To do this, you first need to shrink the partition with the largest volume, separating unallocated disk space from it. In our case, this is partition C. For you, it can be any other drive, as long as there is free space on it. Right-click on the selected device and select the “Compress” option.

In the form that opens, in the “Size of compressed space” field, indicate the amount of disk space that will be needed for new system(for Win 10 minimum – 25-30 GB). After specifying the value, click the “Compress” button.

As a result, on the visual line hard drive An unallocated sector should appear. We'll put a new ten on it.

All these actions can be performed directly during the installation of the second system, but it will be more difficult to do there. So choose which option you like best.
The next step is to download the Windows 10 image from the network and burn it to a DVD or flash drive. Finding an ISO image of the system is not difficult; use a regular Google or Yandex search. You can also download the tens distribution kit from official website. Pay attention to the language and bit depth of the image. As for the first, you will probably need the Russian version. Bit depth is also an important point. You need to focus on the 32 or 64-bit version based on the bit capacity of your processor and the amount of RAM. If you have a 64-bit CPU and more than 4 GB of RAM, you should give preference to the 64x image. If the volume random access memory less, you can get by with the 32x-bit version.
This will help you with recording the distribution to an external drive. Here the recording process is described in detail and in great detail. When downloaded from the manufacturer’s official website, your PC will receive a special proprietary Windows 10 installation program from Microsoft, including all recording tools installation files to the appropriate media.
Further using BIOS settings you need to boot your PC from external storage(laser disk or USB flash drive where you recorded the distribution). How to make these settings is described in the same material.
When everything is ready, insert the media into the computer and boot. If the parameters in the BIOS are set correctly, the message “Press any key to boot from CD or DVD” will appear on the display. Press any button on the keyboard.

After selecting the language, confirming the license and specifying the installation type, we proceed to the hard disk partitioning form.


If you have done all the partitioning work in advance, and you have 25-30 GB of unallocated space, select the unallocated area to install the second system and click “Next”.

If there is not enough free space, you will have to delete one of the occupied partitions, which will expand the unallocated disk space. It is important to understand that when you delete a partition, all data on it is destroyed. That is why we advise you to do all the partitioning in advance, in the disk management manager on the current system, since there partitions can be compressed rather than completely deleted, which will prevent data loss.
So, the main installation phase begins. It will take some time, so be patient.

All subsequent installation stages are described in the same material, and we will not dwell on them.
Finally, when Windows installation 10 on a laptop, computer or tablet is completely finished, the device reboots, and the next time you turn it on, it appears on the display boot menu with the choice of system to launch. Having selected the desired item, you can use any of the versions (see the picture on the main page).
Interesting possibilities are provided by the additional option “Change default values or select other parameters” located at the bottom. When you click on it, a subform appears. Here you can set a timer to display the system selection menu, after which the default OS will be loaded. You can also specify Windows version For automatic download, which will occur if there is no action on your part during the interval specified above.

Click on the third item “Select other options”. In this menu, the most interesting option is the “Diagnostics” option.

The first option is “Return the computer to the initial state"is useful if the integrity of the system has been compromised (that is, you cannot manually remove applications, install new ones, loading does not occur, etc.). As a result of such a rollback, you can perform reinstalling Windows, removing non-factory applications and settings while preserving personal data and documents. A similar operation can be carried out through the GUI in the top ten itself.
Now about the last subform " Extra options"What features does it provide?

The first option allows you to restore the system using the restore point mechanism. Such checkpoints are created automatically during the installation of some programs, and are also generated manually by the user before making major changes to the OS. The next menu item “System Image Restore” is useful when returning Windows to its initial state using an ISO image of the distribution saved on the hard drive (very useful if there is no boot disk from Windows).
Another useful item is “Startup Recovery”. If the system does not boot, it will help fix it system records and will return the ability to download. Command line – indispensable tool For system administrators, For ordinary users he is of little interest.
The fifth option "Boot Options" is used to debug Windows in safe mode. The last option “Return to the previous build” will come in handy if bugs, frequent freezes or lags occur as a result of updating the OS. This is possible if the new build has not been sufficiently tested and was released in a raw form. After rolling back to an earlier build, the settings and applications installed in the new branch will be deleted, but personal files will not be affected.
Using the described instructions, you can completely cope with the question of how to install a new Windows in parallel with 1 or 2 other systems on one hard drive, provided there is sufficient space.
Did your favorite app get an update that changed its interface or are you having problems right now? It does not matter. You can install more old version any application on Android, and then block its automatic updates and remain in the current version. How to do it?

Apps are updated frequently, which is normal and welcome... most of the time. Updates fix bugs, optimize applications, enrich the program with new features and, as a rule, are a very positive development. However, there are times when updating our favorite app gives us a headache. Why?
The app interface we've become accustomed to over the years may change as a result of an update, and some features may be removed because the creator claims no one uses them. It also happens that the newer version does not work well on our device, stutters or turns off completely. What to do in this situation? You can install an older version of this application. How to do it?
Step 1: Uninstall the current version of the selected application.
To begin with, you first need to uninstall the current version of the application. You cannot install an older version of an application when the system detects that the latest version is installed. So the first step would be to go to the Android settings and then to the "Application".
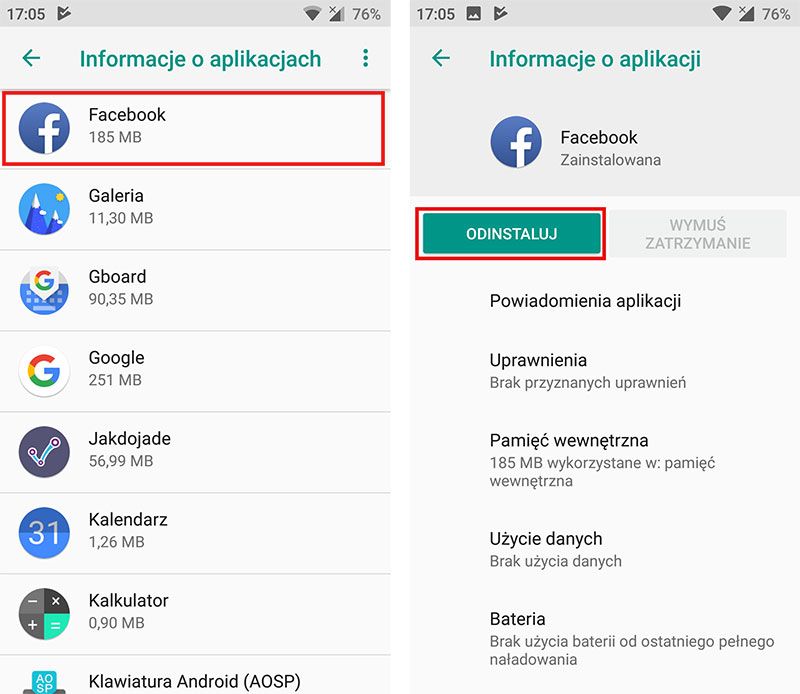
Find the app you want to remove from the list and then enter its details. In the list of details, select an option "Delete" to remove the entire application. If the application is a system one, find the button "Uninstall update", to remove the latest update.
After uninstalling the application, we can move on to the next step, that is, download the installer of the same application, but in an earlier version.
Step 2: Download an older version of the selected application.
Only the latest, currently available version of each app can be downloaded from the Play Store, so we must use a different source. Android allows you to install applications not only from the Play Store, but also from APK files, that is, local installers. One of the best sites where we can find popular application installers is APKMirror.
Go to APKMirror
The advantage of APKMirror is that this site stores not only many popular apps, but also old versions. The user can choose which version of the application he wants and then download.

After going to the APKMirror service, search using search engine application whose older version you want to download. Once you find it, enter its details and then download the one you're interested in to the version list. With each version you'll find not only the version number, but also the release date, so it's easy to find the right one. Use the button "Download APK" to download the selected version.
If you can't find the app you're interested in on APKMirror, look for other similar sites that store archived versions of the app.

Download APK file with the selected application version. You can download the file directly to your smartphone or Android tablet or to your computer. If you download a file to your computer, you need to copy it to the internal memory of your smartphone, for example, using a USB cable.
Step 3: Install the old version of the app from the APK file and disable its updates in the Play Store.
To be able to install apps from APK files, you must enable this option. To do this, go to Android "Settings>Security",then check the box « unknown sources» to be able to install apps outside of the Play Store (after installing the app, you can disable this option again).
Once you have the APK file in your device's memory, launch any file manager (application for viewing files in internal memory and on the SD card). After watching file manager Locate the APK file of the application and select it to begin the installation process. Confirm the installation with the button "Install".

The application in the old version will be installed and ready to use. However, before you start using it, there is one more thing you need to do. After installing the application, disable its automatic updates in Play Store because if we don't do this, after some time the latest version of the application will be automatically downloaded to us.
To do this, go to the Play Store and then find the app in the store that has an older version installed.
Select this app from the Play Store to view its details. You will notice that an update is available for the latest version - ignore it. In the top right corner you will find a button with three dots. Tap it to open the menu and then uncheck the " Automatic update" Here.

Now this application will no longer be automatically updated and will remain in the version we installed.
It's also important to be careful when updating other apps manually on the Play Store. If you need to perform multiple updates, an "Update All" button is usually available. Touching it will also update the app that the old version just installed. If you want to update other apps on your phone, don't use this button—instead, use a separate Update button next to each app you want to update.
Sometimes you need to install an older version of a package/program due to stability or other reasons. Let's figure out how to do this.
APT always installs the latest version of the package available. And if you have problems working with new programs installed from a third-party repository, then in such cases the utility can help, which will roll back all versions of packages from the third-party repository to the native ones from the official repository.
But it happens when you need to install a package or program from a third-party repository that has a lower version than the one in the native repository, or you have connected a repository that contains several programs, but you want to roll back only a specific program. How to be?
Consider the option of downgrading the version of Gimp.
Version installed 2.9.1.83
from a third party repository, but I want to install the version 2.8.6.0
, and in the native repository only the version 2.8.6.1
, which, for example, also doesn’t work well or doesn’t suit me, etc.
First, let's find and connect the repository with the required version of the program, and also make sure that the version of the program is available for your OS. To do this, go to the Launchpad.net service and look for available versions of the program.
Connect the repository:
sudo add-apt-repository ppa:noobslab/ppa-gimp
sudo apt-get update
Now look at the list of available program versions:
apt-cache policy gimp

Yeah, the required version is present, so we move on.
Let's remove the package whose version we want to downgrade so that we don't have to deal with dependencies and other problems in the future. We also remove dependencies:
sudo apt-get purge gimp
sudo apt-get autoremove

The packages have been removed, let's proceed with installing the required version of the program:
sudo apt-get install gimp=2.8.6~saucy~NoobsLab.com

And here are the pitfalls! I didn't specify versions for dependency packages libgimp2.0 And gimp-data. As I wrote above, APT always installs more recent versions of packages, so that’s why it happened.
We manually specify these packages:
sudo apt-get install libgimp2.0=2.8.6~saucy~NoobsLab.com gimp-data=2.8.6~saucy~NoobsLab.com
Most fans Skype programs have long appreciated all the advantages latest versions, such as the ability to maintain functionality in the background; in addition, significant disadvantages were discovered: the frequent occurrence of unexpected malfunctions and operational problems, an unusual interface, and also not entirely aesthetic emoticons. Therefore, many Skype users increasingly prefer the old version of this program.
Finding an old version of Skype
Many lovers of limitless communication often face the following problem: where can I find the old version of Skype? But, fortunately, it is quickly resolved. There are two main ways to search for an old modification:
- You can go to the official website of the developer of the Skype program and in a specially designated window find the desired and best Skype version.
- A more labor-intensive option: if you did not delete everything system files, which you previously used when installing an older version, then you need to find them in system folders. Then all the data about the old version of Skype can be used to install it.
Important: before installing the old modification, you must definitely get rid of the new modification.
To do this, you need to perform the following algorithm of actions: start - control panel - install and remove programs. In the list that appears on your computer screen, you must select the required version Skype and confirm its deletion.
Returning an old version of Skype
Professional programmers know exactly how to return the old version of Skype and how, if necessary. Therefore, it is important to follow their advice in everything. To efficiently return the old version of Skype to your computer, I recommend using the system data rollback method:
- In the start menu, you need to find the All Programs item and find a special folder called Standard. Then it is important to go to the service section and double-click on its icon.
- After this, a list will open in front of you, in which you should select the system restore button.

Important: in this field you need to rollback exactly to the date when Skype received the system file update.
Installing and connecting the old version of Skype
After a successful system data rollback, you need to delete latest version Skype from your computer and perform a full installation of its older version. To make this process more successful and avoid unpredictable troubles, you must constantly and unswervingly follow all the pop-up tips from the Skype program developers.
After you install the old modification, a window will open where you can register in the old Skype. In all free fields you must enter your personal data: login and password for your account.

To make using the popular Skype program as convenient as possible for you, you need to check the box next to the Save password option when entering your personal data, which will ensure systematic automatic connection of your account every time you download the program.
Thus, if you need the old version of Skype, you should definitely follow a simple algorithm of specific actions, and also pay special attention to the advice of professional programmers.
 Order 343 mail. Order by Russian post. Consequences of failure to appear in court when summoned
 How to put a password on a folder on a Windows computer without and with programs
 Pluton – Free Bootstrap HTML5 One Page Template
 History of ZX Spectrum: Myths and reality New Spectrum
 Voice assistant Siri from Apple Siri functions on iPhone 6s
 How to roll back to a previous version of iOS?
 Unlock iPad in four days