How to install network. Setting up working groups. Setting up access to a computer via a local network
Today you won’t surprise anyone with the presence of 2 personal computers in the same house. And if there are two computers in the same house, then they should be connected to each other via a local network for quick and comfortable access.
And if you own two personal computers running the system, create a local network for them. In this article you will learn with a clear example set up local network on Windows 7 between several computers or laptops.
Setting up a Windows 7 local network between two PCs
Before directly connecting a PC via a local network, you need to have network cards on two PCs. In modern computers, the network card is already built into motherboards, and even more so in laptops. You also need two network cables, the ends of which must be crimped according to the “computer - router” scheme.
The presence of two cables and a router is necessary for normal functioning local network and PC home group. After all, if you simply connect two computers directly with one cable, the network you create will be unidentified after a reboot.
Before you start creating and , you need to make sure you have the necessary drivers for your network cards on your PCs. If the drivers are already installed, start connecting cables to the PC and router. Now just wait until the connection identification is completed.
Now you need to decide which of the two computers will be the main one. Now on the main computer, go to Control Panel - Network and Internet - Network and Sharing Center.
yours new network will automatically be assigned public status. You need to change your status to Home. To do this, you need to click “Home Group” and go to the page in the lower left corner where you will see that the system was unable to connect your computer to the home group. Click "What is Network Location?"

Here select “Home Network” and wait until you connect to the network and apply the new settings. Next, you need to select the elements to which you want to provide access from the second PC. Click “Next”. Write down the system-generated password and click “Finish”.

Now the “Change home group settings” window will open in front of you, where you need to go to “Change additional parameters public access."
Expand “Home or work” and set the position of all markers to the first item.
Congratulations, you have created a homegroup on the main PC, now you need to connect the second computer to the group.
Connecting a 2nd PC to a homegroup
On the 2nd computer, you need to go to the “Network and Sharing Center” and click “HomeGroup”:
Congratulations, your home network is ready. You can check the health of your network by going to the Network Control Center, where you will see a message stating that your network has home status.
If something goes wrong, you need to contact a specialized service.
Now for quick access from the first PC to the second, you need to open “Homegroup” or “Network” in the start menu, where you can see the names of your PCs that are connected to your personal homegroup. When you go to images on this PC, you will have access to shared folders.

In order to provide general access any folder for another PC, you need to go to context menu the required folder and in the Sharing tab, activate the “Share” checkbox. By the way, are you aware that the release date for Windows 9 is already known? We will definitely tell you how to set up a local network on a new operating system when you already have it installed.
Hello. Recently responding to a comment on a blog, I promised to write an article about that how to set up a local network via a Wi-Fi router. And since I have TP-Link TL-WR841N installed, I will write instructions using this router as an example. Although in setting up a local network between computers, the router will practically not be configured, so even if you have a different Wi-Fi router, then the article will be useful to you.
Local network is a useful thing. You can exchange files, you can play games, especially since setting up a network through a router is not very difficult. If you have two or more computers If they access the Internet through one router, then there is already a network between them. And it doesn’t matter how they connect, both via a network cable, Wi-Fi, or one via cable and the other via wireless network. Let's get started with the setup process. I will write in order what we have and what needs to be configured. Go.
Setting up a local network via a Wi-Fi router
What we have:
- Wi-Fi router is connected to the Internet. Distributes IP and DNS automatically.
- Computer No. 1. Operating system Windows 7. Connected to the router via a network cable, the Internet is working.
- Computer No. 2. Windows 7 operating system. Connects to the router wirelessly Wi-Fi networks, the Internet is working.
Target:
Set up a local network between two (you may have more) computers. Share access to a specific folder or local drive. Get the ability to share files.
We work:
Before starting to set up the network on the computers, I decided to ping from one computer to another to see if there was a connection between them. Read more about ping. If you want to do this too, then you need to go to the router settings from one computer and see what IP address the router assigned to another computer on the network. I recently wrote an article about that, you can read it.
Well, I’ll quickly write how to do it. We type 192.168.1.1 (192.168.0.1) in the browser and go to the router settings. Go to the “DHCP” and “DHCP Clients List” tab, we see there the devices that are connected to the router. We look at the IP address that is assigned to the second computer with which we want to set up a local network.
Now we ping to it. Click “Start” and write in the search bar cmd, in the search results, run the utility “ cmd.exe“.

A window will appear in which we write the command ping “IP address of another computer” and press “Enter”. Let's look at the result, if you see that packets are being exchanged, then everything is fine, there is a network between the computers.
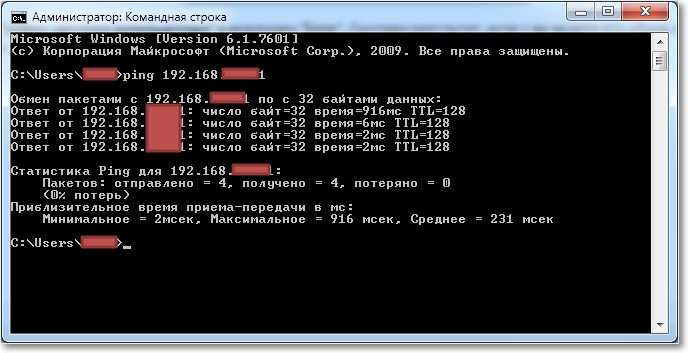
I think I’ll do another ping from a laptop that is connected via Wi-Fi, and I see that packets are not being transferred. And if the ping does not pass, then the network will not work. And then it began, for a long time I changed different settings, until it dawned on me that it was installed on the laptop and computer ESET Smart Security , yeah! He completely checks the network.
If during setup or operation problems arise with network connection, then the first thing you need to do is check and disable antiviruses and firewalls. I also advise you to disable Windows Firewall.
I open the antivirus, go to the “Settings” tab, “Network”, select “Change the computer’s network security mode” and celebrate “Allow sharing”. Click “Ok”, repeat the ping, everything works. Half the job is done, let's continue.
Setting up a local network
Now you need to check on each computer which workgroup they are connected to and give them a name. If the name has already been set, then it is better to change it by writing the word in English letters.
Right click on "My computer" and select “Properties”. Further "Additional settings" and go to the tab “Computer name”. Click the “Edit” button. Enter a new name and, if necessary, a group.
You need all the computers you want to connect to the network to work in the same group.
I had a registered group “WORKGROUP”, and I left it.
After making the settings, click “Ok” and restart the computer.

Let me remind you that we perform all actions on both computers.
We continue the setup, go to “Start”, "Control Panel", “Network and Sharing Center”.
Let's look at what network your network belongs to, what you need is "Home network", if you have for example “Community Network”, then click on it and select "Home network".
Now click on the right “Ready to Create”.

Click.

Select the items you want to share and click “Next”.

A window with a password will appear, just click “Finish”. In the window that appears, click .

We also need to disable the password request when accessing a computer on our local network. Scroll the page and find the item “Sharing with password protection”, select “Disable password protected sharing”. Then open the “General” tab, look for the same item, and disable the protection. Don't forget to press the button “Save changes”.

That's it, the network settings are complete. Restart both computers, or however many you have. For some reason, it then seemed to me that the Home Group could not have been set up, everything would have worked just the way it was, but oh well.
Let's see if our computers can see each other. Let's go to "My computer" and on the left click “Network”. Everything works for me, both my computer and laptop that are connected to the router via Wi-Fi are displayed. The network works the same way on a laptop.

If we log into a computer on the network, we will only have access to the Public Folder. In order to open general access to, for example, the entire “D” drive, you need to make some more settings.
If you have different operating systems on your computer, say Windows XP and Windows 7, and you have problems setting up the network, then read the article.
Opening shared access to folders on the local network
Go to the folder, or to local disk, which you want to share and click the button at the top "General access", “Advanced sharing settings...”.
 A window will open in which click “Advanced setup”. Check the box next to “Share this folder” and click “Ok”. If you want, you can also specify the name of the share.

Now all devices connected to the network will be able to share access to this folder.
What we got. We have set up local network via Wi-Fi TP-Link router TL-WR841N. One computer is connected to the network via a network cable, the second via Wi-Fi. Basically, you can have more computers, and they can be connected in different ways.
How to connect an Android smartphone (tablet) to a local Wi-Fi network?
I was already thinking about finishing this article, but I decided to try connecting my HTC One V to the newly created network. To do this, I advise you to install the “ES Explorer” program. Really cool program. Launch it and go to the tab "The local network" (phone number must be ), click the “Search” button.
My smartphone found two of my computers on the local network, I can connect to them and go to folders that have public access. I even started the movie on my phone from my computer, wow technology :).

Now that’s all for sure, well, it took a while to write this article :), I hope it’s useful to you. For some reason, I’m sure that many questions will arise about that article, ask, we’ll try to figure it out. Good luck friends!
Also on the site:
How to set up a local network via a Wi-Fi router? detailed instructions on example TP-Link TL-WR841N updated: February 7, 2018 by: admin
How to connect two computers to each other using a network cable with RJ-45 connectors? In a particular case, this question may sound like this: how to set up a local network between a laptop and a desktop computer?
The reasons for connecting computers into a network can be very different - the need to access files and folders of another computer from one PC, the desire to combine a laptop and an old stationary computer, or simply for network games. Let's consider situations for different operating systems. In this case, we will need to have installed on both computers network cards(the vast majority of devices have them by default), as well as network cable with RJ-45 connectors at the ends.
How to set up a local network between two Windows XP computers using an RJ-45 network cable
Make sure that you are logged into Windows with administrator rights, that the computers have network cards, and that they are connected to each other by cable. If everything is OK, move on to setting up the network card.
- Opening Start > Control Panel > Network connections.
- We find LAN connection and right-click to open Properties.
- Select from the list Internet Protocol TCP/IP and open again Properties.
- In the window that opens, select the item Use the following IP address and enter the local address of our computer 192.168.1.1 (the last number can be anything from 0 to 255). Subnet mask 255.255.255.0.
We follow the same procedure on the second computer, specifying the IP address, for example, 192.168.1.2. Then you need to make sure that the devices are in the same workgroup.
- My computer and choose Properties
- In the window that opens Properties of the system select a tab Computer name And Change. .
You can check whether a connection is established between two PCs using the ping command. Opening command line: Start > Execute > cmd and click OK. Enter the command ping 192.168.1.2(here we indicate the IP of the second computer). If the packets are transmitted successfully, the network is configured.
Setting up a local network between two Windows 7 PCs
When working with Windows 7 on two computers, you must immediately specify the same workgroup, as is the case with XP.
- On the desktop, right-click on the shortcut My computer and choose Properties(key combination Win+Break or Win+Pause).
- In the window that opens Properties of the system select a tab Computer name And Change. Computers must have the same workgroup, for example WORKGROUP, but different network names.
- Save the changes and reboot the computers.
After this, the operating system itself must make all the add-ons and recognize the network; if this does not happen, you will have to perform a few more steps. Opening Start > Control Panel > Network and Internet > Network Sharing Center > Change adapter settings and in settings necessary connection set the computer's IP address similarly to the previous instructions for Win XP.
Setting up a network between computers running Windows 7 and Windows XP
Above, we looked at setting up a network between computers with the same operating systems, but what if, for example, you need to connect a laptop with Windows 7 to a desktop PC with Windows XP? First, we perform the actions that are already familiar to us: we set the same workgroups and indicate the computer names (necessarily in Latin characters and without spaces).
To open access to files and folders on one PC for another, you need to use the desired folder (or logical drive) right-click and select General access. In chapter Specific users we open access.
To log in from Win XP to Win 7 you will need to accept account user "seven". If your account does not have a password, you will have to set one.
You may also need to do the following: Network and Sharing Center go to advanced sharing options, where you need to set the “correct” settings.
The principle of creating a local network in any Windows versions(XP, 7, 8, 10) practically nothing is not different. Exceptions are complex multi-level corporate networks, where several subnets, proxy servers and VPN are used.
But in this article we will look at how to create home network without resorting to purchasing expensive equipment, but using a regular switch or router with Wi-Fi support.
What is needed to create a network
First of all, to create a local network of a certain number of computers, we need equipment:
note: If a direct connection will be used (i.e. twisted pair insert into both devices without using a router), then you will need not a standard cable, but cross— over, except when modern network cards with MDI-X support are installed. In this case, you can use the standard crimping method.
How to create a local network
Now let's proceed directly to creation. First we need to prepare:
- Install all equipment in its place - computers, routers, etc.
- We crimp cable, if necessary.
- Let's do wiring, i.e. we extend the twisted pair to the equipment.
- Connecting twisted pair equipment.
Costs note, that when the connection is made and all devices are started, the connection connectors on the computers should shine. The same applies to routers with routers, only they have light bulbs located on front panel. If any light is not lit, then the connection has been made. wrong.
When the connection is made, you need to configure the network in the operating system.
To start checking working group, for which we go to properties " My computer" You don’t have to open the properties, but use the combination Win+
R and enter in the window sysdm.
cpl.
On all devices working group must be is the same, otherwise the computers will not see each other.
To change the group, just click on the button change and enter the group name. Name must be entered Latin alphabet, and match on all devices. 
Then we look for network icon in the notification area and with its help we get to Network and Sharing Center.
Here we are interested in the link change additional parameters, it's third from the left and will allow you to edit sharing settings. In each profile we select: Enable network discovery, auto-tuning And general access to files and printers. 
Scrolling page and below turn off shared access with password protection. All other settings can be left. Click Save changes and exit.
This completes the setup. The network should work, but only if your router distributes dynamic addresses.
If you used a router, or the devices were connected directly with a cable, then you need to make a few more settings.
Network settings
When direct connection or using a router, we need change IP addresses of computers. For this necessary:

We will not describe what each setting is responsible for, because... This is quite a large topic. It is enough to enter the addresses described above on all computers.
After making all the above settings, the network should work. However, do not forget that a firewall or antivirus software can completely block the network. Therefore, if nothing works, check their settings or temporarily disable them altogether.
Local network via WiFi router
Setting up a network through a router is absolutely nothing is not different from what we described above.
If the device is configured to distribute dynamic addresses, then there is no need to change the addresses. Well, what if IP users static, then you will have to use the previous section.
Also, there will be no difference between whether the device is connected by cable or via Wi-Fi; in most routers, the settings for distributing addresses are configured simultaneously and wireless and on wired connection.
How to make shared folders
After everything is configured, you need to create shared folders for information exchange.

However, this is not yet enough. Now on the folder properties window you need to find the bookmark safety. And then press successively Change – Add.
Until recently, most users had only one computer at home, but times have quickly changed, and each apartment has not only a desktop PC, but also a laptop or even several netbooks and other computer equipment.
Not to mention printers, scanners, tablet computers, smartphones, etc. This anticipated the user's question about the need to create a LAN at home.
Below is a guide to setting up a LAN using an operating room as an example. Windows systems 7, but the creation principle is the same and the instructions given are suitable for owners of PCs running Windows XP, 8 and 10.
What is LAN?
These are PCs, office equipment and other similar equipment interconnected into a single network for storing and exchanging information.
 They are divided into two categories:
- local;
- global.
The first ones are created within a specific space (apartment, institution, locality and so on.);
The latter allow devices to access the global network and use information from global networks.
 “LAN” or for advanced users it is more common to use the abbreviation “LAN” ( Local Area Network), which in Russian means “Local computer network» – PCs, office equipment and other similar equipment interconnected into a single network for storing and exchanging data.
 For normal operation, in addition to the listed devices, additional equipment is required. For example, network adapters, routers, switches, etc. They are interconnected by cable and wireless connections.
It is necessary to note the importance of using a LAN for operation software, that is, the OS and special protocols for data exchange.
In a LAN, PCs are not spatially distant from each other, since the use of, for example, a twisted pair cable leads to signal attenuation as the distance increases.
If it is necessary to combine into one “LAN” several networks that are geographically located far away (even at different ends of the world, tens of thousands of kilometers from each other), VPN is used - virtual private network technology.
- The network creator has a unified security policy at his disposal. In simple words the administrator no longer relies on the conscience and caution of LAN clients, but solely controls, records and limits the actions of individual users;
- Efficiency of information and file exchange. Eliminates the need to use external drives(flash drives, floppy disks, USB hard drives, CDs, etc.) for transferring data from one PC to another;
- When using a LAN in offices, collaboration is ensured without taking the employee away from the desk, as well as the introduction of electronic office work;
- Simultaneous work of several users in a single file without duplicating information in each individual PC;
- Use of network office equipment. There is no need to buy and connect your own printer, plotter, scanner and other similar equipment to each PC.
Thanks to development wireless technologies transmission of information and the use of secure radio channels, there is no need to install cables to network devices.
Using wi-fi routers, mixed systems are organized using wired and wireless methods of information transmission in the LAN.
Data transfer methods
In “LAN” they are divided into wired and wireless.
Wired
From the name it immediately becomes clear that a wire is used to transmit information.
PCs can be connected to each other only with a cable without the use of additional intermediate equipment, but since this requires computers to be equipped with two network cards(one for reception, the second for transmission), and also taking into account the impossibility of providing general access to the global Internet, this method is used extremely rarely.
It is advisable to use a switch between PCs. This switch allows you to create a network of several PCs, and those of only 2, as in the method described above. And most importantly, each PC has access to the Internet and network office equipment.
The disadvantage of this method is the mandatory manual configuration by entering IP addresses in Windows 7. If there are many PCs on the network, then the process, despite the ease of implementation, is labor-intensive and time-consuming.
Wireless
The method of creating a local network using wireless routers. Modern routers are capable of connecting dozens of devices and computers on a LAN. It should be noted that even a novice user can quickly set up such a network.
Devices used
As noted above, it is advisable to use the connection of intermediate devices when creating a LAN. Next, we will consider popular equipment for achieving this goal.
Hub
In Russian, this device is called “Repeater”, but, as often happens in our country, the English name “HUB” remains familiar to the user. In colloquial language it sounds like “hub”.
 Everything that is connected to this small box is repeated. The repeater is assigned one IP address and connects connected PCs to each other. The hub receives data into one of the ports and transmits it through the remaining ports.
 There is a direct correlation between the increase in network load and the number of clients connected to the hub, so this technology is gradually being replaced by more advanced ones. After all, everyone needs a stable and high speed of data reception and transmission, regardless of the number of equipment on the LAN.
 However, due to the affordability of such technology, it continues to be used by some users to connect a small number of PCs. Sometimes in the documentation you can find the name of this device as a “hub”.
Switch
“Switch” is already more modern equipment compared to “HUB”. It does not have the disadvantages of a hub. Each device that is connected to the Switch has its own IP.
If working in a hub is similar to talking on parallel-connected phones, then a PC connected to the Switch receives information that remains inaccessible to other participants in the LAN. This reduces the load on the network.
 However, if the provider cannot provide the required number of IP addresses, then problems immediately arise. Therefore, this method is gradually becoming a thing of the past. Depending on the size of the LAN being created, switches of various models are produced.
 Functionally, they are equipped with special ports, for example, for printers and other office equipment.
Hubs and switches cannot share the speed for accessing the global network between PCs; therefore, routers have become widespread.
This device no longer has the disadvantages of all the devices described above. There are various modifications of routers, which allows each user to choose a router suitable for their purposes.
 Routers are often equipped with internal or external antennas to broadcast a wireless signal to devices equipped with Wi-Fi modules.
 Expensive models are equipped with USB ports to which you can connect network printers and USB modems.
The device is configured using the program (firmware) installed in it. Its own interface provides convenient input of network parameters. The router's web configurator provides control and secure operation in subnets.
Currently, routers are used not only by commercial companies, but they can also often be found in home use. Through them, access to the worldwide network of any of the LAN components is organized.
Access point
It differs from a router in that it is like a signal extender (wired or wireless). “Access point” (AP) or “Access Point” (AP) does not have such wide possibilities like a router. Does not create subnets.
 “AR” can be purchased as separate equipment, but it should be noted that any router is capable of functioning in AP mode, and computers or mobile devices connected to the Internet that have a Wi-Fi module can be used as APs.
Setup process
In all Windows process the settings are almost the same. Below is an example based on the seventh generation operating system from Microsoft.
Configuring Windows network settings
You need to do the following:

Note: In the IP address, the last digit can be any number from one to 255, the main thing is that different IPs are registered in all computers on the LAN.


Router configuration if available
If you have a router at home, you can create a LAN through it. In fact, if you use a router to communicate with global network of all home devices, we can state the fact that these gadgets are already on the common network.
It makes no difference which devices are connected to the router via a wired connection and which via WI-FI. They are already connected by a network. Its configuration looks like a “Star”.
 The basic element here is a router, to which the following are connected by cables or via a wireless signal: PCs, mobile gadgets, netbooks, set-top boxes, etc.
The router is connected to the provider’s network, thanks to which each of the network clients has the opportunity to access the World Wide Web.
A network access password is set through the router's web interface. Logging into the interface is usually done through any Internet browser by entering the address, for example, “192.167.0.1”.
The accompanying documentation for the router indicates the address for entering its settings and an access code with a name for authorization.
Due to the wide variety of router model manufacturers and the use of different software modifications in them, it is necessary to use individual instructions for the network configuration settings created by the devices.
How to check the network operation?

 Order 343 mail. Order by Russian post. Consequences of failure to appear in court when summoned
 How to put a password on a folder on a Windows computer without and with programs
 Pluton – Free Bootstrap HTML5 One Page Template
 History of ZX Spectrum: Myths and reality New Spectrum
 Voice assistant Siri from Apple Siri functions on iPhone 6s
 How to roll back to a previous version of iOS?
 Unlock iPad in four days