How to return standard ringtones to android. Where to get a new ringtone for Android. Where are ringtones stored in Android? How to set a ringtone on Android
Tired of the standard ringtone on your phone? Read our instructions and you will learn how to set your favorite song to the ringtone of your Android.
Millions of people own devices running Android OS, but not everyone knows how to change the standard ringtone. In this article we will look at several ways to set any song as a ringtone.
The standard way to change the ringtone
This method is carried out through the general settings menu. Go to settings, then click on the “Sound” section, then click the “Ringtone” button.

A list of melodies that were installed by the manufacturer opens. Some smartphones and tablets allow you to set your own composition in the same menu. To do this, there is a “+” button at the top.


If there is no such button, we use a little trick. You will need to put the audio file in the desired folder with ringtones. After this, the composition will automatically appear in the general list in the sound settings described above.
To do this:
1. We connect the phone with via USB- cable to the computer. Click the “Start” button on your computer desktop and select “My Computer.” Next, you will see an icon for your connected mobile device. It needs to be opened.

2. Find and open the “Media” folder. Next, click on the “Audio” folder located there, and already in it on “Ringtones”. The path to this folder will look something like this: \Media\Audio\Ringtones. This is where you should move the desired music file. If there are no folders with the same name on your device, you can look for where existing ringtones are stored on your mobile device. To do this, remember the name of any and enter it in the search bar. Select your object as the object to search for the file. mobile device. Having found a file with the name of this ringtone, we place our composition in the same folder where this file is stored.
3. After placing the music file in “Ringtones”, we reboot the device.
After the completed actions, the composition appears in the general list of ring tones. Then everything is done according to the usual scenario. Go to the device settings, then to the “Sound” and “Ringtone” sections. The song you downloaded will be added to the standard sounds from the manufacturer. Click on it and confirm its installation as a call. This procedure will take you no more than 3 minutes.
Simplifying the process of installing your own ringtone on Android versions 5 and 6
Owners of new devices are very lucky. Manufacturers have greatly simplified the process of setting your own ringtone. Now everything is done through the device settings, without using a computer.
1. Go to the device menu and select “Settings”.
2. In this window we are interested in “Sounds and vibration”.

4. Click “Ringtone” again (in some versions of Android the item is called “Ringtone”). If the device supports two SIM cards, you must first select the one on which you want to change the call. A window with preinstalled musical compositions appears in front of us.

5. Scroll the list of songs to the very end and select the button that says “From device memory.”
 Photo: Changing the ringtone
 Replacing the standard ringtone with your own on your Android device is as easy as shelling pears. Choose music according to your mood, let everyone incoming call brings only joy!
Dear readers! If you have any questions or comments on the topic of the article, please leave them below.
On many Android devices, the ability to set your own signal melody (call, SMS, alarm, etc.) is limited. Or, to put it simply, it doesn’t exist at all! Only a short list of various already built-in melodies is given (not boasting a variety of sounds!).
And as you know - restrictions no one loves! And we began to look for a way to get around them... and whoever searches will always find!
And as it turned out, the method is quite simple (but we decided to describe it in sufficient detail anyway)!
In this example we will show how to set your own melody to an SMS, but it is also suitable for “personalizing” a call, an alarm clock and an interface (THL W200 is used as an “experimental” smartphone, OS - Android 4.2 Jelly Bean)
For clarity, we will post several screenshots of the standard list of melodies (before “our intervention”).


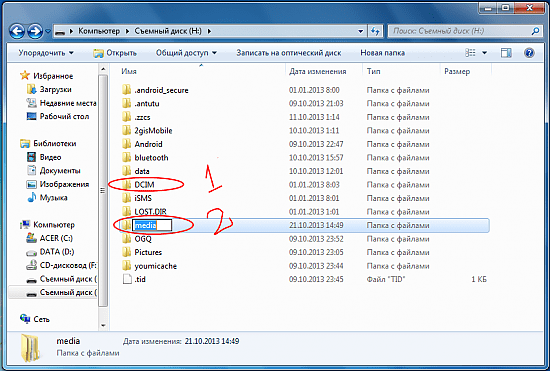
1) Connect the device to the PC (you don’t have to connect, but create folders directly in the device, but in my opinion, if you have a computer at hand, it’s more convenient to connect). Next you need to find the folder DCIM(wherein Usually photos from the camera are stored)

2) B DCIM create new folder...

3) Rename the new folder to media(as indicated in the screenshot below)

4) In a folder media, create another folder which we “call” audio...

5) And in the folder audio create a new folder in the same way, but call it notifications.
As a result, the location path is like this: DCIM/ media/audio/notifications

6) And into this folder (notifications) we put the melody we need (in this case, which we would like to see on SMS).

Pay attention to the title of the melody" Sunstroke Proj"

7) Reboot the device (required!). We go to the list of SMS melodies and at the very top we see our " Sunstroke Proj". We put it on the SMS signal and enjoy the result! :)

Folder " notifications" is used for notifications (which include SMS). If you need to set a melody for a call, an alarm clock, or use it in the interface, you will need to create other folders:
"alarms" - for an alarm clock
Path: DCIM/ media/audio/alarms
"ringtones" - for calling
Path: DCIM/ media/audio/ringtones
"ui" - for the interface
Path: DCIM/ media/audio/ui
(folders are created without quotes)

If for some reason, after the steps you have taken, the melody still does not appear, you can try a few more options, such as:
1) Do all of the above directly in the media folder (if for some reason it is not on the phone, then you need to create it)
Path: media/audio/notifications

2) Do all of the above on the memory card, there is a similar DCIM folder there
Path: sdcard/ DCIM/media/audio/notifications
3) Do all of the above on the memory card in the media folder (if for some reason it is not on the memory card, then you need to create)
Path: sdcard/ media/audio/notifications
P.S. We have done all 4 methods (on a smartphone with DCIM/media folders and on a memory card with DCIM/media folders) and each one works for us! As a result, in the list of melodies at the top we found 4 identical “Sunstroke Proj”
Don't forget to reboot your device! And make sure to name the folders correctly!
Hello, dear visitors of the LifeDroid website!
If you are reading this, I can assume that you are trying to set your own ringtone for SMS or alarm. If so, I offer a short manual on how to do this.
In standard SMS and alarm clock applications, there is no way to add music using the application itself, so we will have to perform a few more steps to achieve the result.
So, let's get down to business! Ring tones are usually set without special problems. As for SMS, alarm clocks and all sorts of notifications, there are several melodies of varying degrees of dullness to choose from. If this set suits you, great, but if you are also a music lover and a connoisseur of beauty (you want to wake up to Wagner’s Ride of the Valkyries, for example), let’s remember the lesson.
In order to expand the list of melodies, we will need to create several folders in our smartphone (or tablet). How it will be more convenient for you to do this is up to you. There are two options - connect the device to the computer via USB or create folders through a file manager (the same ES Explorer, for example). It doesn't matter how, the result will be the same. It’s easier for me to do everything through the file manager in Android itself.
Let's continue. We find a folder called media on the memory card or in the phone memory. If there is no such folder, create it. We go there, create an audio folder inside, go there too, create two more folders with names - notifications and alarms. As a result, we got the following:
media/audio/notifications - here we will keep ringtones for SMS and MMS;
media/audio/alarms - and here the melodies for the alarm clock will be stored.

Next, as you already understood, you need to place in the freshly created folders those melodies (files in mp3 format, as a rule) that you would like to hear when you wake up and when you receive SMS messages. After you do this, your music will appear in the list of melodies available for installation on the corresponding signal.
By the way, I recently wrote about for sending SMS. So, it allows you to set any melody on the device as a signal. Anything from the file system, without any creation of folders and moving music there.

 SMS application - Chat. Selecting the signal melody.
 Articles and Lifehacks
If you fail to set your own ringtone, many people wonder where ringtones are stored on Android. For example, downloaded music is not displayed when the message alarm is set, although it is in the device memory.
Of course, you can take it easy and set a standard signal, but you always want to stand out and set something of your own.
Then to do this you will have to create several folders, sort the music into these folders, but then you will be able to play any song, even for a call, even for a message.
Where are the ringtones for messages?
- To set your music for SMS notification, you need to create a “media” folder in the root of the sdcard, in it a “audio” folder, and in it – “notifications”. In the last one we add the necessary music.
- Now open “Message settings”, at the very bottom we find the line “Signal melody”. Now not only standard sounds are displayed here, but also those that you placed in “notifications”.
- In a similar way, you can understand where ringtones for alarms and calls are stored. In the first case, instead of “notifications”, make “alarms”, and in the second - “ringtones”. Now each melody will have its own place.
How to set a ringtone for a call

- In the main menu, find the “Music” section; in some versions it is called “Player”.
- From the list of songs, select the one you want and hold your finger on it.
- From the window that drops down, find the line “Ring a call” and click on it.
- Now this song will play when someone dials your number.
- You can also select a sound for one specific contact. And when this subscriber calls you, a completely different melody will play on the phone.
By selecting this item, you will set your own ringtone music. The “Use as a signal” line on some devices is hidden under the appearance of three vertical dots located at the bottom of the screen.
23.06.2019
Where are ringtones stored in Android? How to set a ringtone on Android
Since version 4 Android problems as the ringtone changes, it becomes less and less - OS developers long ago introduced a separate tab dedicated to music notifications in “Settings”, added the ability to change the “sound” of individual contacts and opened access to system parameters to third-party applications. But, if for some reason you still have questions, then the surest way to put music on your call is to look at the detailed instructions!
Proven methods
You can change the standard and already boring ringtone to a long-loved track on the Android operating system like this:
Install via media player
The “Music” section, hidden either on the desktop or in the main menu of the smartphone, allows you to turn any track available on the internal or external memory into ringtone music. And the algorithm for setting your own ringtone is extremely simple.
By the way, the method sometimes works with third-party MP3 music players, and not just with the standard one - so sometimes you can experiment!
Via "Settings"
If for some reason the method above did not work, then you will have to turn to the truly all-powerful menu of parameters and capabilities of the operating system. It is in “Settings”, in the “Sounds and Notifications” section, that you can easily change the vibration and activate the appearance of “ indicator light", and, of course, change the ringtone. Anyone can understand the system menu, but to complete the picture it is better not to deviate from the instructions.

In the same menu, you can also set a notification about the arrival of SMS - you will have to look for such a function in the “Default ringtone” section.
Via the "Contacts" menu
The method of changing the ringtone through “Settings” almost always works, but sometimes it’s not the performance that’s important, but the variety. Exactly The address book will allow you to add individuality to each contact and turn a boring call into a real musical hit parade. It all works as follows.

The method works on all modern Android versions, but some actions may differ, as well as the names of some menus and sections.
Through third party applications
Did the methods listed above not lead to positive results? Are there any additional problems? This means you will have to turn to the system tools available in Google Play and partially automating the process. The best option put a song on a call third-party service program - .
It is impossible to get lost in the main menu. The interface is predictable and clear, and the functionality is incredibly extensive. The developers allow you to select a ringtone for SMS and calls, quickly “cut off” the excess, change the vibration and set each separate contact own notification.
Another good assistant in solving problems with your ringtone can be RingTone Slicer FX, which is functionally a music editor. If it’s too boring to work with the files available in memory yourself, then the developers suggest looking into the extensive electronic library of pre-prepared ringtones. The selection is impressive, and even with proper navigation and the ability to sort the results by views and reviews from the community.
Possible problems and their elimination
Each method listed above usually works on all versions of the Android operating system and on smartphones of any brand. But if problems arise and the ringtone is not set, then it is worth understanding the following small nuances:
- Check the duration of the track installed on the call. If three-minute compositions are not played, then it is better to cut off the excess, at least to a minute, and sometimes to 30 seconds.
- If you can’t even select a ringtone from the list of available ones, then there is a problem with access rights to the file library; it is better to use the explorer downloaded from Google Play.
- Sometimes tracks for an incoming call can be added not from the entire library of files, but only from some directories. For example, it is sometimes better to download ringtones to the address: media/audio/ringtones, and notifications - media/audio/notifications.
- If an individual contact from the phone book cannot set the ringtone they like, then sometimes it’s worth re-selecting the method of saving the contact from the SIM card to the smartphone’s memory. It seems like a small thing, but it saves the situation.
Hello, dear visitors of the LifeDroid website!
If you are reading this, I can assume that you are trying to set your own ringtone for SMS or alarm. If so, I offer a short manual on how to do this.
In standard SMS and alarm clock applications, there is no way to add music using the application itself, so we will have to perform a few more steps to achieve the result.
So, let's get down to business! Ringtones, as a rule, are installed without any problems. As for SMS, alarm clocks and all sorts of notifications, there are several melodies of varying degrees of dullness to choose from. If this set suits you, great, but if you are also a music lover and a connoisseur of beauty (you want to wake up to Wagner’s Ride of the Valkyries, for example), let’s remember the lesson.
In order to expand the list of melodies, we will need to create several folders in our smartphone (or tablet). How it will be more convenient for you to do this is up to you. There are two options - connect the device to the computer via USB or create folders through a file manager (the same ES Explorer, for example). It doesn't matter how, the result will be the same. It’s easier for me to do everything through the file manager in Android itself.
Let's continue. We find a folder called media on the memory card or in the phone memory. If there is no such folder, create it. We go there, create an audio folder inside, go there too, create two more folders with names - notifications and alarms. As a result, we got the following:
media/audio/notifications - here we will keep ringtones for SMS and MMS;
media/audio/alarms - and here the melodies for the alarm clock will be stored.

Next, as you already understood, you need to place in the freshly created folders those melodies (files in mp3 format, as a rule) that you would like to hear when you wake up and when you receive SMS messages. After you do this, your music will appear in the list of melodies available for installation on the corresponding signal.
By the way, I recently wrote about sending SMS. So, it allows you to set any melody on the device as a signal. Anything from the file system, without any creation of folders and moving music there.
 SMS application - Chat. Selecting the signal melody.
 When a user first encounters a new type of smartphone, they need to quickly figure out how to use some basic functions. In this article we will look at one of these basic functions, namely setting ringtones. In this article you will learn how to set a ringtone on an Android smartphone with a standard shell and a Samsung shell.
Setting a ringtone using the example of an Android smartphone Google Nexus
First, we'll tell you how to set a ringtone if you have a smartphone with a standard Android shell. As you might guess, first go to the Android settings. To do this, open the top curtain and click on the gear button, or find the Settings application in the list of applications or on the desktop. Once you have opened Settings, you need to go to the “Sound” section (the “Device” settings group).
And then you need to open the subsection called “Ringtone”.

This way you will open a list of ringtones that are already present on your Android smartphone and that you can use. To install one of these ringtones, select it and click on the “OK” button. After this, the selected ringtone will be set as the standard one and will be played when there is an incoming call.

If you are not satisfied with standard ringtones and want to use your own melody, then this melody must first be loaded into the device memory and placed in the /media/audio/ringtones/ folder. This can be done in different ways, but the easiest way is to connect your Android smartphone to your computer using USB cable. We will consider this option below.
Connect your Android smartphone to your computer using a USB cable and open the “My Computer” window. After connecting, the icon of your smartphone should appear there. If there is such an icon, then just open it.

If the smartphone icon does not appear, then you need to change the operating mode of the smartphone from USB connection. To do this, you need to open the top curtain on your smartphone, click on connection notifications and select “File transfer” in the menu that opens.

After opening the smartphone on the computer, you need to go to the “Internal storage” section, and then to the /media/audio/ringtones/ folder. If the /ringtones/ folder is missing, you can create it yourself.

Copy the desired ringtones to the /media/audio/ringtones/ folder and you can install them on your smartphone through the settings.
Setting a ringtone using the example of an Android smartphone from Samsung
If you have a smartphone from Samsung, then the ringtone installation process will be a little easier. First, you need to open the Settings app and then go to the Sound section (Device tab).


As a result, a menu with standard ringtones will open. If one of the standard ringtones suits you, you can simply select it and click on the “Yes” button. If you want to set your own non-standard ringtone, then you need to click on the “Add” button.

Next, a file manager will open, with which you can select any ringtone that is located in any folder on your smartphone. As you can see, in the case of a Samsung smartphone, you do not need to specifically connect the device to the computer and download the ringtone to a specific folder. Here everything can be done through the smartphone interface.
By default, Google does not equip devices with Android control a full-fledged file manager, since this is against company policy. Access to various files is carried out using the corresponding applications - photos, videos, text editor etc. But sooner or later the need to access files directly still arises.
Which folder contains contacts and other data on Android? The Android file system format is not similar to the Windows shell. Here's how the internal memory is organized here:
- Device memory is the memory you will work with. Here you can use and change any files. Like Windows or Mac Explorer. Data from some applications is stored here - photos, videos, game cache or Internet browser, etc.
- SD Card – Many Android devices also have SD card slots. You can connect the SD card to your computer or other device, download files to it, and then insert it into your smartphone. If you are using a Marshm device and an SD card formatted for use as internal storage, it will not appear separately in the file manager, but will instead become part of your device.
- Root - Android has a special root folder in which data is stored operating system, confidential information, etc. Most file managers cannot make changes here for security reasons. Unless you have root access And file manager capable of using it. Getting root and access to system data require knowledge about the structure of the system and the purpose of its components, so it is better for beginners not to take risks.
The device memory will contain several folders created by Android. Some of them are generated and used by applications to store cache files and should not be modified or deleted. But if you delete only their contents, you can free up a lot of space. How to find download or Bluetooth directories? Here they are:
- All photos from your phone camera are saved in this folder, just like on other digital cameras. They are displayed in the utilities " Gallery" or " Photo”, but are physically here. This also applies to storing video files.
- Bluetooth– speaks for itself;
- Download. Browser downloads are located here. They can be freely changed, deleted or moved. Downloaded files can be exported to any drive.
- Movies, Music, Pictures, Ringtones, Video. These are folders designed to store your personal media files. Required for quick access and synchronize your Android smartphone with your PC.
- folder System stores everything system settings and data from all smartphone applications.
You can view these folders from anywhere file manager. One click on a file will display a list installed applications who support him. You can work with the data stored here directly, opening it just like on a PC.
How to Manage Files and Use the File System on Android
The transparency and functionality of the Android file system is one of its advantages over iOS. It allows you to easily work with files by opening them in any application... as long as you know how to do it and where new applications are installed. Android comes with a ported file manager by default. Some manufacturers pre-install their own, more powerful utilities. Otherwise for full management file structure Android will be needed third party application. Here's what you need to know.
Android 6.x (Marshmallow) or later devices have a built-in file manager, it's just hidden in the settings. Open Settings-Memory-Other, and you will receive full list all files and folders in the smartphone memory. The application can also be displayed as a separate shortcut on the home screen. In Nougat Android 7, the file manager is part of the application " Downloads", but essentially it's the same thing. Certain file types are displayed here, such as images, videos, music, and downloads. To access the full file system phone, go to Settings-Memory-Other.
Third Party Manager
But the built-in manager is quite weak compared to some of the options available on Google Play. For more efficient file management, install one of the available file managers. – one of the most popular file managers in Play Market. It has powerful built-in features such as cloud access account and the ability to run two windows in landscape mode (on any device!). Customer support is good and updates are released frequently. Free after 2 weeks trial version will end and you will have to pay $2 for further use.
is one of the best root file managers available on the Google Play Store. One of the main features of the utility is the use of the Recycle Bin, where recently deleted data is stored. This free application not only contains all the basic file management features, but also has the ability to manage any application on a rooted smartphone. Utility features:
- access, sort, transfer, rename, copy and paste, delete, backup or recover any files and folders on rooted Android devices;
- compress documents, decompress compressed data;
- encrypt the data with a password;
- upload media to cloud services.
– a powerful and effective conductor with impressive functionality. Peculiarities:
- Change access options on your smartphone or other devices;
- send files individually or in batches;
- create folders and change them at your discretion;
- make a complete copy, delete, rename and even move the data to another device;
- save files anywhere on your device.
File Manager+ allows you to manage files and folders on your device, NAS and cloud service. Manage your files just like in local folder, and in cloud storage. Supports all Explorer actions such as browsing, searching, folder structure navigation, copy/paste, cut/delete, rename, extract and sort. Full control over media files, documents and APKs. Access remote or shared storage, such as NAS and FTP server. Analyze your local storage to remove unnecessary files.
If you need access to calendar entries or notes, you need to rely on the application you're using. All utility data files are located in the folder /data/. NextApp's File Explorer features new ways to transfer files between Android and your computer, built-in support for multiple Windows so you can view two windows at once, and support for most file and document formats in which apps are stored. Access to network computer, including FTP, WebDAV and SMB. Browse audio content, playlists, albums and artists.
How to add your own ringtones and notification sounds
Flexible operating room Android system allows you to use many settings, and one of the most popular methods to personalize your smartphone is to set your own ringtones and notification sounds. To do this, you first need to understand the file structure and correctly determine the location where the ringtones are stored.
Step 1: Download audio to device
First, you need to download the ringtone or notification sound directly to your Android device or transfer it from your computer to internal storage. Android supports MP3, M4A, WAV and OGG formats, so almost any audio file you can download will work.

Step 2: Copy the audio files to the appropriate folder
Once you have downloaded the audio file, you need to move it to the desired folder. Here you need to use a third-party file manager. Let's look at the procedure using an example. After installing File Explorer, open it and go to the folder Download» in internal memory or on an SD card (depending on the device settings). Select a file with a long press, then click Cut in the menu. Click the button Back" once to return to the previous directory. Here, open the Ringtones folder, then click " Insert" If your device does not have a folder " Ringtones", just create it.
Step 3: Reboot your smartphone
After transferring the ringtone to the desired folder, restart your phone or tablet so that Android can see the file. Open " Settings" and go to " Sound and notification" Select " Ringtone" or " Default notification ringtone", find yours in the list of standard signals and set it as a ringtone. If you are using an SD card, you can also access the Android directory via cardreader and PC. This may reveal new directories that are not visible in Android Explorer. Especially if you use the same SD card on several devices.
Which folder contains contacts and other data?
These documents can only be accessed from using root and a third-party file manager. The contacts file is called contacts.db or contacts2.db, and is located along the path:
/data/data/com.android.providers.contacts/databases/This is a database file, so there's no need to edit it too deeply. To export contacts to a file and save it on a memory card or PC, use the built-in tools. Open " Contacts", then " Menu", select " Export" and mark the contacts you want, then select " Export to memory card» and click OK. In folder storage/sdcard1 a document with the extension will appear .vcf. transfer it to another device or PC. To restore contacts, go to the menu " Contacts", select " Import from internal memory" Specify the path where contacts are stored on your Android and wait for the copying to complete.
Text messages and MMS are also stored in the pack data
On many Android devices, the ability to set your own ringtone (call, SMS, alarm, etc.) is limited. Or, to put it simply, it doesn’t exist at all! Only a short list of various already built-in melodies is given (not boasting a variety of sounds!).
And as you know - restrictions no one loves! And we began to look for a way to get around them... and whoever searches will always find!
And as it turned out, the method is quite simple (but we decided to describe it in sufficient detail anyway)!
In this example we will show how to set your own melody to an SMS, but it is also suitable for “personalizing” a call, an alarm clock and an interface (THL W200 is used as an “experimental” smartphone, OS - Android 4.2 Jelly Bean)
For clarity, we will post several screenshots of the standard list of melodies (before “our intervention”).

1) Connect the device to the PC (you don’t have to connect, but create folders directly in the device, but in my opinion, if you have a computer at hand, it’s more convenient to connect). Next you need to find the folder DCIM(wherein Usually photos from the camera are stored)

2) B DCIM creating a new folder...

3) Rename the new folder to media(as indicated in the screenshot below)

4) In a folder media, create another folder which we “call” audio...

5) And in the folder audio create a new folder in the same way, but call it notifications.
As a result, the location path is like this: DCIM/ media/audio/notifications
6) And into this folder (notifications) we put the melody we need (in this case, which we would like to see on SMS).
Pay attention to the title of the melody "Sunstroke Proj"

7) Reboot the device (required!). We go to the list of SMS melodies and at the very top we see our " Sunstroke Proj". We put it on the SMS signal and enjoy the result! :)

Folder " notifications" is used for notifications (which include SMS). If you need to set a melody for a call, an alarm clock, or use it in the interface, you will need to create other folders:
"alarms" - for an alarm clock
Path: DCIM/ media/audio/alarms
"ringtones" - for calling
Path: DCIM/ media/audio/ringtones
"ui" - for the interface
Path: DCIM/ media/audio/ui
(folders are created without quotes)
If for some reason, after the steps you have taken, the melody still does not appear, you can try a few more options, such as:
1) Do all of the above directly in the media folder (if for some reason it is not on the phone, then you need to create it)
Path: media/audio/notifications
2) Do all of the above on the memory card, there is a similar DCIM folder there
Path: sdcard/ DCIM/media/audio/notifications
3) Do all of the above on the memory card in the media folder (if for some reason it is not on the memory card, then you need to create)
Path: sdcard/ media/audio/notifications
P.S. We have done all 4 methods (on a smartphone with DCIM/media folders and on a memory card with DCIM/media folders) and each one works for us! As a result, in the list of melodies at the top we found 4 identical “Sunstroke Proj”
Don't forget to reboot your device! And make sure to name the folders correctly!
 Order 343 mail. Order by Russian post. Consequences of failure to appear in court when summoned
 How to put a password on a folder on a Windows computer without and with programs
 Pluton – Free Bootstrap HTML5 One Page Template
 History of ZX Spectrum: Myths and reality New Spectrum
 Voice assistant Siri from Apple Siri functions on iPhone 6s
 How to roll back to a previous version of iOS?
 Unlock iPad in four days