How to use CCleaner
With the help of these instructions, we will show you how to use CCleaner on Windows 10 (on Windows 7 and 8 - by analogy). Launch the program and look at the first tab called “ Cleaning».
The main functionality of CCleaner is located in this tab. Here you can choose which components of the operating system and installed applications need to be cleaned and which ones not. Checkboxes mark items that will be cleared as needed. Look at the checkmarks in the screenshot below.

The first is Internet Cache, for Microsoft Edge. If this checkbox is checked, CCleaner will delete the cache in the Edge browser when you run the cleanup.

Or below, in the list " System", paragraph " Emptying the Trash" If there is a checkmark there, it means that every time CCleaner runs, it will delete all files from the Recycle Bin.

Thus, you can configure which components the program will clean and which not, simply by checking the required boxes.
But what to do if you don’t know what needs to be cleaned, what doesn’t need to be cleaned, which boxes to check and which ones not to? The answer is: do nothing :) By default, the checkboxes in CCleaner are placed so as not to remove anything unnecessary and so that cleaning at the same time has maximum efficiency. Therefore, you can trust the program.
Before you start cleaning, Cycliner needs to know which files can be deleted and how many of them. Click on the "Analysis" button to find out.

After a few seconds, you will see a report in which CCleaner will tell you how many and what files it is going to delete and how much space will be freed up after that.

In my case, as much as 3202 MB will be freed up, this is not small, I think it’s worth removing everything unnecessary from the system. Click on the button Cleaning" to start it.

 Sandboxie download Sandboxie in Russian download sandbox for free
 How to disable PUSH notifications (alerts) in browsers: Google Chrome, Firefox, Opera
 25 online tools to generate easy-to-pronounce and random passwords
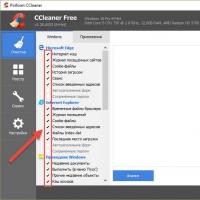 How to use CCleaner
 Programs for permanently deleting files
 Windows 10 backup
 How to enable incognito mode in Chrome