How to copy a bootable USB flash drive to UltraISO
Some users are interested in the question of how to copy a bootable USB flash drive, and then transfer the disk image to another flash drive, making it bootable. It is necessary to save the image of the flash drive, transfer it to another flash drive in order to get two identical flash drives.
Another bootable flash drive may be needed in some cases: relatives, friends or acquaintances ask for a bootable flash drive for a while (it is not yet known what they will return), it is necessary to copy someone else's bootable flash drive, which must be given away, etc.
Can I copy a bootable USB stick? Simple copying is impossible, because the flash drive will not be bootable, when you start the computer, it will not be possible to start the Windows installation from it.
Therefore, you will have to use workarounds. In this article I will use the UltraISO program, which is designed for working with images.
With UltraISO, you can copy a bootable USB flash drive, and then transfer the image to another flash drive. Additionally, I will show you how to copy a system image from the installation DVD to a USB flash drive.
It makes sense to check the created bootable USB drive to be sure that it will not fail at the crucial moment when it will be necessary to reinstall or restore Windows. When checking a bootable USB drive, pay attention to one nuance:
- on modern computers it is necessary to disable the "Secure Boot" mode in UEFI, which prevents booting from USB drives
In the article I already wrote about creating a bootable Windows USB flash drive in UltraISO. In the examples in this article, I use a bootable USB flash drive with the Windows 10 operating system, previously created in UltraISO.
How to copy a bootable USB flash drive to another USB flash drive in UltraISO (1 way)
First, let's look at a fairly simple way to copy content from one flash drive to another.
To copy an image of a bootable USB drive, you will need to do the following:
- Connect a bootable Windows USB stick to the USB port of your computer.
- Start the UltraISO program.
- Enter the Bootstrap menu. In the context menu, select "Create Floppy Image ..." or "Create Hard Disk Image ..." (both options work the same).
- In the "Create Disk Image" window, in the "Disk Drive" item, select the drive letter, which is indicated in the Explorer as the bootable USB flash drive connected to the computer. In the "Save As" option, select a location to save the disk image or floppy disk. By default, a disk or floppy image will be saved in the ".ima" format.
- Please note that the file in the "IMA" format will have a size equal to the size of the entire flash drive. If the flash drive has a size of 4 GB, 8 GB, 16 GB, then the ".ima" file will have the same size. Make sure that there is enough free space on the computer disk. After the copying of the flash drive is completed, this file is no longer needed, you can delete it.
- Click on the "Make" button.

- Next, in the "Process" window, a disk image file is created.

- The "Hint" window that opens will inform you about the successful completion of the disk image creation.

- Connect the second UISB drive to the computer, to which you want to transfer the contents of the first flash drive. Disconnect the original bootable USB stick from the computer, it is no longer needed.
- In the UltraISO program, go to the File menu, click Open ..., select the boot.ima file.

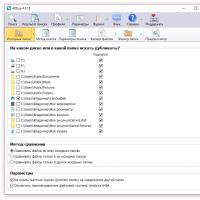
- In the "Write Disk Image" window, you need to make settings for recording a bootable USB flash drive with Windows:
- in the "Disk Drive" setting, select the flash drive (follow its designation in Explorer, the name and size of the disk space)
- you can put a daw in the "Check" item to check the recorded flash drive for errors
- in the "Image file" field, check the path to the original disk image
- in the option "Recording method" select "USB-HDD +"
- Click on the "Burn" button.
![]()
- In the "Hint" window, agree that all information will be deleted from the disk.

- Next, the flash drive will be formatted, and then the image recording will begin, which will last a certain period of time.
- After completion and verification, the information about the event will appear in the “Write Disk Image” window: “The recording is completed!”.

Close the UltraISO program, the Windows bootable USB drive has been moved to another disk and is ready to use.
How to make an image of a bootable USB flash drive in UltraISO (2 way)
The second method assumes that you first need to copy the bootable USB flash drive to ISO format, which is then written to another USB flash drive. When carrying out this operation, an ISO image of the system was created without bootstrapping; nevertheless, during the check, the copied flash drive with the Windows 10 operating system was loaded on my computer.
Follow these steps:
- Connect a bootable USB flash drive with Windows and an empty USB flash drive to which you want to copy data to your computer.
- Enter the UltraISO program.
- Select the designation of the bootable USB stick in the "Catalog" area, and then drag it to the area of the new project.

- In the "Hint" window, agree to add all files to disk.
- After that, the contents of the bootable USB stick will be displayed in the area of the new project.
- Go to the "File" menu, select "Save as ..." from the context menu.
- In the Explorer window that opens, give the file a name (I chose the name "Windows 10"), select the location to save the ISO file.
- The Process window displays the process of saving the ISO file to your computer.
- After saving the file on your computer, enter the "File" menu, select "Open ..." in the context menu.
- In the Explorer window, select the previously saved ISO image.

- Enter the Boot menu, select Burn Hard Disk Image ...
- In the "Write Disk image" window, make the settings:
- in the "Disk Drive" option, select the flash drive to which you want to copy the contents of the bootable flash drive
- check the "Check" box in order to make sure that the process of writing to the USB flash drive went without errors
- check if the path to the image file is correct, in this case to the "Windowsiso" image
- in the setting "Recording method" select "USB-HDD +"
- Then click on the "Burn" button.
![]()
- In the warning window, agree that all data from the flash drive will be deleted.
- Further, after formatting, the process of writing data to the USB flash drive will begin, which will take some time.
- After finishing recording, close the UltraISO program window.
How to transfer a Windows image from a DVD to a USB flash drive in UltraISO
Sometimes, there are situations when a user has a Windows installation disc on a DVD. He needs to copy the disk with the operating system to a USB flash drive, which will become bootable.
To transfer a Windows image from an installation disc to a USB flash drive, you must perform the following steps:
- Insert the operating system DVD into your computer.
- Connect a USB flash drive to your computer.
- In the UltraISO window, go to the File menu, select Open CD / DVD ....

- In the "Open CD / DVD" window, select the optical drive of your computer, click on the "Open" button.
- Enter the Boot menu, select Burn Hard Disk Image ....
- In the "Write Disk Image" window, make settings for writing a bootable USB flash drive:
- in "Disk Drive" select the flash drive
- check the box next to "Check"
- the drive letter of the optical drive will be displayed in the "Image file" field
 How to easily find and delete duplicate files of your files in Windows
 LoviOtvet - a powerful calculator for solving examples and equations with the output of the solution steps
 Visual browser bookmarks - install and configure ...
 Installing and Configuring VirtualBox on Windows
 com - Microsoft cloud mail service
 Visual Bookmarks Top-Page
 Ways to save your password in Yandex