Set up spell checking. How to enable spell checking in Word. Automatic spell check
Text typed without errors is an indicator of a person’s literacy level. The spell check feature is very helpful if you have doubts about the correct spelling of certain words or the placement of commas.
Word provides automatic spell checking: grammatical errors are underlined with a green wavy line, and spelling errors are highlighted with a red line. To avoid situations in which a misspelled word remains ununderlined, you need to enable spell checking in Word and configure it correctly.
Quick navigation through the article
Automatic check
If Word does not react in any way to text that is obviously incorrectly written, it may not have an automatic checker enabled. You can fix this as follows:
- Click the Office button or the File command (in Windows 7);
- Select “Word Options”;
- Select “Spelling” in the menu on the left;
- Check the box “Automatically check spelling”;
- Uncheck all the boxes in the “Exceptions” group -> OK;

Default check
When typing, words that are not included in the Word dictionary will be underlined. To add a correctly typed word to the dictionary or simply get rid of the underlining, you will need:
- Select the desired piece of text;
- Select from the menu “Review” -> “Proofing” (in Word 2007 and higher), or “Tools” -> “Proofing” (in Word 2003 and lower).
The dialog box that opens will display incorrectly spelled (according to the editor) words, which you can:
- Correct - if there is indeed an error;
- Add to the dictionary - if the word is written correctly and it is desirable that Word does not underline it in the future;
- Skip - if there is no error, but the word is not worth adding to the dictionary.

Installing Spell Checkers
If you try to check spelling and get the message "Spell check complete" or "Spell checker for the default language is not installed," here's how to fix it:
- “Start” -> “Control Panel” -> “Add or Remove Programs” (in Windows XP), or “Programs” -> “Uninstall a program” (in Windows 7 and higher);
- Find in the list Microsoft Word and select “Change”;
- In the window that opens, select “Add or remove components” -> “Continue”;
- Open Office Common Tools -> expand the Spell Checkers list -> select Run everything from my computer.

Check for selected language
Sometimes the reason that Word does not check spelling may be that a checkbox with this requirement is selected. To cancel this setting:
- Click on the “Review” menu;
- In the “Spelling” group, find “Select language”;
- Click on the desired language;
- Uncheck the "Don't check spelling" checkbox.
In this tutorial I'll show you how to set up spell checking in your browser. This feature automatically corrects errors when printing text online.
How to enable spell checking
In any modern browser(Internet program) has a built-in spell checker. With just one small tweak, you can automatically correct errors in almost any text you type on the Internet.
Any misspelled words printed will be underlined with a red wavy line. By right-clicking on such a word, a list will appear where the correct options will be offered.
Google Chrome
Right-click on this line once:
In the list that appears, hover over the “Spell Check” item. IN additional list Click "Check spelling in text fields."
A little higher you can select the verification language. And if what you need is not in the list, then add it using the “Language” item.

For Chrome to not only show errors, but also offer correction options, you need to enable Google Suggestions. To do this, right-click inside the text input field → Spell Check → Search Google for suggestions → Enable.
Now try typing the misspelled word:
It should be highlighted with a red wavy line. To fix it, right-click on it and select the appropriate option. The word will automatically be replaced with the correct one.
Yandex browser
Right-click on this line:
Hover over "Spell Check". In order for the browser to correct errors, you need to check the box next to “Check spelling in text.” To do this, simply click on it with the left mouse button.
A little higher in the list you can select the scan language or add the one you need through the “Language” item.

That's it - verification is on! Try typing a misspelled word:
It should be highlighted with a red wavy line. To fix it, right-click on it and select the appropriate option, if available. The word should be automatically replaced.
Mozilla Firefox
To enable the check, right-click in this text entry field:
In the list that appears, click on the “Spell Check” item.

Then right-click in the text field again, point to “Languages” and check that the desired one is selected.
If it is not in the list, click on “Add dictionaries...” and download the dictionary.

The browser will now check spelling and try to correct errors.
If you make a mistake when typing text, it will be underlined with a red wavy line. To correct it, you need to right-click on the word and select the appropriate option. Immediately after this, the “problem” word should be replaced with the selected one.

If misspelled words are no longer underlined, check your settings: → Settings → Language and appearance→ Language. There should be a checkmark in the “Check spelling when typing text” item.
Opera
Right-click on this field once:
In the list that appears, hover the cursor over “Spell Check” and click on “Check spelling in text fields” so that the bird is checked there.

Then you need to select a language. To do this, right-click again in the text field, point to “Spell Check” and select the language at the top. If what you need is not in the list, add it through “Language settings...”.
That's all! To check, try typing the misspelled word:
It should be highlighted with a red wavy line. To correct it, right-click on the word and select the appropriate option. Immediately after this it should be replaced with the correct one.
Internet Explorer
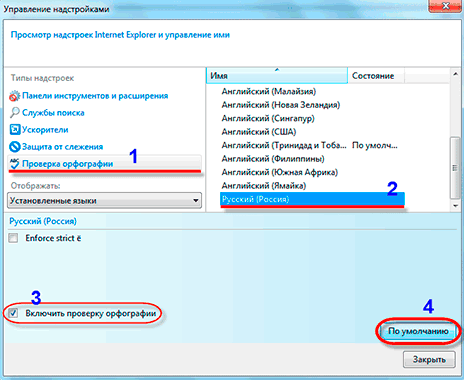
To enable spell checking, click on the “Service” button. It is located under the “Collapse”, “Expand”, “Close” buttons - a gear is drawn on it. From the list, select “Configure add-ons”.

A window will appear in the center of the browser. Click on the “Spell Check” item (on the left) and in the list that loads on the right, click on desired language. Then check the “Enable spell checking” checkbox and click on the “Default” button (below).
Now you can close the window - the check is enabled. Let's see if this is true.
Type the misspelled word into this field:
It should be marked with a red wavy line. To correct it, simply right-click on the word and select the appropriate option, if available.
Very often, there is absolutely no need to perform any additional actions to enable the spell checking function, since the function is enabled by default. And yet, if for some reason, Word editor does not check spelling, let's see how the system is configured.
Spell checking settings are located in the “File” → “Options” tab.
In the “Word Options” window that appears, you are interested in the “Spelling” item. Here you can find a huge number of settings, which we will deal with gradually.
AutoCorrect options
The first section contains the option automatic replacement incorrectly written words and signs. When you click the "AutoCorrect Options..." button, an additional dialog box opens.
AutoCorrect
The main mistakes that are made are listed. In this window you can activate the required function.
By default there are items:
- Correct TWO CAPITAL letters at the beginning of a word;
- Capitalize the first letters of sentences;
- Capitalize the first letters of table cells;
- Capitalize the names of days;
- Eliminate the consequences of accidentally pressing cAPS LOCK;
- Correct the keyboard layout.
In the event that you need to make your own auto-replacement, you need to write the initial option in the “replace:” window, and in the “to:” window the option you want to replace with.
After making the necessary settings, do not forget to check the box next to the line “Automatically correct spelling errors” to activate the function.
Autocorrect with math symbols
When entering mathematically refined text that contains a huge number of characters, it is best to configure the input of characters by pressing certain commands.
In the “replace:” window we write the initial option that is being entered, and in the “to:” window we write the option that needs to be replaced with.
Now, just enter, for example, the command \aoint to get a treble clef.
Autoformat as you type
A sign of good manners is considered to be the separation of speech by means of em dash, and not short and especially minus, as many do. Also, very often, users use straight quotes when they need to use double quotes.
There is no catastrophic error in this, but you still need to try not only to write without errors, but also to add the appropriate characters in the appropriate place.
In the “Autoformat as you enter” tab, some of these inaccuracies can be replaced automatically.
Check out all the auto-substitutions offered for yourself.
Autoformat
In the “Autoformat” tab, you are asked to independently indicate exceptions to the rules.
Actions
The fifth tab contains possible options auto-correct for any actions. It is possible to add your own option.
When correcting spelling in Microsoft Office
When automatically checking spelling errors in text, you can specify which words should not be checked. To activate the function, check the box of interest:
- Skip words in CAPITAL LETTERS;
- Skip words with numbers;
- Skip Internet addresses and file names;
- Mark repeated words;
- Use capitals with accents (French).
In order to offer spelling options only from the main dictionaries, put a tick in the sixth box.
To use other dictionaries, click the “Auxiliary dictionaries” button. In the window that appears, there are dictionaries from which you can use words.
You can add your own dictionary: click on the “create” button and select the location to save the dictionary and its name. After that, put a checkmark next to the created dictionary and click the “edit word list” button.
In a new window we add and delete words. You can add an existing dictionary: click the “add” button and select the desired file on your computer.
The last point can be configured to replace the letter “e” with the letter “e”.
When correcting spelling in Word
You can check spelling and grammar directly while typing. Activate the commands of interest by checking the box and the editor will indicate errors immediately after an incorrectly entered phrase or word.
This section contains the following activation items:
- Check spelling while typing;
- Mark grammar errors while typing;
- Difficult words;
- While checking spelling, also check your grammar;
- Show readability statistics.
You can also choose a set of rules that Word will follow.
How to enable spelling in Word 2003
You can enable automatic error checking in Word 2003 by selecting the “Tools” → “Options” tab.
The window contains a “Spelling” tab, where you need to check the box opposite the “Automatically check spelling” item.
How to enable spelling in Word 2007, 2010, 2013, 2016
In Word 2007, 2010, 2013, 2016, to automatically check spelling, go to the “File” tab and find “Options” in the list.
The window contains “Spelling”, select the necessary items, click “Save”.
Automatic text checking mode for errors
When turned on automatic mode text checking; if errors are made, they will be highlighted with an underlined wavy line. To correct an error, point to the misspelled word and press the right mouse button. A list opens, starting with replacement options. If there is no error, the word can be skipped and the underlining will be removed.
How to check spelling
Correcting errors is an extremely important point when compiling a professional, text document. IN modern world, grammatical errors indicate a person’s lack of education.
There are many ways on the Internet to check text for grammatical errors; you just need to upload your document and that’s it. But why turn to the Internet if the Word editor also contains a very powerful dictionary that can check the spelling of text of absolutely any complexity.
During the article, options for automatic checking have already been discussed, but in the case when this function is disabled, checking the text for errors can be started from the “Review” tab → “Spelling” commands.
After activating the command, a “Spelling” window will appear on the right side of the document in which errors in the text will be noted.
Working with the window is extremely simple. In the example below, you can see that the editor identified the word “Word” as an error. There are several options to choose from:
- Skip - skip this particular error;
- Skip all - skip all errors in the document;
- Add - if you are absolutely sure of the spelling of a word, it is best to add it to the dictionary, and this error will not appear again.
In my case, it is better to add the word to the dictionary, as I am confident in the correct spelling of the word.
Here is another example in which a typo was made and Word highlighted the misspelled word.
Word detected the word "opened" and underlined it with a red squiggly line, indicating a spelling error. In the “Spelling” window, options for correcting errors are offered, with a description of the proposed words.
All that remains is to select the desired word and click the “Change” button. That's it, the error has been fixed.
How to Check Punctuation in Word Text
If commas in the text are placed incorrectly, the sentence is underlined with a wavy blue line. To correct it, you need to right-click on it and select the proposed option, or make changes manually.
In the example below, the Word editor has highlighted the word “For example” with a blue wavy line, which means not a spelling error, but a punctuation error.
In this case, the window changes its name to “Grammar” and highlights correction options, adding a description of why it needs to be done.
As we can see, we are told that a comma is missing after or before the introductory word. We highlight the right option corrections and click the “Change” button.
How to disable spell checking in Word
There is an opinion that before checking errors, you need to type the text completely, not paying attention to typos and formatting. Thus, you will be able to significantly reduce your typing time and will have more time to check the text for spelling and grammatical errors.
To disable spell checking you need to:
- Click on the command “File” → “Options”.
- Select the Spelling command.
- Check the two boxes:
- Hide spelling errors in this document only;
- Hide grammatical errors in this document only.
Online spelling and punctuation checking service- it's unique free service search for errors and typos.
An effective website algorithm finds many errors, including:
- unpaired parentheses and apostrophes;
- two commas or periods in a row;
- separating introductory words with commas;
- errors in coordination;
- grammatical and logical errors;
- typos;
- extra spaces;
- repetition of words;
- lowercase letter at the beginning of a sentence;
- hyphenated spelling;
- and much more.
On our service you can not only find out the uniqueness of the text, but also check its spelling and punctuation. When checking the text, you can just as easily get rid of typos, which are not always noticeable when speed dial. When using this service, you will be confident in the quality of the text.
Checking text for errors online, correcting errors in text from the website
Correcting errors in text online, checking spelling and punctuation will allow you to check the literacy of the text.
Online error checking will help you find errors and typos in the text. Checking text for errors is useful when analyzing any text if you want to check its quality and find any errors. If you're having trouble primarily with punctuation rather than spelling, consider checking commas. The service will point out problem areas where extra or missing punctuation marks were found, for example, several commas in a row or unpaired parentheses.
One of key features free check on errors on the site is the ability to correct them directly in the text. The verification algorithm is simple.
- Paste the desired text into the spelling and punctuation checker.
- Click on the “Check for errors” button.
- Pay attention to the areas highlighted in a contrasting color and the number of errors found under the verification field.
- Click on the highlighted word and select the correct spelling from the list that opens.
Modern programs and applications have very useful function checking spelling and grammar in texts typed by the user. The Word text editor included in the package is no exception in this regard. Microsoft applications Office and possessing wide possibilities to check spelling in documents. In addition to directly detecting errors, Word also allows you to correct them in various ways.
Spelling and grammar checking is enabled in the Word text editor by default. As you enter text, Word automatically analyzes the entered sentences and compares them with its dictionary and, if detected, highlights spelling errors with a red wavy line, and grammatical errors with a green line.
If for some reason the spelling is not checked automatically, then you need to check the settings text editor Word related to spell checking.
To do this in Word 2007, click on the button with the Office logo in the upper left corner of the program and in the pop-up window click Word Options.

In the window that opens, select a group on the left side Spelling and check that the following items are checked: Automatically check spelling, Automatically check grammar And Also check spelling.

You can also run the spelling and grammar check manually by pressing F7 on the keyboard or press the corresponding button in Word.

The window that opens will show the first error found in the document, starting from the location where the cursor was placed. Depending on the type of error found, the spell checker may suggest replacing the word with the correct spelling; if it finds it in the dictionary, skip this error or add the found word to the program’s built-in dictionary.

The last option is used in cases where you are sure of the spelling of a word, but it is not contained in the program’s internal dictionary because it is quite rare and specific.
 Order 343 mail. Order by Russian post. Consequences of failure to appear in court when summoned
 How to put a password on a folder on a Windows computer without and with programs
 Pluton – Free Bootstrap HTML5 One Page Template
 History of ZX Spectrum: Myths and reality New Spectrum
 Voice assistant Siri from Apple Siri functions on iPhone 6s
 How to roll back to a previous version of iOS?
 Unlock iPad in four days