Connecting tp link tl wr741nd. Wireless router TP-Link TL-WR741ND. Wireless Internet. How to connect to a Wi-Fi network
The TL-WR741ND router from TP-Link belongs to the middle class of devices with some advanced features such as a wireless radio or WPS. However, all routers from this manufacturer have the same configuration interface, so correctly configuring the router in question is not a problem.
Immediately after purchasing, any router must be properly prepared: installed, connected to the power supply and connected to a PC or laptop.

Configuring TL-WR741ND
Setting the parameters of the router in question is no different from the same operation for other TP-Link devices, but has its own nuances - in particular, the type and name of some options on different firmware versions. It is recommended to install the latest version of the router software - you can learn about the specifics of the procedure from the further manual.
The configuration interface of this device can be accessed as follows. Open your browser and type the address 192.168.1.1 or 192.168.0.1 into the input line. If the above options don't work, try tplinkwifi.net. The exact data for your copy can be found on the sticker glued to the bottom of the case. 
The combination to log into the router interface is the word admin as the username and passphrase.
You can configure the router in two ways - through quick setup or by specifying the necessary parameters yourself. The first option saves time, and the second allows you to configure specific options. We will describe both, and leave the final choice to you.
Quick setup
Using this method, you can enter basic connection parameters and wireless communication. Do the following:


Wait for the router to reboot and the device will be ready to use.
Manual setting mode
Entering parameters yourself is not much more difficult automatic way, but unlike this option, it allows you to more subtly customize the behavior of the router. Let's start by setting up an Internet connection - the necessary options are located in the section "WAN" menu item "Net".
The device in question supports connection via all protocols common in the post-Soviet space - let's look at the configuration for each of them.
The PPPoE connection is still one of the most popular and is the main one for government providers like Ukrtelecom or Rostelecom. It is configured like this:


L2TP and PPTP
VPN connections like L2TP or PPTP on the TL-WR741ND router are configured using the following algorithm:


Dynamic and static IP
These two connection types are much easier to set up than others.


After setting up the Internet, the router needs to be rebooted - to do this, open the block "System Tools", select an option and use the button "Reboot".
Wi-Fi setup
The next configuration stage is setting the wireless network parameters, which consists of two stages: Wi-Fi settings and security settings.


Now let's move on to the security settings.


After saving the settings, reboot the router and try connecting to Wi-Fi. If you did everything correctly, the network will be available.
WPS
Most modern routers are equipped with a function "Wi-Fi Protected Setup", otherwise WPS.
On some TP-Link device variants this option is called "QSS", "Quick Secured Setup".
This feature allows you to connect to your router without having to enter a password. We have already looked at setting up WPS capabilities on many routers, so we recommend that you familiarize yourself with the following material. 
Changing interface access data
For security reasons, it is better to change the data for accessing the router admin panel. This can be done in points "System Tools" — "Password".


Conclusion
That's all we wanted to tell you about configuring the TP-Link TL-WR741ND router. The instructions were detailed, and there shouldn’t be any difficulties, but if you encounter problems, then ask a question in the comments and we’ll try to answer it.
In order to get to the router’s web interface, you need to open your Internet browser and type 192. 168.1.1 in the address bar, Username - admin, Password – admin(provided that the router has factory settings and its IP has not changed).
Changing the factory password
To ensure that no one but you can enter the router settings, you need to change the password to enter the settings.
To do this, select from the menu on the left System Tools(System Tools) – Password(Password) and enter the settings:
- Previous username: old username, enter admin
- Previous password: old password, enter admin
- New username: enter a new username, you can leave admin
- New Password: enter New Password
- Confirm new password: confirm the new password

Setting up an Internet connection
In the router interface, you need to go to the tab Net(Network), menu WAN(Here you can add, edit and delete connections).
Setting up a PPPoE connection
- In field WAN connection type: select PPPoE/Russia PPPoE
- Username: your login according to the contract
- Password And Password confirmation: your password according to the agreement
- Auxiliary connection: Disabled
- WAN connection mode: Automatic connection
- Save. The Internet is configured.

Setting up an L2TP connection
- Type WAN connections: select L2TP/Russia L2TP
- Username: your login according to the contract
- Password And Password confirmation: your password according to the agreement
- We put a point on Dynamic IP
- IP address/Server name
- MTU deployment
- WAN connection mode- Connect automatically
- After entering the above settings, click Save. The Internet is configured.

Configuring PPtP (VPN) while automatically obtaining a local IP address (DHCP)
- Type WAN connections: select L2TP/Russia L2TP
- Username: your login according to the contract
- Password And Password confirmation: your password according to the agreement
- We put a point on Dynamic IP
- IP address/Server name- server address or name (specified in the contract)
- MTU deployment- change the value to 1450 or less
- WAN connection mode- Connect automatically
- After entering the above settings, click Save. The Internet is configured.

Setting up PPtP (VPN) with a static local IP address
- Type WAN connections: select L2TP/Russia L2TP
- Username: your login according to the contract
- Password And Password confirmation: your password according to the agreement
- We put a point on Static IP
- IP address/Server name, IP Address, Subnet Mask, Default Gateway, DNS- check this data with your provider
- MTU deployment- change the value to 1450 or less
- WAN connection mode- Connect automatically
- After entering the above settings, click Save. The Internet is configured.

NAT when automatically obtaining an IP address (DHCP)
- In field WAN connection type: select Dynamic IP
- Click Save. The Internet is configured.

Setting up Wi-Fi on the router
Setting up a Wi-Fi connection. From the side menu, go to Wireless. In the window that opens, enter the following settings:
- Network name - the name of your wireless network
- Region- You can choose Russia, or you can choose nothing. It's not critical.

Setting up Wi-Fi encryption. In the side menu go to Wireless Security:
- Selecting the encryption type WPA-PSK/WPA2-PSK
- PSK Password: enter the password for the Wi-Fi network. The password must not be less than 8 characters
- Click the Save button at the bottom. After saving the settings, you will be prompted to reboot the router; ignore this requirement (red inscription below).

The times when the whole family used one computer are a thing of the past. Nowadays, most people have various gadgets that have the ability to connect to the Internet via Wi-Fi. In order to provide a wireless connection at home, you need to install a router. Such a network device allows you to create an access point and use the Internet without restrictions.
Most buyers prefer TP-Link. And this is completely justified. For example, the TL WR741ND router supports everything modern technologies. Data transfer speed is 150 megabits per second. In operation, this device has proven itself only on the good side. However, some users have a question: “How to configure a network device?” The answer can be found in this article.
Selecting a location
In order to avoid problems with data transfer speed, you need to start setting up the TL WR741ND by choosing a location. There are certain rules in this matter. As you know, the Internet signal is significantly weakened if there are concrete partitions between rooms. The instructions for the router indicate that the optimal location for the device is the center of the building or apartment. If you follow these recommendations, you will be able to cover the entire area with a wireless network. It would be useful to provide for the location of the outlet, since this router model runs on mains power. And one more important point - the provider's cable. Naturally, it must reach the device.
First connection
Before setting up TP-Link for this model, you need to connect it correctly. To do this you will need the router itself, desktop computer or laptop. At the beginning of the action, it is advisable that all devices are turned off. Now you need to assemble all the components of the router. First of all, secure the antenna.
The cable that comes with your network device has a power adapter on one side and a plug on the other. The latter must be inserted into a socket with a round hole. It is located on the back of the case. The power adapter is plugged into a power outlet.
There is a special port for the provider cable. In this model it is blue. Below it there is a WAN marking. The cable must be inserted into this port. A wired connection, for example, to a computer or laptop, is created using a twisted pair cable. There are four yellow ports for this purpose. They are signed as LAN with a serial number from 1 to 4.

After all the steps described above for connecting the TL WR741ND have been completed, the router is configured via a desktop PC. To do this, you need to turn on the device. The power button is located on the back of the router. When you press it, the indicators on the front side light up, indicating the operating status. Naturally, the computer must also be turned on.
TP-Link TL WR741ND: setting up a router
After checking once again that the network device is connected correctly, you can proceed to software setup router. To do this you will need to do the following:
- Launch any Internet browser on your computer.
- Enter the digital code in the address bar. In the factory configuration (if no changes have been made) custom changes) is 192.168.0.1. Then you need to press Enter.
- A pop-up window will appear on the screen. It asks you to enter your username and password. Default is admin. After filling out both lines, confirm the action by clicking on the Ok button. How to configure TP-Link if the password or login is not recognized? In this case, you need to reset the settings to factory settings.
- If everything is entered correctly, the router menu will open in front of the user. There will be sub-items on the left side. In them you need to find the tab “ Quick setup" In the pop-up window, confirm the action and click “Next”.
- In the menu where you need to enter the IP address, subnet mask and other parameters, you must select “Auto-detection”. Then continue the setup by clicking on the word “Next”.
- If for some reason all the necessary parameters are not automatically determined, you will need to enter them manually. This information provided by the provider. As a rule, it is specified in the contract. If it is not there, you need to call your Internet service provider and find out everything you need.
- After these settings, the router will prompt you to create wireless connection. To do this, you need to enter the name of the network, select an encryption method and set a password. The user leaves the remaining parameters unchanged.
The setup process has come to an end. Now you need to click on the “Finish” button. After this, the network device will immediately reboot for the new settings to take effect. This completes the setup of the TL WR741ND. Now you need to test your wireless connection.

Wireless Internet. How to connect to a Wi-Fi network?
Having created a home wireless network, you can connect to it from any mobile device equipped with a Wi-Fi module. To do this you will need to do the following:
- On your smartphone or tablet, start searching for wireless networks.
- After all available Wi-Fi connections appear on the screen, select the one you need.
- The device will ask you to enter the password that is saved in the router settings. If you type it without errors, the connection will be established.
To check the status wireless connection, just use any browser or mail client. If the user has access to them, then everything is configured correctly.

Finally
All TP-Link routers differ from competitors in their simple setup. This model was no exception. From the information above, the conclusion suggests itself: even an inexperienced user can cope with these actions. And if for some reason you need to return the factory settings, then this will not cause any difficulties. It is quite reasonable to ask: “What is needed for this?” Resetting the TL WR741ND is extremely easy. The developers provide two methods: through the menu and using the button on the case (Reset). In the first case, you need to select a tab and activate the reset process, in the second, hold down the key for a few seconds and wait for the device to reboot.
It's no secret that the stock firmware of inexpensive home routers often does not meet user requirements or lacks any features that have become necessary with the development of a home network. This usually refers to support for certain options for connecting to a provider, IPTV technologies, advanced route management and similar functions that are sometimes forgotten to be indicated in official specifications.
In this article we will try to see how suitable a budget router is for firmware from the well-known OpenWRT family. For the first acquaintance, we used the TP-Link TL-WR741ND model, which has been on the market for a long time. It uses an entry-level platform and does not feature a large amount of flash memory or availability USB port. Interestingly, this device was slightly updated several times while maintaining the name. The manufacturer only changed the version; in this material we worked with v4.20 (you can check it by looking at the sticker on the box or router), which differs in both appearance and hardware from the first revisions.
Delivery set and appearance
Mass models of routers have standard delivery kits - a device, an external power supply (this time 9 V 0.6 A), a removable wifi antenna, network patch cord, leaflets and CD with electronic version documentation. Everything you really need is present, but the network cable could be abandoned.

The design of the box is also traditional - a photo of the router, use cases, specifications. As we said above, not a word about Internet connection modes and compatibility with multicast streams. There is, of course, more data on the site, but some questions still remain.

By appearance The router is completely ordinary - a strong matte white plastic case, a group of LEDs on the front of the top cover, five network ports (100 Mbps) on the back, a power supply input with a switch, an antenna connector, reset buttons and quick connection of wireless devices.

The only things worth noting are the indicators that are too close together - it will be difficult to read their status from a distance (especially since they all have the same color) and the poor location of the QSS (WPS) button - between the antenna and the WAN port.

At the bottom there are four rubber feet and two holes for wall mounting.
Hardware configuration
To implement such a router configuration, a minimum set of chips is usually sufficient. Version 4.20 of the platform consists of an Atheros AR9331 processor operating at 400 MHz, 32 MB of RAM, 4 MB of flash. The radio unit and five-port 100 Mbps switch are built into the processor. Supports 802.11n at 2.4 GHz with speeds up to 150 Mbps. On printed circuit board you can see the second antenna, but it is not possible to determine whether it is used and for what purpose. There are no heatsinks on the processor and other chips. During testing, even under heavy load, the processor temperature did not differ much from room temperature.
The board has elements for implementing a console connection, so if you have experience with a soldering iron, organizing it will not be a problem.
Capabilities and performance of standard firmware
Official deliveries of this router model to our market have pre-installed Russian firmware, which has full localization and several additional functions(in particular, IPTV support). However, technical support sites currently offer only international (English) versions.
As standard firmware, we used the newer non-localized version 3.12.11 Build 120320 Rel.50684n, released in the spring of this year. The capabilities are quite typical for the class of models under consideration. The web interface of this version is only available on English language. You can set restrictions on access to it from the local network segment and the Internet.

To connect to the Internet, fixed and dynamic addresses, PPPoE, PPTP and L2TP are supported. Moreover, the latest versions also support access to the provider’s network. Help with organization remote access maybe built-in DDNS client. Addresses in the local segment are distributed by a DHCP server, which supports IP reservation for the required MACs.

The wireless module can operate in open network mode, WEP and WPA/WPA2 (both with a passphrase and through a RADIUS server). For additional protection, a wireless client MAC address filter is provided.

There is a port translation function, support for DMZ and UPnP. The router has a firewall with programmable rules, can pass PPTP/L2TP/IPSec traffic, and implements the passage FTP protocols, H.263 and RTSP over NAT. It is possible to restrict access to sites by their names.
The traffic control function allows you to allocate priority to certain clients and services for downloading and sending data. System options include updating the firmware, working with the configuration, an event log (with the ability to send it by email), setting the internal clock, changing the administrator password, and traffic statistics. These capabilities will be sufficient for the vast majority of users, unless, of course, they have a very specific provider.
Note that changing some options requires rebooting the device, which is quite acceptable in the class under consideration.
Performance testing was carried out on a special stand using the synthetic test IxChariot. All Internet connection options were tested, tests were carried out with one/two streams, as well as with sixteen streams running simultaneously. The results are presented in the following graph.
As can be seen from the numbers, despite the budget class, the TP-Link TL-WR741ND is capable of operating on 100 Mbit/s channels with any connection option. This is especially impressive if you remember its hardware configuration. Just a few years ago, PPTP and L2TP modes on inexpensive routers often could not operate at full channel speed.
The device supports access to local network provider when a VPN connection is established. The second graph shows the test results in this mode, while simultaneously downloading data from the Internet and the provider's network.
It is quite expected that there are no speed restrictions here either.
The device's wireless module supports 802.11b/g/n standards, operates at a frequency of 2.4 GHz and has one antenna and a maximum connection speed of 150 Mbit/s. In fact, today this figure is only achievable in a private home or field, since the latest Wi-Fi Alliance requirements prohibit devices from using two channels in the 2.4 GHz band when there are neighboring networks. So for the test we chose an Intel 6205 adapter, which connected at a speed of 72 Mbit/s, the maximum possible for 802.11n when working with one antenna and one channel. Let us remind you that the adapter itself is dual-band and supports speeds of 300 Mbit/s. Testing was carried out between wireless clients and clients connected to the LAN segment.
Testing has shown that the actual speed corresponds to the equipment and modes used. It is 40-50 Mbit/s, and, given the class of the router, these figures can be considered a good result. The speed of access of a wireless client to a computer installed in the external segment of the network practically did not differ from the indicated figures for any option of connecting to the Internet.

When the article was already finished and was waiting its turn for publication, the local office of the manufacturer released a beta version of the firmware (3.12.12 Build 121124 Rel.66062n, you can download it on the technical support forum) with a Russian configuration interface and some functions that are relevant for domestic users - IPTV ( in the mode of allocating a port for a set-top box or multicast, in the second case with Wi-Fi support) and VLAN 802.1Q, which may be interesting for multiservice connections.
Alternative firmware
Although official firmware is quite suitable for implementing basic scenarios for using a router; for various reasons, there may be a desire to improve the software capabilities of the model. Unfortunately, budget devices The standard option to install additional packages is rarely implemented. So the only option might be alternative firmware. But it should be noted that the TP-Link website states that failure when using third-party software is not a warranty case.
For our part, we will also note that working with alternative firmware may not be as easy as we would like. Hardware versions and software are constantly changing, and “latest” does not always mean “best.” In addition to following the instructions found on the Internet, it is advisable to use your own head. In some cases, it will be possible to restore the router's functionality only with the use of additional equipment. On the other hand, the cost specifically of this device not very large, so it may well be suitable for the first training.
Describe all the possibilities in detail in the article. alternative versions impossible. Nobody expects this in a laptop review detailed information about Windows and everyone application programs for her. Luckily, many projects have Wikis and forums where you can find necessary information. At the end of the article there are also links to suitable topics in our forum.

One of the options for the TL-WR741ND model in question is the well-known OpenWRT firmware. Getting started with it is quite simple - you need to download the image new firmware from the project website and install it in the usual way via the web interface. For the mass user, certain difficulties will be associated with the lack of a familiar web interface in the basic package. To solve this problem, you can use Gargoyle - a modified version that has a built-in add-on for managing firmware options through a browser.

Another way is to install the LuCI package for a similar purpose inside OpenWRT. In the second case, it is advisable to have access to the Internet from the router for the convenience of installing additional packages.

The capabilities of OpenWRT are noticeably superior to standard firmware, especially if you understand exactly what you need and why, and have at least basic skills in communicating with operating systems of the Linux family. But we must not forget about the limited hardware resources of the device in question, so it should not be loaded with “heavy” tasks.

To connect to the Internet, all the same options are provided, which also provide simultaneous access to the provider’s local network. However, the limited amount of flash memory on the router does not allow you to install both LuCI and L2TP support with simple commands (direct connection, PPPoE and PPTP do not have this problem). You can, of course, try to select the required set of packages, but for testing in this mode we simply abandoned the web interface. Setting up in the console is, of course, more complicated, but “more correct,” especially if we are not talking about “just launching”, but also “figuring out how it all works.” Instructions in Russian for launching this type of connection are available on the project website.
Considering that router firmware can significantly affect not only capabilities, but also performance, we decided to conduct a speed test of this version similar to that described above. The original firmware had no comments on this parameter, so the test rather answers the question “will alternative firmware spoil the speed” rather than giving a serious reason for choosing a version.
As expected, OpenWRT shows results that are almost identical to the proprietary firmware. The only note concerns rebooting the device in multi-threaded L2TP tests. Most likely, this can be fixed by updating modules or additional settings client. This is exactly one of those cases when you will have to deal with the problem yourself; the manufacturer’s official technical support will not help here.
Before we start setting up the router, let's check the local network connection settings. For this:
Windows 7
Click on " Start", "Control Panel".
Then click on " View network status and tasks".

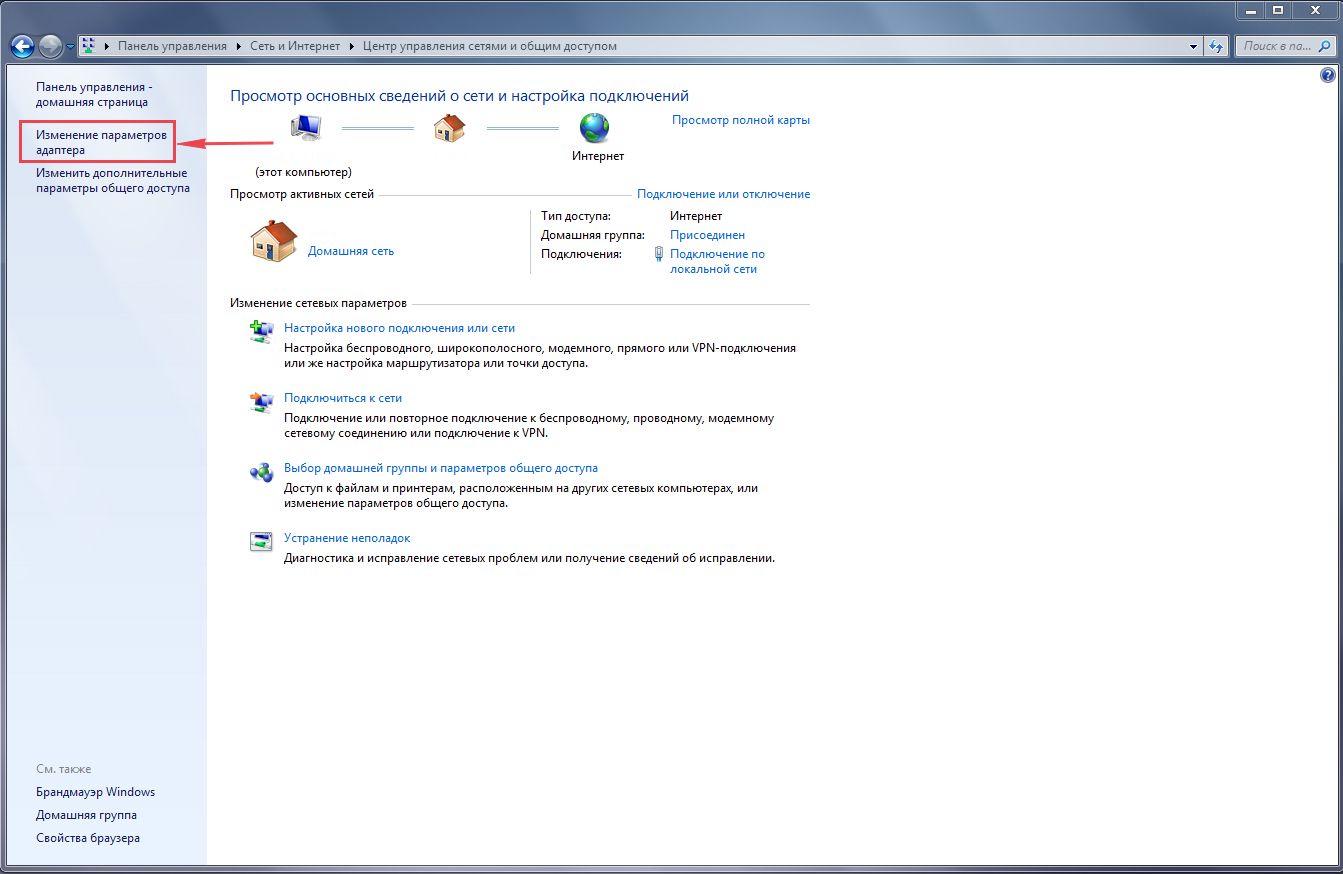
LAN connectionProperty".

Then select from the list " Internet Protocol Version 4 (TCP/IPv4)" and press " Property".

" and "", then press the " button Ok".

Windows 10
Click on " Start", "Options".

Then click on " Network and Internet".


In the window that opens we see " Ethernet". Right-click on it and select " Property".

Then select from the list " IP version 4 (TCP/IPv4)" and press " Property".

In the window that opens, you need to check the box " Obtain an IP address automatically" And " Obtain DNS server address automatically", then press the button " Ok".

Connecting the TP-Link TL-WR741ND router to a computer
The next step is to connect the router TP-Link TL-WR741ND to your laptop or Personal computer(PC). To do this, you need to connect the cable that your provider provided to you to the blue port of the router (that is, this is the cable that goes to your apartment, house, office, etc. from outside), and the cable that came with router, one end into one of the four ports, which are marked in yellow on the router, and connect the other end to your laptop or PC. And yes, don't forget to connect the power cable.

Authorization of the TP-Link TL-WR741ND router
So, we connected the router, now you need to use any browser (be it Google Chrome, Mozilla Firefox, Internet Explorer, etc.) get into its web interface. To do this, open the browser and enter the router address in the address bar: 192.168.0.1 and press the button " Enter" on your keyboard (in older models of this router this address may be: 192.168.1.1 ).
- Username - admin
- Password - admin
So, enter the data and press " Login"


Setting up the Tp-Link TL-WR741ND router
And finally we got to the router’s Web interface and now you need to configure the equipment. First of all, let's secure the wireless network by setting a password for wi-fi. Then you will need to find out what type of connection is used to access the Internet, is it PPTP, L2TP or PPPOE. You can find out by calling your provider (this is the organization with which you entered into an agreement to provide Internet services). So, let's start setting up the router.
Setting a password for wi-fi
I bring to your attention Video instructions for setting a password for wi-fi on a router Tp-Link TL-WR741ND
Let's also take a written and illustrative look at setting up a Wi-Fi password on a router Tp-Link TL-WR741ND.
On the Web interface, select the "tab" in the menu Wireless"and we get into" Wireless Settings" - setting up a wireless network. Here it is necessary in the column " Wireless Network Name:"Come up with and indicate a name for your wireless network; this name will then light up when you connect to the network. Then select " Region" - Russia. After that, click " Save".

Next, go to the menu in the tab " Wireless Security". Here we will set up a password for the wireless network invented above, for this we select the encryption type " WPA-PSK/WPA2-PSK" and then below in the field " PSK Password:"we come up with and enter a password. Then click " Save".

After we pressed " Save"A message will appear above this button indicating that the settings have been saved and now we need to reboot the router. This is what we do by clicking on the button" click here"by sending the router to reboot. After the reboot, the name of your wireless network will appear in the network settings of your computer.
Setting up PPTP
PPTP on the router Tp-Link TL-WR741ND using the Tp-Link TL-WR1043ND router as an example.
Let's also write and illustrate PPTP on the router Tp-Link TL-WR741ND.
Network", then " WAN".
IN " WAN Connection Type:"choose" PPTP/Russia PPTPUsername:"), password (in line " Password:Confirm Password:Server IP Address/Name:
Connect Automatically NOT Connect on Demand
Save".

Setting up PPTP with a static IP address
Let's look at the connection setup PPTP with static IP address on the router Tp-Link TL-WR741ND.
So go to the menu in the tab " Network", then " WAN".
IN " WAN Connection Type:"choose" PPTP/Russia PPTP", below you will be asked to indicate your username (in the line " Username:"), password (in line " Password:") and password confirmation (in the line " Confirm Password:").
Static IPServer IP Address/Name:"), IP address (in the line " IP Address:"), subnet mask (in line " Subnet Mask:"), default gateway (in line " Gateway:") and DNS (in the line " DNS:"). All of the above data is provided to you by the provider (the organization that provided you with the Internet).
All this data is usually specified in the contract with the provider. If for some reason you could not find them, you need to call hotline Your provider and find out how you can get them.
After you have entered all the necessary data, check the box next to " Connect Automatically" (This setting will keep your Internet connection constantly, so if you NOT unlimited tariff I recommend checking the box next to " Connect on Demand", which means connection on demand, that is, the Internet is connected only when you start using it).
After all manipulations with the settings, press the button " Save".

L2TP setup
Let's look at the connection setup L2TP on the router Tp-Link TL-WR741ND.
So go to the menu in the tab " Network", then " WAN".
IN " WAN Connection Type:"choose" L2T/Russia L2T", below you will be asked to indicate your username (in the line " Username:"), password (in line " Password:") and password confirmation (in the line " Confirm Password:"). You will also need to specify the server IP address (in the line " Server IP Address/Name:"). All of the above data is provided to you by the provider (the organization that provided you with the Internet).
All this data is usually specified in the contract with the provider. If for some reason you could not find them, you need to call your provider's hotline and find out how you can get them.
After you have entered all the necessary data, check the box next to " Connect Automatically" (This setting will keep your Internet connection permanently, so if you have NOT For an unlimited tariff, I recommend checking the box next to " Connect on Demand", which means connection on demand, that is, the Internet is connected only when you start using it).
After all manipulations with the settings, press the button " Save".

Setting up L2TP with a static IP address
Let's look at the connection setup L2TP with static IP address on the router Tp-Link TL-WR741ND.
Typically a static IP address is provided legal entities, or as additional service to the main tariff individuals.
So go to the menu in the tab " Network", then " WAN".
IN " WAN Connection Type:"choose" L2TP/Russia L2TP", below you will be asked to indicate your username (in the line " Username:"), password (in line " Password:") and password confirmation (in the line " Confirm Password:").
Since the connection uses a static IP address, you check the box next to " Static IP", then indicate the server IP address (in the line " Server IP Address/Name:"), IP address (in the line " IP Address:"), subnet mask (in line " Subnet Mask:"), default gateway (in line " Gateway:") and DNS (in the line " DNS:"). All of the above data is provided to you by the provider (the organization that provided you with the Internet).
All this data is usually specified in the contract with the provider. If for some reason you could not find them, you need to call your provider's hotline and find out how you can get them.
After you have entered all the necessary data, check the box next to " Connect Automatically" (This setting will keep your Internet connection permanently, so if you have NOT For an unlimited tariff, I recommend checking the box next to " Connect on Demand", which means connection on demand, that is, the Internet is connected only when you start using it).
After all manipulations with the settings, press the button " Save".

Setting up PPPOE
I bring to your attention Video instructions for setting up the connection type PPPOE on the router Tp-Link TL-WR741ND using the Tp-Link TL-WR1043ND router as an example.
PPPOE on the router Tp-Link TL-WR741ND.
So go to the menu in the tab " Network", then " WAN".
IN " WAN Connection Type:"choose" PPPOE/Russia PPPOE", below you will be asked to indicate your username (in the line " Username:"), password (in line " Password:") and password confirmation (in the line " Confirm Password:"). All of the above data is provided to you by the provider (the organization that provided you with the Internet).
All this data is usually specified in the contract with the provider. If for some reason you could not find them, you need to call your provider's hotline and find out how you can get them.
After you have entered all the necessary data, check the box next to " Dynamic IP" And " Connect Automatically" (This setting will keep your Internet connection permanently, so if you have NOT For an unlimited tariff, I recommend checking the box next to " Connect on DemandTime-based Connecting
After all manipulations with the settings, press the button " Save".

Setting up PPPOE with a static IP address
Let's look at the connection setup PPPOE with static IP address on the router Tp-Link TL-WR741ND.
Typically, a static IP address is provided to legal entities, or as an additional service to the basic tariff to individuals.
So go to the menu in the tab " Network", then " WAN".
IN " WAN Connection Type:"choose" PPPOE/Russia PPPOE", below you will be asked to indicate your username (in the line " Username:"), password (in line " Password:") and password confirmation (in the line " Confirm Password:"). Since the connection uses a static IP address, you check the box next to " Static IP", then indicate the IP address (in the line " IP Address:"), subnet mask (in line " Subnet Mask:").
All of the above data is provided to you by the provider (the organization that provided you with the Internet).
All this data is usually specified in the contract with the provider. If for some reason you could not find them, you need to call your provider's hotline and find out how you can get them.
After you have entered all the necessary data, check the box next to " Connect Automatically" (This setting will keep your Internet connection permanently, so if you have NOT For an unlimited tariff, I recommend checking the box next to " Connect on Demand", which means connection on demand, that is, the Internet is connected only when you start using it, or " Time-based Connecting", which means a timed connection, that is, the Internet works at a certain time specified by you).
After all manipulations with the settings, press the button " Save".

Changing the web interface password
I bring to your attention Video instructions for changing the password on the router web interface Tp-Link TL-WR741ND using the Tp-Link TL-WR1043ND router as an example.
Resetting the web interface password
If you set a password for the web interface of the router and forgot it, I invite you to watch the Video instructions for resetting the web interface password on the router Tp-Link TL-WR741ND using the Tp-Link TL-WR1043ND router as an example.
Firmware update
I bring to your attention Video instructions for updating the firmware on the router Tp-Link TL-WR741ND using the Tp-Link TL-WR1043ND router as an example.
Connecting a computer to wi-fi
After connecting and setting up the router, you need to connect the computer to a wireless network (wi-fi), let's consider connecting to wi-fi in two operating systems, these are Windows 7 and Windows 10:
Windows 7
Video instruction

Sultan

Connect automatically" and press
"Connection".


Windows 10
Video instruction
In the lower right corner of the desktop, find the wireless network (wi-fi) icon and click on it with the left mouse button.

A window pops up with a list of available wireless networks. Select a wireless network, in my case it is the network " Sultanova"(You select the network whose name was given at ).

After selecting the network, check the box next to " Connect automatically" and press " Connect".


We wait perhaps a couple of seconds and you are connected to your wireless network.

 Order 343 mail. Order by Russian post. Consequences of failure to appear in court when summoned
 How to put a password on a folder on a Windows computer without and with programs
 Pluton – Free Bootstrap HTML5 One Page Template
 History of ZX Spectrum: Myths and reality New Spectrum
 Voice assistant Siri from Apple Siri functions on iPhone 6s
 How to roll back to a previous version of iOS?
 Unlock iPad in four days