Eye help for ipad. Learn about accessibility features for people with visual impairments in our other products. How to set up accounts
Do you use an iPad? Do you want him to do more, work more efficiently and, in general, only improve your life? Then our 40 iPad tips are for you. Recommendations are suitable for everyone iPad models, be it iOS 8, 9 or 10. Whether you are a beginner or experienced user, you will definitely find something new for yourself in this article.
Since the iPad was released in 2010, it has become the device of choice for millions of consumers around the world. As with any product, you need to know all the ins and outs to get the most out of your iPad, and here we list 40 best advice on using iPad.
There is an interesting trick here for everyone, from a beginner to a true iOS expert. After all, there are always secret functions that you definitely didn’t know about. Regardless of your level of knowledge, we're confident that at least some of the tips and tricks we'll cover will be new to you, and useful in some way.
Basics
How to change wallpaper on iPad
You can (of course) easily change your iPad's wallpaper, both on the lock screen and on the home screen. Simply select Settings, tap Wallpaper, and then tap Select New Wallpaper. You can choose from Apple's collection of wallpapers or "Dynamic" wallpapers, which move slowly in the background. You can also select a photo from your photos.
Once you find a wallpaper that suits you, tap it to open a preview of your lock screen wallpaper. Here you can preview what your wallpaper will look like and whether you want to set it as a universal wallpaper, just for the lock screen, or just for the Home screen.
How to free up space on your iPad
Perhaps yours iPad already won't let you take another photo. It may be refusing to download another app. Since iOS storage space doesn't expand, it's important to keep an eye on what's eating up the available gigabytes on your device. Here's how it's done.
Go to section “General” -> “Storage and iCloud” -> “Manage” In chapter "Vault" and wait a minute or two as iOS figures out which apps are using the most space within itself and in iCloud.
More often Music And Photo And Camera are two of the worst consumers. If you use a service such as Apple Music or Spotify, you can safely delete the music cache on your device to free up space. If you are creating backups photos and videos on your PC or Mac, you can also delete them.

Next in the list you will see the programs you use, starting with the most heavily used ones. If programs you rarely use are taking up a lot of space, click on them and then click "Uninstall a program" to remove it in an instant.
How to set location-based reminders for specific locations
If you want to be reminded to do something when you leave your home, work, current location, or any address in your address book, it's pretty easy to set up using the app reminders in iOS. But what if you want to remember to buy something when you go to the store? You probably don't want to add store addresses to your address book to use this feature.
Luckily, you don't need to. Once you've created a reminder, tap it and turn on Remind by Location. By default, reminders will fill in your current address - tap it and a bunch of options will appear, including a text box at the bottom for entering a custom address.
Make your iPad read to you
Enabling the option "Speech" Allows your iPad to read any selected text aloud. Open “Settings” -> “General” -> “Accessibility”. Scroll down to Speech and tap to turn it on. You can also adjust the speaking speed, choose from a wide range of voices, and highlight words as you speak.
Now go to any application that will allow you to highlight text. It could be Mail, and Safari, Notes and many others. Select the text and it will appear in the context menu new parameter(you may need to press the right arrow to view Extra options). Click the "Speak" command and your iOS device will begin to read the text aloud.
Enable the Emoji Keyboard on iPad: Access special emoji and animal icons
The Emoji Keyboard lets you insert all sorts of fun images wherever you type, including the recent additions of tacos, unicorns, and the "you know" and middle finger emoji. Your iOS device can also name these symbols.
You may have seen these iconographic symbols in emails, iMessages and tweets and wondered how people were able to type them. You may have mistakenly thought that you need to download a third-party app to access these special characters.

No. Apple provides these characters, called Emoji, as an international keyboard. Open “Settings” -> “General” -> “Keyboards” and select Keyboards. Then click "New keyboards..." and find "Emoji". Now open an application where you can enter text.
Next to the space, you will see a small globe icon. Click on it to switch between regular keyboard and Emoji.
How to Multitask on iPad
Now this advice only applies to those using fairly recent versions of the iPad, and by recent we mean iPad mini 2 or later iPad Air or the next versions, and of course iPad Pro. Multitasking functions are divided into three groups. Image fusion, image splitting and picture-in-picture. All of the iPads mentioned can use image stitching, which opens up a small sidebar(using 1/3 of the screen), displaying the application as on the iPhone, along with the first one. You can then change programs by swiping from the top of the program and selecting a new one.
The only downside is that you can't interact with both apps at the same time, and if you want to use the app you originally opened, you need to close the "image blend" app first.
Image splitting is more impressive, but it's only available on the iPad Air 2, iPad mini 4, and iPad Pro. When using image stitching, users can "pull" a program into split-screen mode, where both programs can be used simultaneously and the amount of space can be adjusted by pressing and holding the divider between applications.
Finally, Picture-in-Picture mode allows recent iPad users to watch videos or talk to the camera in FaceTime while using other apps. When on a FaceTime call or watching a movie (not only Video - some are supported as well) third party applications) simply press the Home button and the video will be minimized and displayed in the bottom corner of your iPad. You can easily drag it to other corners of the screen if necessary, and when you click on a video, it will expand to full screen.
Click up
You won't believe how much time you can save. If you've scrolled halfway down a web page in Safari, tap the top of the screen ( to the clock display area) to return to the top of the page. Try this in other apps as well—many of them, including third-party apps, use this navigation trick.
Shooting with the volume key
Did you know you can take photos using any volume button? Their placement is much more convenient when shooting in landscape mode, especially when using an iPad.
How to Download One Track from Apple Music
Apple Music users can stream music from the Internet to their Cell phones wherever there is a signal, but what about when you're on the subway or on a plane without an internet connection? Luckily, you can download any individual track from the streaming service to your iOS device—simply tap the menu button that appears next to each song in the My Music tab and tap “Make Available Offline.”
Pull to refresh
To check for new emails in Mail, simply go to the Mailbox screen or the Mailboxes screen (you can't refresh while viewing a message), then pull down on the screen until you see a small refresh button (circular arrow) at the top. Continue scrolling until this button pulls down and then “slides back” to the progress bar.
Delete recent addresses
The post office has always been helpful in terms of addresses. It shows possible matches from your recent history and contacts as soon as you start filling out the “To” field. With iOS 9, Mail also gained the ability to suggest contacts based on the people you usually write to. e-mail. As reasonable as it may be, there may still be situations where you email someone once and never want to contact that person again. Therefore, it is better to remove it immediately from the list of “recent addresses”.
Simply scroll down to the address you want to remove. Click the icon «>» , then "Remove from recent". You can't do this for those in your contacts list as they will always be suggested where needed. If you want to get rid of them, you will need to delete the contact completely.
How to set a different signature for each mail account
You'll be glad to know that you can edit the default signature (the default is usually "Sent from my iPhone" or "Sent from my iPad") for each of your email accounts independently, without much effort.

Open “Settings” -> “Mail, addresses, calendars...” -> “Signature” and then select "To account". This allows you to create a separate signature field for each email account you create. Type or paste the signatures you want and Mail will automatically add them to every outgoing email message.
How to tag messages in Mail on iOS
iOS 9 offers top-level mailboxes (VIP and Flagged), each of which collects certain messages across all your inboxes and presents those messages in one convenient list. They are simply gorgeous.
The flagged mailbox displays any flagged messages - those that you marked with the "Flag" button. This makes it easy to quickly see your most important messages without having to scroll through other messages in your inboxes.
You can flag an email while viewing it by clicking the small flag icon in the top bar and selecting Flag.
How to set a VIP flag and how to view VIP messages in Mail on iOS
VIP Mailbox on iOS 9 collects messages from people you've designated as a VIP—your wife, your boss, your co-workers, your bookie...um...financial advisor—so you don't miss them in your daily email stream. To designate someone as a VIP, click the ">" icon in the right corner of the VIP mailbox (under All Mailboxes), then click "Add VIP" and select the person from your contacts list.
Alternatively, open an email from the person you want to add as a VIP, click on their name/email address, and then click “Add to VIP” to achieve the same result.
Click "VIP Alerts" and you will be taken to “Settings” -> “Notifications” -> “Mail” -> “VIP”, where you can configure notification settings for emails received from VIPs.
How to quickly add photos and videos to messages
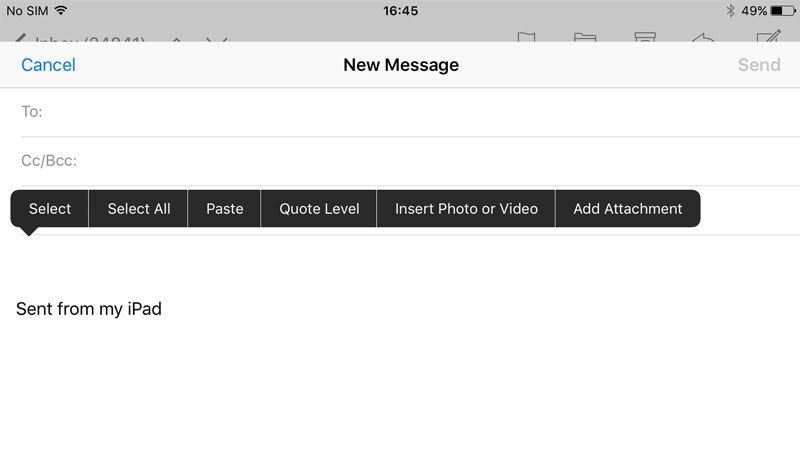
Instead, go to the Mail app and start writing a new message. Touch and hold an empty space in a message to open context menu, then click Insert Photo/Video (you may need to click the right arrow). You will see a photo selection screen.
You can put a photo or video in an email by simply long-pressing the message. Simply select the file and then select the compression level to complete.
How to return to drafts in Mail on iOS
Let's say you didn't send the letter and left. You don't need to be in a hierarchy mailboxes mail app to find the Drafts folder. Instead, you can tap and hold the New Message icon to open a menu that lists all your saved drafts. You can select a completely new message from the drop-down menu that appears.
How to Archive Messages in Mail on iOS
To archive email instead of deleting it, simply select “Settings” -> “Mail” and click the corresponding email account. Click on the "Account" tab at the top, scroll down to the "Advanced" section and click on your email address. Swipe down until you find the Archive Messages toggle. Enable it, and then don't forget to click on the "Done" button in the top right corner to save your changes.

Now all instances of the Delete command in Mail will be replaced with an Archive button.
How to delete messages in Mail on iOS
If you turn on archiving as an option for your messages, it doesn't mean you can no longer delete messages directly from your iPhone or iPad. Just press and hold the "Archive" button and you will get a second option: "Delete message."
Show more (or fewer) unread emails
Open “Settings” -> “Notifications” -> “Mail”, and you will see three sets of options. The "Show" element simply allows you to select the quantity unread messages emails in Notification Center - the default is five, but this number can be increased or decreased depending on your preferences.
How to set up accounts
To make life easier for users with multiple Mail accounts, you can set up notifications (not to mention sounds) for each account.
Just open “Settings” -> “Notifications” -> “Mail” and tap the account you want to change. You'll get the standard Notification Center options: sound, icon sticker, whether to show message thumbnails, and whether to show notifications on your device's lock screen, but these settings are unique to the account you choose. This way, you can enable all of your account settings, but only for your personal account.
How to Mark a "Read" Message as "Unread" in Mail on iOS
Sometimes you look at an email, think everything is clear, but then realize that you didn't remember anything from it. Or you may want to remind yourself to review the contents of a message again without putting it in the “Flag” folder with really important messages. One option is to mark it as "unread", which can be done by clicking the flag icon from the email and clicking "as unread". Or, in your email list, you can swipe right to mark it as unread.
Siri
Select Siri Audio Input
If your car has a built-in speaker or you have a Bluetooth accessory with a microphone and speakers, you can choose which one is used for Siri commands.
When you press and hold the Home button on iPad, you'll see a ">" icon to the right of the main Siri button. Click on it and you'll see a menu of all the different inputs your iPhone can use. Choose the one you want.
Your own IMDb
You probably already know that you can use Siri not only to find out what's playing in theaters near you, but Siri is also an expert on almost every movie.
Not only can you ask something about your favorite movies, but you can also get Siri to do some serious work. For example, if you are curious about which actors appeared in films together. You might ask, “Which movies star both Susan Sarandon and Tim Curry?” And Siri will answer: “The Rocky Horror Picture Show” and “Toddlers in Paris.” Hmm, how interesting.
Place punctuation marks
Saying punctuation out loud doesn't feel natural, but it can greatly improve the readability of emails Siri reads. For example:
Dear Jason comma new paragraph, I'm working on this Siri story comma and I expect comma that it will be ready soon exclamation point
Other interesting punctuation is available: ampersand, asterisk, all capital letters or all lowercase letters (Caps Lock) and even a winking smiley face.
How to make Siri more secure
Finally, some more serious advice. By default, Siri can be used even from a locked iDevice, which means a thief can send messages to your contacts. To change this, go to Settings -> Touch ID & Password and enter your password. Once accessed, simply toggle Siri from Off to On.

Camera
Now for some camera and photography tips.
How to make better panoramic photos
What is the secret to a well-made panorama? Some simple principles will help you create something unforgettable. First of all, avoid wobbly or crooked lines by sticking to the center line: this is the basic and most important point.
Also consider composition before you start taking photos and turning. Decide where you'll stop (be mindful of any ugly spots you want to leave out of frame) and think about lighting: a panorama mode that includes well-lit and dark areas may not work very well. Trying to take panoramic photos in dark lighting will never end well.
Finally, work (and move) slowly throughout the photo to ensure it comes out neat.
Reverse panorama
While we're talking about panoramic photos, we'll give you one more tip. Typically, the Camera app prompts you to take panoramic photos from left to right. But Apple hasn't made it obvious that the arrow might be abolished altogether. To reverse the arrow and allow you to shoot a panoramic photo from right to left, simply tap once on the panorama overview panel to flip it to the opposite side of the screen.
Shared Albums
You probably already know about iCloud Photo Library, which shares images between your iOS devices (and Macs). But if you want to share photos with specific friends, family, or colleagues, you can also create shared photo streams.
To create such a thread, open "Photo" and tap the General tab on the toolbar. In the upper left corner there is a “+” button. Tap it and enter a name for the shared album as well as a list of people you want to invite.

How to remove red eyes from iPad photos
The built-in red-eye removal tool can help you sort out the most common photography problems, although iPad photographers won't be as likely to suffer from this problem due to the iPad's lack of flash. Either way, find some imperfect photo in Photo Stream and click Edit (top right), then select the red-eye option in the top left: a red circle with a diagonal white line.
It's worth noting that this icon only appears if iOS detects red eyes in the photo, which is both impressive and really annoying, especially if iOS doesn't detect red eyes where they are present.
Settings
How to Improve Storage on iPad
You don't necessarily want your personal data to be available to every application that requires it. iOS can give you the sort of micro-control you need in this situation. In the Privacy section of Settings, you can not only customize which apps have access to your location, but also prevent them from accessing your contacts, calendars, reminders, photos, and sharing Bluetooth.
Additionally, if you use Twitter or Facebook, you can decide which of your apps can log you in with your credentials. Simply tap the appropriate section for any of them and slide the switch for the selected application to the OFF position.
How to set Restrictions
Open “Settings” -> “General” -> “Restrictions”, click "Enable Restrictions" and you will be prompted to enter your password. You can then choose which features you want to block on your iOS device. If you're planning on passing the iPhone to one of your kids who has a habit of accidentally deleting your apps, you can specifically disable this feature in the Restrictions screen. You can also block access to the iTunes Store, iBook Store, Safari, Camera, FaceTime and other items.
Setting up Guided Access on iPad
While we're on the subject of what may limit your iOS device, it's time to mention Guided Access, which you enable under “Basic” -> “Universal Access”. Once you have enabled this feature, go to any other application and press the Home button three times. This is how the device enters guided access mode.
Now, if you want, you can close certain areas of the interface current application. Let's say, for example, that the game your child will be playing has an omnipresent settings button. You can draw a circle around this button and this part of the application will ignore any clicks.
Other key feature The thing about Guided Access is that it disables the Home button so your child can't accidentally exit the app. To exit the app in Guided Access mode, again Press the Home button three times and enter your password.
One of the additional benefits of Guided Access is that it can serve the best option Do Not Disturb as it mutes notifications and alert sounds.
How to limit ad tracking
If you're going to limit your children's access, you might also want to limit what advertisers can do. In chapter "Settings" click "Confidentiality", then click on "Advertising", squeezing down. On the screen that appears, you will find two options. The first, Limit Ad Tracking, is an indicator to online advertisers that you don't want them to track which advertisements you viewed and were interested in (which they do so that they can show you advertisements that they think may be better suits you).
The second option on this screen is a button to reset your advertising ID, which is meant to be an anonymous tracker that advertisers can use to learn your interests when showing their ads in apps. If you notice that the ads in the app seem to know you too well, you can reset your ID here to reset your information.
How to set up double-clicking the Home button
On the menu "Universal access" V “Settings” -> “General” There's a setting that lets you choose how quickly you need to press the Home button twice or thrice so that the press counts as one action rather than individual presses. Just click on the “Home” subsection and select your preferences – Default, Slow or Very Slow.
How to assign a function when you press the Home button three times
The Triple Press Home Button option now allows you to select one action (Switch Control, VoiceOver, Invert Color, Zoom, Color Tints, or Assistive Touch) or multiple options that will appears in the menu when pressed three times.
Safari
How to Quickly Access Recent Safari Browsing History
Press and hold the Back button in Safari to see a list of your recently visited pages, and press and hold the " New inset"(+) to get the recent list closed tabs. If that's not enough and you need to see your entire browsing history, click the Bookmarks icon (the book to the left of the URL field) and select History.
How to Open New Tabs in the Background in Safari
Safari on Mac makes it easy to open related web pages in a new tab, so you don't have to interrupt what you're reading just because you also want to check out a few related items. You get the same bonus on iOS, although you need to enable it first.

Don't miss Apple news - subscribe to our Telegram channel, as well as
Sometimes you get up from the computer and feel like a lemon. It seemed like I wasn’t doing anything supernatural, but I was tired. My eyes are especially tired. You promise yourself to spend less time on your laptop/iPad, but then you realize that there are a lot of things ahead and in order to get them all done you need to spend even more time on the computer than before... Do you know this feeling?
2 years ago, the settings on my old laptop went wrong and I spent six months working on an incorrectly configured screen. As a result, my vision was greatly affected.
I managed to restore my vision during a retreat at a meditation center, where I did not use any electronic devices in a week. After 7 days of constant meditation and fasting in the mountains, my normal vision returned to me again. And now I clearly see how it improves when I spend time in nature, admiring the beauty of the Earth, and not the screen of a tablet... But I don’t want to exclude my phone, tablet and laptop from my life, out of 24 hours in a day - 10 I spend it staring at the screen: working, reading, looking for ideas for knitting, watching movies or TV series, talking with parents, writing texts, etc.
I try to be in nature as often as possible and do eye exercises. This really helps! That's why when the developers sent us an email telling us about their new app dedicated to vision training, I immediately downloaded it.

It’s not that I was hooked by the design or the exercises themselves - they have been known for a long time, they are available both on the Internet and in various books. In addition, there are grammatical errors in the texts in the application:

But I really liked that the exercises were shown by a cool robot. And doing exercises together with someone (even if this someone is just a robot) is much more fun:

By the way, the palming exercise is very useful if you want to master speed reading. And I also imagine that my favorite book and TV characters are doing the exercises with me - it’ll make you laugh out loud. Give it a try. :)
There is information on how to perform the exercises correctly:

And the most useful thing: in the settings you can turn on notifications so you don’t forget to do these same exercises:


True, a positive mood - The best way restore vision, verified!
I’ll share an exercise that I came up with for our future iPad app with Decafe, “365 ways to catch inspiration, or How to shake yourself up and feel the joy of life” (I hope we’ll finish it by the end of the year):
Eye exercise:
Draw a simple 3 by 3 table. Fill it with words (or desires) that are important to you. Leave the center of the table empty.
Here's what I got, for example:

Every half hour (set a timer on your phone or computer to be sure) take a break from what you are doing and do some eye exercises. To do this, imagine that you are a small dot and are in the center of the table.
You won’t need the drawn table anymore, just remember what words you put in it. You need to work with an imaginary table.
You look up and see your top word (or rather the image that corresponds to it), squint to the right and see another word, look at the lower left corner and...
Is the principle clear? It is important not just to see the word, but to feel it, to connect to the image.
Gradually add other movements: for example, circular ones, trying to see and feel all the words from the table. First clockwise, then counterclockwise. Then add left-right movements, combining two corresponding words, as well as diagonally and crosswise. Come up with your own trajectory for eye movement, combining images into a single whole.
Visualization is also useful for the eyes. :)
Promo code draw:
We have 7 promo codes for the Vision Training app. Share your story - how are you doing with your eyesight, how much time do you spend at the computer, what words did you add to the tablet to exercise your eyes? Authors 3 best comments will receive promotional codes from us, the remaining 4 will be drawn, as usual, using a lottery among all those who answered the question. We are waiting for your comments until October 6, 2013, 23-00 Moscow time.
Winners:
- Natalia
- Kalla
- MIhasin
- Islam
- Vladimir
Codes have been sent by email :)
We are used to looking at screens mobile devices several hours a day. No matter how much display developers boast, this still has a negative impact on our vision. Fortunately, iOS has several features and options that can make working with your iPhone or iPad more comfortable.
This will help some people read text faster, while others won’t need glasses when working with the device. This is necessary not only for people with poor vision; any user will be able to operate their smartphone faster and reduce the number of false clicks.
1. Choose the text size Not all smartphone users have 100% vision. The size of the text on the screen may appear a little large or, conversely, small. To avoid squinting when working with letters and messages, just choose a convenient font size. Go to Settings - Screen and brightness - Text size and set the appropriate size. 2. Make the inscriptions bold You can achieve good text readability without increasing the font size. Bold text is much more visible and contrasts well with the background.
3. Change the scale of the interface This iPhone setup will not only make the inscriptions larger, but also increase the size of the interface elements. After changing the parameter, the icons will become larger, the buttons will become easier to access, the battery charge and signal level will be better visible. Go to Settings - Screen and brightness - View and turn on interface magnification. 4. Make the buttons contrasting The inscriptions at the top of the screen often merge, this design solution does not look the best. To immediately understand where the button ends and where the name of the current menu begins, you can enable button highlighting.
Enable the Button Shapes option along the path Settings - General - Universal Access.
5. Use a screen magnifier Not all iOS users know about the presence of a screen magnifier in the system. It allows you to enlarge part of the screen to gigantic sizes. No matter how small the text is written, anyone can read it.
Go to Settings - General - Universal Access - Magnification and activate the first switch. This function has many parameters that can be configured below. It is worth noting the possibility quick start and disabling the screen magnifier. To do this, go to Settings - General - Universal Access - Keyboard shortcuts and check the Magnify option. Now triple-clicking the Home button enables or disables zoom on the screen.
6. Take care of your eyes at night Night Shift is an option that we recommend turning on for everyone without exception. At night, the display of a smartphone or tablet will change the color temperature of the screen to a warmer one. The white color will turn yellowish, but you will quickly get used to it.
This way, the brain will be better prepared for sleep, especially for those who like to look at mobile device screens in bed. We look for the parameters here: Settings - Screen and brightness - Night Shift. 7. Read the news comfortably If the text size on any website seems small, or you don’t like the background or contrast of the text, you can quickly switch to reading mode. This feature is available in standard Safari browser. Almost any page can be displayed in reading mode.
After loading the site, click on the icon in the left corner of the address bar, and then configure the settings by clicking on the icon on the right.
8. Don’t forget about all the gadget’s capabilities Owners of the 9-inch iPad Pro have one more useful feature. True Tone is similar to Night Shift, but works 24/7. Depending on the external lighting, the image on the screen will be adjusted for the most comfortable work. The iPad is capable of producing different images in daylight and in incandescent light. The mode is turned on along the path Settings - Screen and brightness - True Tone
Turn on some of these parameters and in a few days you will see that your eyes become less tired when working with your favorite gadget, false clicks have decreased and the speed of work has increased. Thanks to re:Store for a useful collection of tips.
 Order 343 mail. Order by Russian post. Consequences of failure to appear in court when summoned
 How to put a password on a folder on a Windows computer without and with programs
 Pluton – Free Bootstrap HTML5 One Page Template
 History of ZX Spectrum: Myths and reality New Spectrum
 Voice assistant Siri from Apple Siri functions on iPhone 6s
 How to roll back to a previous version of iOS?
 Unlock iPad in four days