Create a beautiful WordPress feedback form. WordPress. Feedback form How to set up a feedback form on WordPress
Online form indispensable tool absolutely any site. This is the most important source of communication with your website visitors. Forms allow you to collect feedback, conduct surveys, create email subscriptions, collect customer payments, and much more. If you know programming, you can easily create a form for the site. Otherwise, there are many good plugins that can be easily installed on a website and used to create forms.
stepFORM
stepFORM - WordPress plugin to create forms of any complexity based on a visual designer. It has built-in spam protection, collection of responses to email and CRM, integration with Google Analytics and Yandex.Metrica, cost calculation using formulas, accepting payments via PayPal, Wallet One, Yandex.Money and Yandex.Cash, using the form via the link in social networks and much more.

uCalc
uCalc is a popular WordPress plugin for creating calculation forms of varying degrees of complexity. The plugin is perfect for forms in which it is necessary not only to receive information from site visitors, but also to make automatic calculations using formulas or accept customer payments for the sale of goods or services. The plugin can be connected in a few clicks and does not require programming knowledge. A calculation form is added when editing a page or publication.

Contact Form 7
Contact Form 7 is one of the most popular plugins for creating forms on WordPress. With this plugin you can very flexibly customize the contents of forms and configure sending data by email. Forms include ajax submission, as well as Captcha and Akismet against spam.

WPForms
WPForms allows you to create beautiful forms feedback, subscription forms, payment forms and other forms for your website in minutes. WPForms will look great on all devices (mobile, tablet, laptop and desktop).

Ninja Forms
Ninja Forms helps you create online forms for WordPress in minutes by simply moving form fields using your mouse. For developers, you can use built-in hooks, filters, and custom field templates to do whatever you need at any stage of form creation or submission using Ninja Forms as the foundation.

Form Maker
Form Maker creates responsive forms for WordPress through a simple and intuitive interface. The plugin allows you to create various questionnaires with any fields, options for questions and answers. It only takes a few clicks to create forms and a couple of minutes to customize them with available themes, styles, and display options.

Caldera Form
Caldera Form is a free and powerful plugin for WordPress that creates responsive forms using a simple visual editor. The plugin has many free, convenient add-ons for both beginners and web developers. Antispam, AJAX, notification emails, and database record tracking are enabled by default.

Visual Form Builder
Visual Form Builder is a plugin that allows you to create and manage all kinds of forms for your website in one place. Creating a fully functional contact form takes just a few minutes, and you don't have to write a drop of PHP, CSS or HTML.
This list includes the most popular WordPress plugins for creating online forms. If you use other interesting plugins that are not on this list, write in the comments.
Web forms can be used for a variety of reasons, but their main purpose is to obtain feedback and collect requested information. However, their use goes beyond collecting information, and they are used for registration on the site, applications, and so on.
If your site is on WordPress and you are looking for a feature-rich form builder for creating forms for any purpose, take a look at the plugin Form Maker.
WordPress Form Maker
This is one of the most popular form building plugins in the WordPress.org directory and comes with a user-friendly admin panel, a built-in form builder, and many customization options. At the time of this review, the plugin has over 1.5 million downloads, 90 thousand active installations and an average rating of 4.6 stars.
Description Demo Download
Let's take a closer look at the Form Maker plugin and see what features and functionality are included in it.
The Form Maker plugin can be downloaded either from WordPress directory, or from the official plugin page on Web-Dorado.com. The plugin comes with detailed documentation And demo version for the admin panel and the forms themselves.
Creating a Form
Creating forms with Form Maker is very easy and does not require much time. After installing and activating the plugin, you will find it in the side menu of your Console, where you can create and manage your forms.
Unlike other plugins where you have to create forms from scratch, Form Maker comes with 12 ready-made templates , which can later be edited and customized as desired.
In addition, the plugin allows you to edit and save the form as a copy, which means that the template will not undergo any changes.

Here, for example, is a template for a standard feedback forms. You can drag fields up/down, change order
and move them left or right to create columns in the form:

However, if you want to create your own forms from scratch, just click on the button Add New(Add New) and the plugin will direct you to the form creation page.
First, you will need to come up with a name, choose a theme for the form, and then you can start adding fields. Form Maker has an intuitive form designer, which allows you to add the desired number of fields in forms and view the changes you have made:

There are various field options, which can be added to forms. They are designed for entering text, time and date of sending files, integration with PayPal, Captcha protection, and more.
With available form fields, you can get any information from your visitors. The full list of field options is below:

Each parameter of each field can be configured, which allows you to adjust the properties of the fields according to your needs and see all changes when preview:

Setting up the form
Now let's talk about your form settings. You can give shape great view thanks to affordable design templates. Currently the plugin has 37 form themes, which can be edited using custom CSS.
In addition, the plugin allows you to create your own own themes from scratch.

To customize a form template, you need to go to its parameters (icon with a yellow pencil Edit).
After you uncheck automatic creation layout, you can edit the HTML code, as well as change the position, add in-line design styles, and so on. Click on the appropriate buttons to add the field you need.
Form Options
There is a wide range of form parameters that the Form Maker plugin allows you to customize. For example, general form parameters, parameters Email, payment methods, actions after form submission, JavaScript, MySQL options and conditional fields.
Under general parameters you can find some basic form settings and front-end options. Choose the form theme and where you want to save your data, and select the users who can access the front-end form submission.
In the settings section Email you can find settings for messages sent to users and administrator. Specify your email address, subject, and paste text into your message to the administrator.

IN sending section You can choose what happens when your visitors fill out and submit the form. You can choose from available options such as stay on the form, stop at a specific page or post, redirect them to a specific URL, or add custom text that will be displayed to visitors after submitting the form.
Form Maker also provides PayPal integration. IN payment methods section You can adjust payment settings, such as enabling PayPal, choosing the payment currency, tax rate, etc.
Conditional fields- this is one of the features of the Form Maker plugin. This feature allows you to hide or show form fields depending on the specific modes that you have set.
For example, you can set a conditional field to prompt for the name of the state if the user has selected the United States as their country. This will mean that the state name field will not be visible to other non-US users:

In the submission section you can find all submitted forms. A summary is available for each form analytical data such as the number of entries, number of form views, conversion rate and so on.
This section is also searchable, which means you can search the database for all fields on a given form. In addition, you can edit or delete any content and arrange the submission fields in the order that suits your needs.
The plugin allows you to export materials to CSV or XML-format for viewing data in Microsoft Excel.
Form Maker allows block IP addresses, if you are sent spam through your forms. To do this, you just need to go to the Blocked IPs section, indicate the IP address that you want to block in the appropriate field and click the Add IP button.
You can also block IP addresses from the submit section of the plugin. Blocked IPs can be unblocked at any time.

Add-ons
Form Maker is a feature-rich plugin that comes with a number of add-ons that will allow you to expand technical capabilities your form.
Here full list Form Maker add-ons:
- Import/Export
- Save Progress
- Stripe Integration
- Google PDF Integration
- Mailchimp Integration
- User Registration
- Post Generation
- Conditional Emails
- Dropbox Integration
- Google Drive Integration
- Pushover Integration
- Calculator
Results
Form Maker is an excellent choice if you are looking for an effective tool for creating responsive web forms of any complexity on WordPress. It is well designed and has a good technical support team that is ready to help.If you came to this post looking for feedback for your site, then you are in the right place.
To be more specific, I have compiled a selection of the five best feedback plugins for WordPress. We all know how important it is, especially when you don't want to write your contact information or automate the process of receiving questions from your clients.
I present to your attention the TOP 5 WordPress plugins for creating feedback.
1. WPForms
WPForms is a young WordPress plugin for creating feedback forms.
pros
Used visual editor Drag&Drop, which makes this plugin even more “user-friendly” (easy to use).
The light version does not limit the installation of the plugin on an unlimited number of domains.
The paid version of the plugin includes such functionality as: multi-page forms, email subscription, payment forms, order forms, use of your own field logic, and so on.
Minuses
Although the light version is free, you still need to update the plugin to Pro versions to open new functionality, which was described in “Pros” above.
The main task for WPForms is to make the plugin as convenient as possible for users. Since not everyone is familiar with HTML/CSS in order to directly correct form fields, etc. Therefore, it does not have some of the difficult-to-understand functions that other plugins have.
Gravity Forms is a premium plugin that provides as much functionality as you could possibly want.

pros
Powerful plugin with unlimited functionality.
The plugin comes with premium support, as well as extensive documentation, FAQ and discussion forum.
Minuses
Gravity forms does not have a free version and most likely it will be an expensive product for one site. If you have several websites (multi-site), then cost should not be a problem for you.
Ninja forms is the perfect solution for creating free forms in WordPress. Can also be used to create highly interactive forms.

pros
The plugin is available for free from the official WordPress website. You can install it on an unlimited number of sites.
In addition to free version There is a premium one, which has even more features (such as SMS notifications, Freshbooks, Campaign Monitor and Salesforce).
Excellent community support, detailed documentation, and email support.
Minuses
The main and only disadvantage of this plugin is that if you want to use add-ons for it, they must be purchased, since many of them are distributed on a paid basis.
Pirate is free WordPress plugin written by Themeisle team. Easy to customize and convenient for creating simple shapes.

pros
Absolutely free to download and subsequent updates.
This plugin has all the many functions, for example: CAPTCHA for checking against bots and SMTP, to remove the possibility of the letter ending up in the Spam folder.
Minuses
This plugin is used if you need to create a simple form. If you need to create something more complex, this plugin most likely will not suit you.
Lack of addons (other plugins) that work together.
Fact! This plugin has the most downloads of all form building plugins.

pros
The main advantage is that it is free and can be installed on unlimited amount sites.
Due to its popularity, Contact Form 7 was able to attract many developers, who in turn wrote a large number of add-ons. Many of them are distributed free of charge.
It is a great addition for creating a simple feedback form for your blog.
Minuses
Setting up the form can be a bit difficult for novice users, as the interface is a bit confusing.
Due to its free nature, support for the plugin is minimal. You are getting free updates plugin, but to solve any problem you will need to go to the official WordPress repository forum or the general forum in the hope that someone will help.
Popup forms
Many of the plugins that were described above in this post have the ability to connect forms using shortcodes.
The official documentation of the WordPress site writes that “Shortcode” is a set of functions for creating special elements on the page used in the content of posts or pages.
To get started, take any shortcode and use Popup Maker to create a modal window where you need to add a form.
Essentially, this is all you need to create a modal window with a feedback form.
Conclusion
If you are looking for a plugin that will solve all your desires, then most likely you will not find it, because there will be something wrong with each one. In some places the functionality will not suit you, in others the design will not work.
Each of them needs an upgrade. Most likely you will have to find a developer who will add some functionality for you or correct the site's styles.
Quality has always sold, so I wouldn’t expect extensive functionality from free plugins. Use what you can still afford. As soon as you have the opportunity, update the plugin to the “Pro” version or buy another plugin (maybe you like one better).
Take your time with the purchase, analyze what really suits your needs, and only an informed choice and analysis will allow you to rejoice after a successful purchase.
From the author: Greetings, dear readers. If you needed a feedback form for your WordPress website, then this article is just for you. After reading the article, you will learn how to make a feedback form on WordPress, and do it easily, quickly and efficiently.
So, to solve this problem we will use a feedback form plugin called Contact Form 7. I don’t know why the author chose this name, or rather the serial number in the name, perhaps this is his lucky number
Be that as it may, the Contact Form 7 plugin for WordPress is one of the most popular plugins among plugins for creating a contact form. WordPress communications, so among any others. And indeed, more than a million installations - the figure speaks for itself. The plugin's rating is quite high - 4.5 stars, which eliminates all doubts about its use. In addition, the plugin is already Russified, so you don’t have to translate form fields and messages into Russian.
INSTALLING THE CONTACT FORM 7 PLUGIN FOR WORDPRESS
Well, let's go through the standard installation process. By the way, if you have never installed plugins before, then be sure to read the article “WordPress. Installing plugins”, where you will find everything possible ways installing plugins.
In the site admin panel, go to the Plugins - Add new section and enter the name of the plugin in the search bar - “contact form 7”. The first feedback form plugin found is the option we need.
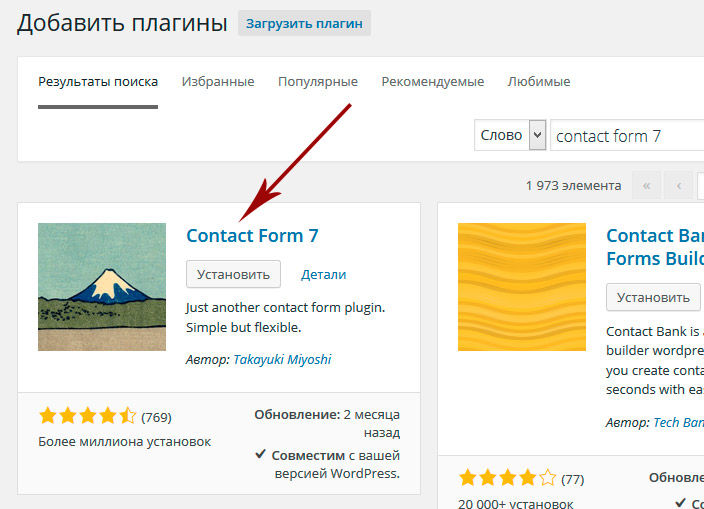
Click the Install button and activate the plugin. After installation, a new Contact Form 7 section with several items will appear in the menu.
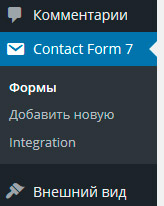
The first Forms item contains a list of current forms on your site and allows you to manage them: edit or delete. The finished form is nothing more than a shortcode (short code) that can be inserted into a post, page, or even widget. This shortcode will be expanded on the page into full form code. The plugin already comes with an example of a feedback form, let's copy its shortcode and paste it, for example, onto the contact page. After that, let’s go to the page and see a ready-made working WordPress feedback form on it.

We can try to fill out the form and send it, the letter will be delivered to email address specified in the administrator profile settings. Please note that the Contact Form 7 plugin doesn't just offer the usual standard contact form. No, the plugin allows you to flexibly configure it. In addition, the form is sent without reloading the page, which is an additional plus. And, of course, validation of form fields, the ability to specify required fields, is another huge plus.
SETTING UP A FEEDBACK FORM FOR WORDPRESS
Well, we used a ready-made form. What about changing it? Is this possible and is it easy to do? The answer is yes to both questions. For example, I want to remove the Subject field from the form, how can I do this? Let's move on to editing the form in the Forms plugin menu and see the following picture.

In order to remove the topic, it is enough to remove the 2 corresponding lines circled in the screenshot. The second line is interesting here: . As you may have guessed, this is nothing more than a shortcode, which is deployed in the form field. In this case, this is a field of type text with the value of the name attribute - your-subject.
If, for example, we are talking about the text area below, then its shortcode looks like this: . Here textarea is the textarea tag of the form and your-message is the name of this element forms. It's simple.
Here you can ask a completely logical question: what to do with other form elements? How to find out which shortcode is responsible for, say, a drop-down list? There is nothing complicated here either. There are buttons above the template field of the editable form, by clicking on which we will add the necessary elements to the form.
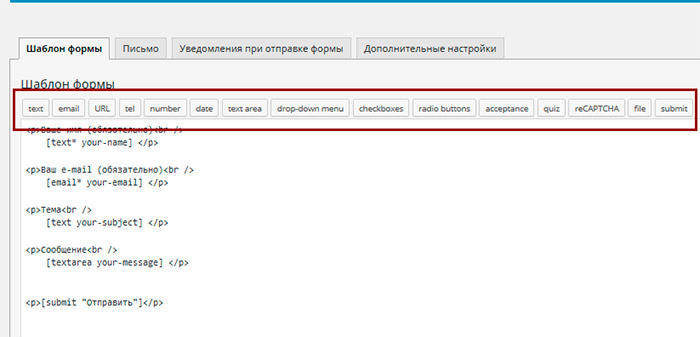
Well, if difficulties still arise, then the documentation for the plugin will help you, where you can find many examples.
So, as an example, let's remove the subject of the message and add a list with options for selecting the subject of the message. To create a drop-down list, click on the drop-down menu button. In the modal window that opens, fill out the form. The key is the Options field, in which we enter options for the drop-down list. Each option with new line. Other form fields should be intuitive. For example, if we check the Field type (Required field) checkbox, we will make the created form field required to be filled out. The Allow multiple selections checkbox allows you to create a list with the ability to select multiple options, and the Insert a blank item as the first option checkbox will create the first empty option in the list. The Id and Class fields speak for themselves - these are fields for adding id and class attributes, which allow you to further design the field.

After creating a list with the required options, a new field will appear in the form template.
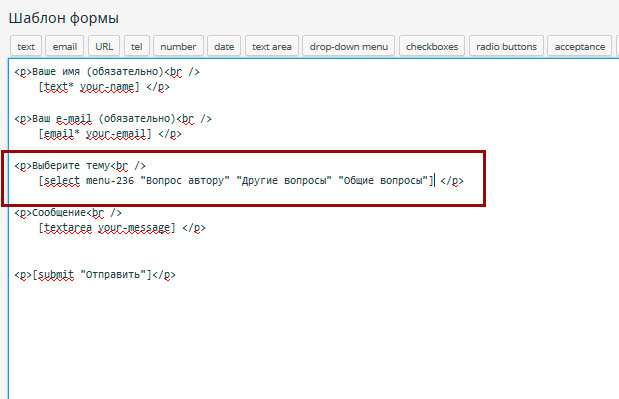
We save the template and try to test the new feedback form. On the site, the form has indeed changed; instead of a topic text field, there is now a drop-down list with options for choosing a topic.

Let's try to fill out and submit the form. The form is sent, but oops... the received email does not have a selected subject option. How so? How to correct this misunderstanding? Don't worry, it's easy to fix. Go to edit the form and switch to the Letter tab.

In this tab, you configure the format of the letter that comes to email from the feedback form. In the screenshot, in the first circled area, we see a list of shortcodes (form field names) that are used in our feedback form. It is the values of these fields that are substituted into the letter template. We see in the second marked area that the Subject field retains the name from the previous field. The Message Body field also contains the same shortcode. Let's replace them with the appropriate tag from the list above - . By the way, here we can also change the recipient’s email, it is written in the To field. We can also change other settings below, they are all signed and clear.
We save the changes and try to resend the letter. Now the feedback form works as expected - an email with the selected subject is sent to your email.
In the next Form Submission Notifications tab, we can configure success or error messages that occur when submitting the form.
SECURING THE FEEDBACK FORM
What about spam, you might ask, is a reasonable question? The author of the plugin took care of this too. In the plugin settings section there is an Integration item.

Here we can set up Google's reCAPTCHA service. To do this, you will need to follow the specified link to the corresponding Google service and then follow the instructions to get the necessary key and integrate the captcha with your site.
For those who do not want to use the reCAPTCHA service, the plugin offers protection from robots in the form of a question/answer field. To add this field in the form template, click on the quiz button and fill out the form in the same way as we did for the drop-down list. Enter the question and answer via vertical line.
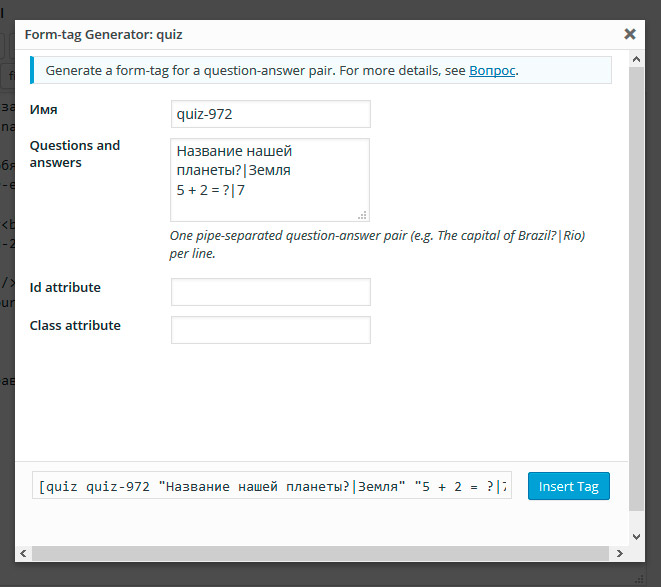
After this, a new field will appear in the feedback form with one of the options for the questions that you typed. Now, for the form to be submitted, you must provide the correct answer to the question.
As you can see, creating a feedback form on WordPress is as easy as shelling pears. The Contact Form 7 plugin allows you to build a form for almost any purpose. This could be a feedback form, an application form, etc. Yes, as I said above, the form can be inserted not only into a post or page, but also into a sidebar widget. To do this, just create a Text widget and insert the shortcode of the desired form into it. Well, new forms, as you guessed, can be created in the Add New plugin menu.
That's all for me. Play around with the Contact Form 7 plugin for WordPress, try creating different forms, believe me, there are still a lot of possibilities to explore. If you have any questions, then, as always, I’m waiting for them in the comments. Good luck!
Good afternoon friends! In this tutorial I will teach you how to create a contact form in WordPress using plugins. The feedback form on WordPress serves ideal solution for those who want to maintain contact with their audience or receive requests by email to order any services. We will learn how to make a pop-up form in a modal window. After reading this article, you will be able to embed the form on your websites yourself. So, let's go.
Why do you need a WordPress contact form?
You may be wondering why I need a feedback form for a WordPress site? Why not just add an email address to the site so people can just write to me?
This is the most common question from beginners who are afraid to add form code to a website without programming knowledge. In fact, you don't need any code at all when creating a contact form in WordPress. In this tutorial, we will create a contact form step by step so that even the most complete beginner can do it.
Below are the 3 main reasons why using a form is better than just adding an email address to the site.
- – spam bots with enviable regularity use their parsers to pick out email addresses where there is a mention of a mail domain and add it to their database in order to then send you unwanted correspondence. On the other hand, when using a feedback form for WordPress, you get rid of the problem of SPAM emails overwhelming your mailbox.
- Completeness of Information – When sending mail, people don't always send all the information you need. With a contact form, you decide which fields you need to make it easier for users to send you an email (name, email, phone number, comment, and more).
- Save time – WordPress contact form will help you save time. In addition to the completeness of the information that you requested from the user and which he will send to you, you can also indicate what awaits in the next step, for example, “Your application will be reviewed within 24 hours” or Watch the video and many other useful things.
Below is an example of the contact form we will create in this tutorial.

Let's start with, gentlemen.
Step 1: Choosing the Best Contact Form Plugin for WordPress
On this step We need to decide on the appropriate form plugin. There are a great variety of them, both free and paid. In this tutorial I will tell you about different plugins so that you have a wide choice. In the first case, the WPForms plugin will be used.
Below are the reasons why WPForms is best plugin Feedback:
- Firstly, this is the most beginner-friendly plugin. By simply dragging and dropping the required blocks, you can create a contact form in a few clicks.
- WPForms Lite is completely free.
- When you are ready for more powerful functionality and if it is really important to you, then you can upgrade to the Pro version.
Great, if these reasons turned out to be sufficient and I convinced you, then we move forward.
Step 2: Install the WordPress Contact Form Plugin
For this tutorial we are using the Lite version because it is free and easy to use. You can install it by logging into the blog and going to Plugins - Add New.

In the search bar, type the name of our plugin and click Install now.
After installing the plugin, make sure you activate it. This is shown here:

Step 3: Create a Contact Form in WordPress
So, after successfully completing the plugin activation, it's time to create our feedback form. To do this, in the blog admin panel, click on the WPForms Menu tab and go to Add New.

This will allow you to open the Wpforms designer, where by simply dragging and dropping the necessary blocks you can create a WordPress feedback contact form. In free Lite versions Two pre-built templates are available (blank and simple form). You can use them together to create the one you need and is convenient for you. In this example, we have chosen the second option for you, i.e. a simple contact form. We will add a name, email and a text field to it.

You can click on each field to edit it. You can also drag and reorder form fields using your mouse.
If you want to add a new field, simply select the one you need from the list on the left and drag it to the work area.

When everything is done, just click the Save button.
Step 4: Set up Notifications and Confirmations
Once you have successfully created a contact form in WordPress, it is very important to configure the notification and confirmation forms correctly.
The confirmation form is what your users see when they submit a form request to you. This could be a thank you message or you could redirect them to another special page.
Notification forms are the messages you receive when you receive a new request or email from your WordPress site.
You can customize both of these fields by going to Settings inside the WPForms forum builder plugin.
By default, we did not set it to touch and left the Confirmation Form field with the message “Thank you for your request” as is. However, you have the right to change it to other text or redirect the user to a separate page.

The best thing about this plugin is that the default settings are perfect for beginners. They don't have to figure out what to do or what to change. Everything is very intuitive and simple. When you go to the notification settings, all fields will be pre-filled dynamically.

Notifications are sent by default to the email you specified in the settings. If you want to change the recipient for sending notifications, you can also easily change it. If you want to indicate several email addresses (specified by commas), then please, cards in hand, as they say :)
The Email Subject field will be automatically filled in with your form name. The name field will be taken from the username (your name). When you respond to a letter, it will go to the mail with the name of the user who filled out the contact form.
Step 5: Adding a WordPress Contact Form to the Page
At this step, when you have built and configured the feedback form, you need to create a separate “Contacts” page for it, where you can place it. Either you create a new one or edit an existing page where you can add it.
We'll use a simple shortcode to embed the form on the page. Simply click on the “Add form” button and select the name of your form to insert it onto the page.
Great. Now save the page and open the preview to see the changes.
This is what the form will roughly look like: simple WordPress page:

If you just want to add a form to a page, then congratulations. All steps have been completed successfully. If you want to add it as a widget to the sidebar, then continue below.
Step 6: Adding a WordPress Contact Form to the Sidebar
The WPForms plugin comes with a built-in contact form widget that you can add to your sidebar or any other area of your site (such as the footer).
To do this we need to go to the section " Appearance» (Appearance)-> Widgets (Widgets). There you will see a pre-installed form plugin widget on the left side. We just take it and set the display order in the desired area in the sidebar using regular drag and drop.

The next step is to specify the name of the widget and save. Go to the site and see the result.
This completes the review of our WPForms feedback form plugin. But, especially for you, I have prepared another review of one free plugin, with which we can make a pop-up feedback form and all the same features as in the previous one. It's called Contact Form 7. It's really very powerful and its trump card is that it's completely FREE!
It can also be made adaptive, that is, the feedback form will adapt to the screen size of your device.
So, just in case, so you know that they are there.
How to make a contact feedback form using Contact Form 7
We continue to understand the issue of creating forms for accepting applications from your website. We have another WordPress contact form plugin ahead called Contact Form 7. Let's install it on our blog and activate it as we know how to do.

It is already installed on my website, not on this blog. The procedure is standard. Now we need to go to the blog admin panel and create a new form that will collect applications and other useful information. Go to the section “Contact Form 7” -> Add new.

Great! Now let's give it an appropriate name, in my case there are a lot of these contact forms. Let’s choose one, for example “Website promotion order form”

I'll briefly tell you what we need here. First of all, we need to decide how many form fields we want to make. I’ll say right away that there is no need to create 100,500 fields and it’s pointless, for the simple reason that people will close your site and not leave a request. They need to make this step easier. That is, if you think about it, what we need from a person is:
- His name to address him (personal address)
- Mail address (feedback, where to send him an offer)
- Phone number to call immediately (if this happens quickly, then he will become your client anyway)
- The actual “Submit” button
This is the basic data, you can already find out others during correspondence or telephone conversation. Logical? I think yes. Let's move on.
Creating contact form fields in the Contact Form 7 plugin
So, we have decided on the number of fields, now we need to create these fields. The following tabs are available to us:
- Text (Any text field, such as "Name", "Ask a question", or any other title that you will collect through this field)
- Email (the purpose here is for the user to enter )
- URL (the site address will be entered in this field, other values are not acceptable and an error will be displayed)
- Tel (field with phone number for our feedback form on WordPress, numeric values are allowed, the text will give an error)
- Number (Numerical range of values, can be applied, for example, to the price: “how much are you willing to pay for the site? From 23,000 to 120,000 rubles”)
- Date (Indicate the date, from what date to what date. Example: “Reservation of a car from 04/13/2016 to 04/25/2016”)
- Text Area (Text area, here you can enter text as a comment)
- Drop-Down Menu. Implemented on my blog, you can see it. At the end of each article, I suggest users to create either a simple website or an online store. This is exactly the functionality this option provides.
- Checkboxes (multiple choice, for example: Website + Logo creation + promotion + contextual advertising)
- Radio buttons (Selecting one item, for example: “You order or contextual advertising or targeted")
- Acceptance (Accept the terms of the agreement, i.e. user information, like a public offer)
- Quiz (Quiz is a series of short questions that can also be inserted into the contact form).
- reCaptcha (Confirmation that you are not a robot and will not spam.) Good protection from SPAM. Note: this option works if you have connected the Really Simple Captcha plugin.
- File (If you want to allow users to upload a file to you, for example: “Attach technical specifications for website development”).
- Submit (Send data by email)
So, we have decided on the fields, you also know the meaning of each. Let's get started building our contact form in WordPress.
In the example below I used 2 fields: Name, Email. Accordingly, you will need these tabs:

By clicking on the text tab (Text) we get to the dialog box:

Here we need to click on the Field Type – Required checkbox. This is done so that if the user does not enter a name in it, then he will not be able to send you an application; there will be a sending error, indicating that not all fields are filled out correctly.
You will then see a shortcode for inserting this field and next to it a blue “Insert Tag” button. This will add one new contact form field.
So that you don't get confused, I highlighted it with style. Code below:
< div class = "col-md-4" > < label class = "sr-only" >Full Name< / label >[ text* text - 658 class : form - control placeholder "Your name" ] !}< / div > |
And here is the screen:

We perform a similar operation for the “Email” field. We click on the corresponding tab and get into this dialog box.

It’s absolutely no different from the previous one, we’re just repeating our actions. My email field also has a style. I provide the code below:
< div class = "col-md-4" > < label class = "sr-only" >Full Email< / label >[ email* email - 447 class : form - control placeholder "Your Email" ] !}< / div > |
And here is the screen:

And finally, the “Submit” button. She's all in my styles.
< div class = "col-md-4" >[ submit class : btn - flat class : col - xs - 12 "Order" ]< / div > < / div > |
Important Note: Dear friends, in this example I am using responsive styles to create a contact form in WordPress, i.e. it can take forms of any screen size.

You will see the button in the upper right corner. You definitely won't miss it. 🙂
We have done some of the work, now we are moving on to the next stage.
Setting up an email address for receiving applications
At this step we need to make some settings so that the letters are sent to us on our Mailbox. I will tell you how to achieve this below.
We need to click on large tab"Letter". It will be second after the Form Template.
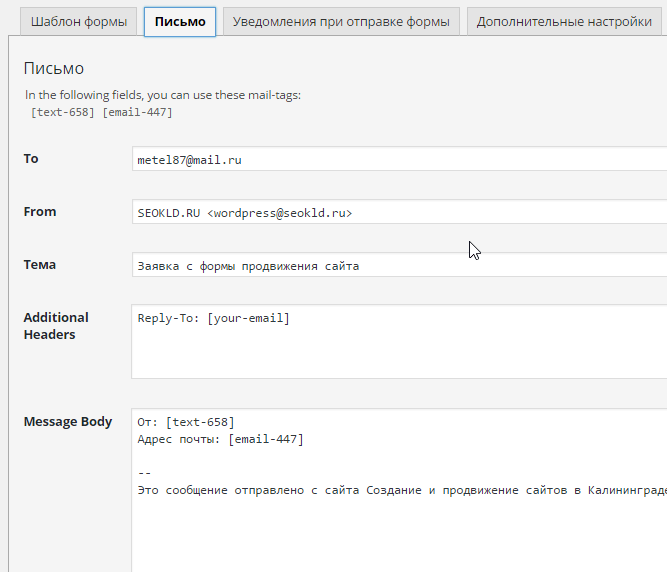
The first thing you will see is your tags that you added, we need to insert them into the body of the letter, they will substitute the data that the user enters from the form. I think I explained it clearly.
Now for the fields:
- To (Where the application will be sent, in my case, this is my email address, you can specify several addresses where to send applications)
- From (Field From, i.e. the value will be substituted that the application comes from my studio website)
- Subject (Serves to determine which form the application comes from, in our case it is an application from the site promotion form).
- Additional Headers (Additional headers, we do not touch them, they are needed for the correct submission of the form)
- Message Body (Message body, here you indicate from whom the letter came and from what address, for example: “From: Ivan” “Mail address: vasya@mail. ru »)
- File Attachments (Attachments to the file, do not touch)
Now we need to configure notifications about the successful or unsuccessful sending of an email from the WordPress contact form.
These will be messages that will be shown to the user in response to his actions with the form. By default they go to English language. I have translated into Russian the most necessary things for you. There will be more than enough of them, and if not, then Google translator will help you. So let's get started.

- When sending a message successfully: “Your message was sent successfully. Thank you."
- If a message is sent incorrectly from the form: “An error occurred while sending the message. Please try again later or contact the site administrator."
- Filling error: “Filling errors. Please check all fields and submit again."
- The sent data is identified as spam: “Error sending message. Please try again later or contact the site administrator."
- Some conditions must be accepted: “Please accept the conditions to continue.”
- Some fields must be filled in: “Please fill out a required field.”
- The length of characters in the field has been exceeded: “Too much data has been specified.”
- Insufficient length of characters in the field: “Too little data specified.”
- Invalid date format: "The date format is incorrect."
- Early date at minimum limit: “The date specified is too early.”
- Late date at maximum limit: “The date specified is too late.”
- File download failed: "The file could not be downloaded."
- Unallowed file type: "This file type is not allowed."
- Loading too large file: "This file is too big."
- The file upload failed due to a PHP error: "File upload failed. An error has occurred."
- The number format entered by the sender is incorrect: "The number format is incorrect."
- Number is less than the minimum limit: “This number is too small.”
- Number greater than maximum limit: “This number is too high.”
- The sender did not enter a correct answer to the question: “You entered an incorrect answer.”
- The e-mail address entered by the sender is incorrect: “Invalid e-mail.”
- The URL entered by the sender is incorrect: "Invalid URL."
- The phone number entered by the sender is incorrect: “Invalid phone number.”

Very good. We are done with setting up the form, now we need to insert it into the site. To do this, using already known technology, let’s go to an existing page or create a new one. In my example, I will show you an example of an existing form on a page on a WordPress site.
Since our form collects applications for website promotion, let’s go to a similar page.
To insert our contact form, we need to copy the shortcode assigned to it by the plugin. It is available under your form name.

We copy and paste into our page, after going to text editor(not visual). Shown in the screenshot below:

Let's save our page and see what we end up with in the browser:

Super! Now let's try sending the form without filling anything in. And this is what we will see.

A form submission error occurred because the user did not provide the required data in the fields. Now let's enter the correct data and see what we get in this case. 
Click submit and this is what our form says:

Now let's see what our application looks like. They come to my email. Let's check the delivery:
Let's go inside to make sure the encoding and all the data are correct.

Everything is alright. The form works fine and submits data. Now we can collect applications that will come to you when you start, if we are talking about regional promotion.
So, we told you how to make a contact form in WordPress on a website page. Now I'll tell you how to do it pop-up adaptive feedback form using our Contact form 7 plugin.
Making a pop-up responsive contact feedback form in WordPress
In order for our form to become adaptive, i.e. “fluid”, we need to connect another plugin, or rather its addition to Contact Form 7 - it’s called Bootstrap Contact Form 7. We install and simply activate and that’s it - it works. You don't need to make any settings with it. Set it and forget it.

In the next step, I'll tell you what changes we need to make to make our form pop-up and responsive. I made a similar implementation on home page your studio website. To do this, let’s go to the index.php template, which is located in the “Appearance - Editor” section. We will only work with code, manually.
Our popup form will appear in a modal dialog like this:

To achieve this result you will need the following code, I will present it in full in a snippet:
Order
< a href = "#" class = "btn btn-primary btn-flat" data - toggle = "modal" data - target = "#modal2" >Order< / a > < ! -- Modal -- > < div class = "modal contact-modal fade" tabindex = "-1" id = "modal2" role = "dialog" aria - labelledby = "myModalLabel" aria - hidden = "true" > < div class = "modal-dialog" > < div class = "modal-content" > < div class = "modal-header" > < button type = "button" class = "close" data - dismiss = "modal" > < span aria - hidden = "true" >×< / span > < span class = "sr-only" >Close< / span > < / button > < h4 class = "modal-title black" id = "myModalLabel" >Submit your application< / h4 > < / div > |
 Order 343 mail. Order by Russian post. Consequences of failure to appear in court when summoned
 How to put a password on a folder on a Windows computer without and with programs
 Pluton – Free Bootstrap HTML5 One Page Template
 History of ZX Spectrum: Myths and reality New Spectrum
 Voice assistant Siri from Apple Siri functions on iPhone 6s
 How to roll back to a previous version of iOS?
 Unlock iPad in four days