Deleting the temp folder in windows 7. How to delete temporary Temp files. Third-party cleaning utilities
The temp folder in Windows 7, 8 and XP stores temporary and intermediate elements that are created by programs and the OS. Most of these elements are files with the extension (.tmp). At their core, they are trash.
Sometimes these files are not deleted after finishing working with programs. Over time, objects accumulate and the temp folder takes up a lot of space. Can reach several tens of GB.
Is it possible to delete the temp folder - the answer is no. The directory itself does not need to be demolished, but it must be cleared to free up disk space.
Where is the temp folder in windows – this directory is located in several places, namely:
- At the root of the system drive (usually drive C).
- In the windows folder itself.
- On the system partition C:\Users\account name\AppData\Local\Temp
- In XP - C:\Documents and Settings\account name\Local Settings\Temp
Note: the account name is the user name that is set when installing windows.
Note: Turn on show hidden folders to see the AppData directory.
Now you know what the temp folder is, where it is located, and what is stored in it. It's time to look at cleansing methods.
Cleaning the temp folder using standard methods
1. The easiest and fastest method to clear the temp folder is to go to it, press CTRL + A (selecting all objects), click on the DEL key and confirm deletion. However, not all elements can be destroyed.
Close all programs and repeat the procedure. If you see the message again, restart your PC and go through the steps again.
2. Right-click on the C drive (you may have a different one) and select “properties”. Then click the "disk cleanup" button.

In the open window, it is possible to clean various temporary files, including those from the temp folder. From here you can even safely delete the windows.old folder if there is one.
Check the entire list and click OK. In the confirmation window, click “delete files”.

3. The method is that you delete files via the command line. For example, we will clean temp in the windows directory. Run cmd as administrator and write:
DEL /F /S /Q /A "c:\windows\temp\*"
Press Enter and wait until the end of the procedure.

Of course, no one will clean it like this, then I suggest creating a txt file and giving it the bat extension. Write in the body file lines similar to the command above, only with your own paths and save it on your desktop, then double-click to run it. For myself I did this:
DEL /F /S /Q /A "C:\windows\Temp\*" DEL /F /S /Q /A "C:\Temp\*"
DEL /F /S /Q /A "C:\Users\Alex\AppData\Local\Temp\*"
You can copy and correct these lines. Thus, in a few seconds you can clear the temp folder on Windows 7, 8 and XP in several places at once.
Cleaning using programs
The programs are worth using because they are not limited to just cleaning and removing unnecessary items. With their help, PC operation is accelerated and optimized. Here is a list of utilities that will help you clean the registry and delete the contents of the temp folder:
- CCleaner
- System Cleaner
- SBMAV Disk Cleaner
- And others
For example, let's take a closer look at the CCleaner utility:
1. download and install CCleaner.
2. Go to the “cleaning” section, look at the “windows” and “applications” tabs. Here you need to tick the boxes to suit your individual needs. If you check and clear all the items, this will not interfere with the operation of the system, but inconveniences may arise, for example, the absence of entered addresses or saved passwords in the browser, etc.
3. To clean the temp folder, I selected the items that you will see in the screenshot below. Next, I clicked the “analysis” button to collect information on the objects to be deleted.
4. After assessing the volume of data to be destroyed, clicked the “clean” button and OK.

5. The utility reported cleaning, and I closed it.
So we figured out what the temp folder is in Windows 7, 8, XP, and how to clean it. Remove its contents regularly and do not let it become too large. Use all possible cleaning methods. The most effective method is to use a bat file, but do not neglect programs like CCleaner.
nastrojcomp.ru
What is the Temp folder for in windows?

In the operating system windows 7, windows 8 there are folders for storing temporary files of games and programs - Temp. When you correctly turn off the program, the temporary files are deleted, but if the work is stopped incorrectly (the lights are turned off, etc.), then the files remain on the computer and will have to be deleted manually.
Is it possible to delete the Temp folder? No you can not! You can delete all the files located in it, but not the folder itself, otherwise the programs will not be able to install.
Temp folder
In order to clean the Temp folder in Windows 7 and Windows 8, you need to find it. To do this, open “Computer”, then “Local drive C” - “windows” - “Temp”. In this folder, select all the files and delete them.

Clearing the Temp folder
If a message appears stating that a file cannot be deleted, skip it. This means that it was launched by the program and if you shut down correctly, it will delete itself.
This is how we clean the Temp folder in Windows 7, 8.
AppData folder
The second folder for storing temporary files is AppData Local Temp. Since it is hidden, you first need to enable the display of hidden files. To do this, go to Control Panel - Appearance and Personalization - Folder Options - go to the “View” tab. Check the box at the very bottom “Show hidden files, folders and drives”. Click OK.
Only now we can find the AppData folder. You need to follow the following path: “Computer” - “Local Disk C” - Users - Username (Admin, Petya, Vasya, etc.) - AppData - Local - Temp.

AppData folder
Select all the files in the Temp folder and delete them. If something cannot be deleted, then we simply skip these files.
There are a few more Temp folders you can find:
- Computer - Local disk - Users - UpdatusUser - Temp
- Computer - Local Disk - Users - All Users - Temp
- Computer - Local disk - Users - Default - Temp
Video on how to find the Temp folder and delete all files.
xn--e1adkpj5f.xn--p1ai
Cleaning the Temp folder
Hello dear visitors of the Spectr-rv.ru blog. Today, with novice users, we will look at some issues that arise when there is not enough space on the computer’s hard drive. One of these issues is cleaning the Temp folder.
Despite the large size of the hard drives of modern computers, the amount of free space on them is steadily decreasing during the operation of the computer. One fine day you are surprised to notice that there is almost no free space left on your hard drive, which means it’s time to clean it up.
Many users have difficulty choosing files that can be safely deleted from the disk. First of all, this concerns the Temp folder, which is too large and can negatively affect system performance. Let's figure out how to clean the Temp folder, and first let's find out its purpose.
The purpose of the Temp folder and the need to clean it
What is the Temp folder for, what information does it hide? The Temp folder stores temporary files created both by the Windows system itself and by other running applications. These files are the intermediate results of programs that they use during operation. When programs are closed, this information is usually deleted. However, this is not always done.
In general, you can and should clean the Temp folder. To do this, it is best to use the Disk Cleanup program available in Windows.
Cleaning the Temp folder using built-in Windows 7 tools
To start the Disk Cleanup program, click the Start button and follow the chain: All Programs - Accessories - System Tools - Disk Cleanup. In the window that opens, select the disk to be cleaned. (Select the system drive on which the Temp folder is located). Click OK.
After this, the process of estimating the amount of space on the selected disk that can be freed will begin.
In the “Disk Cleanup (selected disk)” window that appears, in the “Delete the following files” field, check the boxes in the line of files that you want to delete.
 Click the "OK" button, after which the program will begin the deletion operation.
To decide whether the specified files need to be deleted or not, select an unclear item and read its description in the “Description” area. To clean the Temp folder, select “Temporary files”. As a result, the specified folder will be cleaned, which is what we needed.
You can also clear the Temp folder manually. It should be taken into account that, for example, in Windows 7 there are several such folders. All of them are located on the system disk. The task is made easier by the fact that the vast majority of temporary files accumulate in the first two folders located at:
C:\Users\Username\AppData\Local\Temp
That's all I wanted to tell you about the Temp folder. I hope it is now clearer to you what this folder is for and how to clean the Temp folder in Windows 7. Good luck!
P.S. Speccy will help you get the most detailed information about your computer and the operating system you are using
spectr-rv.ru
Folder Temp | Computer for dummies
During operation, the Windows operating system and third-party software create temporary files, and the Temp folder is a storage for them. Despite the fact that they should be deleted automatically, sometimes this process cannot be completed, for example, when you suddenly turn off the PC (using the power button), and the Temp folder becomes clogged, this can lead to dire consequences. That is why it is extremely important to monitor its size and, if necessary, completely clean it manually. 
windows Temp
The Windows 7 operating system has five Temp folders, two of which are the most used: windows temp and appdata temp. We will talk about them further.
The first important Temp folder is located on the system drive and is located directly in the windows folder, along with important system files. It is this that needs to be cleaned first, as it is most susceptible to clogging. For some users, this Temp folder weighs several tens of gigabytes!
We clean it manually, it’s very easy to do:
- Go to the Temp folder, which is located in the windows directory.
- Select all the files located there.
- We delete them using the combination Shift + DEL.
Some files will be impossible to delete, since they are currently in use, we just skip deleting them and that’s it.
Appdata Temp
The Appdata Temp folder is located in the system files of each individual user; it is also often used by programs and various Windows services.
The path to it should be like this: system drive\Users\Username\AppData\Local\Temp, do not forget about cleaning it, it is done in the same way as cleaning the windows temp folder. Attention, the AppData folder is hidden by default, to see it we enable the “show hidden files, folders and drives” function, how to do this was described in the article “System Volume Information Folder”.
Deleting all temporary files
To delete all temporary files you need to do the following:

This way we get rid of all temporary files in all Temp folders, it is advisable to repeat the procedure at least once a month, they can greatly slow down the work of not only individual programs, but also the entire operating system.
It is very important to clean the operating system in a timely manner and not only delete temporary files from the Temp folders, but also those that you simply no longer need (watched movies, unnecessary images, and so on). In the article http://dontfear.ru/kak-pochistit-kompyuter-ccleaner/ we examined in detail how using ccleaner you can clean your PC and speed up its operation.
dontfear.ru
Temp folder - what is it? Is it possible to delete the Temp folder?
Not all users, of course, but many, if they do not encounter the Temp folder in everyday work, have at least heard and know that it exists in Windows systems. Why the Temp folder is needed, what it is, what functions it performs, and whether it can be deleted will now be discussed. Let's take Windows 7 as an example, although in this case there is no fundamental difference in which system to take as the basis.
Temp folder: what is it and why is it needed?
So, you can understand the purpose of this directory using the usual interpretation of the abbreviation Temp from the word temporary. The basic interpretation, in simple terms, means “a directory for storing temporary files.”

If anyone doesn’t know, in the process of its operation the operating system itself or the programs installed into it for their own needs create exactly the temporary files necessary for correct installation or operation. The files in the Temp folder, as a rule, have the extension .tmp, some of them are deleted automatically, for example, upon completion of some process, some remain in the system, and if the process associated with them is in the active stage, say, running in the background, then It’s simply not possible to get rid of such files. So it turns out that the contents of this directory, in fact, are the most common computer garbage, which can and should be gotten rid of, but do this without harm to the system.
Where is the Temp folder in Windows OS?
Now a few words about where exactly you can find the temporary files directory. The fact is that the Temp folder in windows is not the only one. Many will be surprised, they say, why have several folders in the system. Here it is worth paying attention to the use of multiplayer mode. The directory in which temporary files are stored is created for each specific user, not counting the main directory in the system itself.

Thus, as a rule, the Temp folder in Windows 7 can be located either in the root of the system partition (in most cases this is drive “C”), or in the system directory (windows), or in the Local directory located in the AppData folder of the user partition (Users \"Username"). In Windows XP, the Local folder is called Local Settings.

In principle, in order not to rummage through the same “Explorer” for a long time, you can use the built-in search system, in which the string %Temp% is set as a criterion. This is done in order to find all existing directories that may be hidden. If the search is carried out manually, you should enable the display of hidden objects in the “View” menu of the standard “Explorer” or any other file manager. By the way, some temporary files may also have this attribute.
How to clean the Temp folder using the simplest method?
If we talk about whether it is possible to delete the Temp folder from any location, let’s make a reservation right away: it is under no circumstances recommended to do this. Another thing is to start cleaning its contents. There are several ways to do this.

In the simplest version, you should go into it, select all the files, and then delete. How to make the selection is up to everyone to decide for themselves. But, as you know, it is best to use the combination Ctrl + A, rather than marking with the cursor, and even more so by executing the corresponding commands from different main or additional menus.
But there may be a small problem here. The fact is that some files may be involved in some process, and it will not be possible to simply delete them. First, you will need to shut down the active services that use them, but the easiest way is to not have to figure out which process is blocking the files, just restart the computer and try to delete again. But this method does not always work.
Disk Cleanup Tool
One of the most effective methods is disk cleanup. It is the “native” tool of the OS that allows you to delete temporary files without damaging the system or currently running programs, applications and services.

To do this, use the disk properties menu, where you need to click on the cleanup button and select the items to be deleted. Is it possible to delete the Temp folder this way? No. As such, the directory remains on the disk, but its contents are completely cleared.
Cleaning via the command line
You can also use the command line to clean out the temporary files directory, but typing long commands for each partition seems impractical.
The easiest way is to create an executable file with the .bat extension (for this you can use a regular Notepad and write the following commands in it:
DEL /F /S /Q /A "C:\windows\Temp\*"
DEL /F /S /Q /A "C:\Temp\*"
DEL /F /S /Q /A "C:\Users\Name\AppData\Local\Temp\*"
Name - user name. This method of launching a BAT file allows you to clean all the folders that are present on the system without much effort. As practice shows, it is best to save such a file directly on the desktop in order to always have it at hand and, if something happens, perform this operation within just a couple of minutes.
Using third party utilities
Now a few more words about how the Temp folder is cleared. What it is is probably already a little clear. Let's see how to get rid of its contents using special programs, usually called optimizers.
Any such package has a special module for searching and deleting temporary files, and it makes absolutely no difference where they are located. And, as a rule, it is involved in cleaning and optimizing the system by default, although if you have the necessary knowledge, you can make your own settings. Let us explain using the simplest CCleaner utility as an example.

Here in the cleaning section you need to pay attention to the tabs located on the right side (Windows and Applications). In principle, for deep cleaning, you can select all items, including not only temporary files, but also memory dumps, clipboard, system message history, etc. In fact, all this information can also be classified as temporary objects, or, more simply put, as ordinary computer garbage. Everything else is simple. We activate the analysis process, and after issuing the results, we confirm the deletion of files using the appropriate button. As you can see, nothing complicated. By the way, it is the use of such programs that allows for the most complete and safe cleaning.
Conclusion
Here, in fact, is a brief summary of everything on the topic “Temp folder: what is it and how to clean it.” Naturally, in this case, means of optimizing directories of this type themselves using environment variable settings were not considered. But, I think, the average user by and large does not need this.
As for deleting these directories, as is already clear, this is not worth doing, although some users delete them without a twinge of conscience. But here, as they say, it’s a double-edged sword: for some, the system will automatically create a directory when rebooting, while for others it will crash altogether. So it’s better not to take risks, but to use either standard or third-party cleaning products. It will be much safer this way.
Is it possible to delete the temp folder? I, too, once asked this question, I thought, why do I need it at all - is this a folder on the computer? Every week on the computer, disk space (C:) disappeared somewhere. And what do you think? The temp folder was to blame for everything. It became more and more, and there was less and less free memory.
Later I found out that this is just a temporary folder, and there are no important files for the computer in it, it can be deleted without harm to the system. I would even say it is necessary, there is not one temp folder on the computer, but several, and they all take up memory. Now I’ll tell you in detail and show you what this folder is used for in the system, and how to delete it correctly.
Why do you need a temp folder on your computer?
Programs are unpacked into the temp folder for further installation on the computer. Almost all programs are packed (compressed) to reduce their size; when you run the program installer, the files are unpacked for further installation. Simply put, it stores everything that is no longer needed, just garbage. This means you can safely delete the TEMP folder.
How to delete the temp folder correctly?
We delete not the folder itself, but its contents - this can be done manually, it is usually located in these places:
- C:\Windows\Temp
- C:\Users\Username\AppData\Local\Temp
- C:\Users\All Users\TEMP
- C:\Users\All Users\TEMP
- C:\Users\Default\AppData\Local\Temp
Just one important note, if you are still using XP, then in this operating system there is no Users folder, there is no Document and Settings for it, but otherwise everything is absolutely the same.
In rare cases, programs themselves create such a folder, and we do not know its location, but Windows has built-in garbage removal tools, including cleaning the temp folder. I already had an article about complete garbage removal; using this method I deleted 20 gigabytes of junk, including all temp folders scattered throughout the computer.
In the article about extreme cleaning everything is already written about deleting the temp folder, but in short, you need to do the following:
- Go to the properties of drive C (right button->Property)
- Press the “Disk Cleanup” button (the system will think a little)
- The “Delete” button will complete the matter
Video on how to move the temp folder
The Temp system folder stores temporary files for applications and the operating system itself (Temp is an abbreviation for Temporary, which translates as “temporary”). Intermediate files and document fragments created during the operation of programs and the OS are placed here. As a rule, they are all deleted after the completion of certain operations or after a certain period of time. But in some cases, unnecessary components remain in the Temp folder forever, accumulating and leading to its strong growth and, as a result, system clogging.
There are several ways to clean out the Temp folder.
The easiest way to free up the Temp folder is to manually delete its contents, as if they were regular user files. Select all files (Ctrl+A), and then press Shift+Del (the last key combination deletes the files completely, “past the trash”). If some files are currently in use by the system, they cannot be deleted and a corresponding message will appear on the screen. In this case, simply click “Skip”, after checking the “Perform this action for all current objects” checkbox. If files in the Temp folder can be deleted manually without fear of disrupting the system, then the folder itself should not be touched.
Using the Disk Cleanup system utility
Windows has built-in disk cleaners, including temporary files. Let’s find the standard “Disk Cleanup” utility through the search bar of the “Start” menu and run it. Select drive C from the list or any other one if the OS is installed on it. The program will analyze the local disk and determine the amount of space that can be freed. Here we are primarily interested in the “Temporary files” item, since the contents of the Temp folder are included here. To remove them, check the box in the right place and click the “OK” button. After the operation is completed, check the size of the Temp folder, or the amount of free disk space - there will be more free disk space.
CCleaner and other utilities
There are many specialized utilities for optimizing Windows performance. Most of them have the necessary functionality for cleaning the system partition. For example, the free CCleaner application does an excellent job of this function. We launch it, go to the “Cleaning” section, put the necessary checkboxes in the left column and click the “Analysis” button. Next, we start cleaning with the appropriate button. So, we figured out whether it is possible to delete the contents of the Temp folder and how this can be done. It is recommended to repeat the system cleaning procedure several times a month. But "cleaning" Windows is not limited to just cleaning. We also don’t forget about the antivirus, the relevance of system updates and other important software.
Temporary files inevitably accumulate in the operating system, which generally do not affect its stability and performance. The vast majority of them are located in two Temp folders, which over time can begin to weigh several gigabytes. Therefore, users who want to clean up their hard drive have a question: is it possible to delete these folders?
Various applications and the operating system itself create temporary files for the correct operation of software and internal processes. Most of them are stored in Temp folders, which are located at specific addresses. Such folders are not cleaned on their own, so almost all files that end up there remain, despite the fact that they may never be useful again.
Over time, quite a lot of them can accumulate, and the size on the hard drive will decrease, as it will be occupied by these files as well. When faced with the need to free up space on an HDD or SSD, users begin to wonder whether it is possible to delete a folder with temporary files.
You cannot delete Temp folders that are system folders! This may interfere with the performance of programs and Windows. However, you can clear them to free up hard drive space.
Method 1: CCleaner
You can simplify the Windows cleaning process by using third-party software. Applications themselves find and clean both temporary folders at once. The well-known CCleaner program allows you to free up space on your hard drive without much effort, including by cleaning Temp folders.

Instead of CCleaner, you can use similar software installed on your PC and equipped with the function of deleting temporary files. If you don't trust third-party software or simply don't want to install uninstall apps, you can use the other methods.
Method 2: Disk Cleanup
Windows has a built-in disk cleanup utility. Among the components and places that it cleans are temporary files.

Method 3: Manual removal
You can always clear the contents of temporary folders manually. To do this, just go to their location, select all the files and delete them as usual.

In one of our articles, we already talked about where the 2 Temp folders are located in modern versions of Windows. From 7 and above the path is the same for them.
Once again we want to draw your attention - do not delete entire folders! Go into them and clear the contents, leaving the folders themselves empty.
We looked at the main ways to clean up Temp folders in Windows. For users who optimize their PC with software, it will be more convenient to use Methods 1 and 2. For all those who do not use such utilities, but simply want to free up space on the drive, Method 3 will be suitable. There is no point in deleting these files constantly, since most often they weigh little and do not take up PC resources. It is enough to do this only when the space on the system disk is running out due to Temp.
Many people face the problem of running out of free space on their hard drive. The disk on which the operating system itself is installed becomes especially clogged. This is due to the fact that there are a lot of folders on it, which the system itself fills with the information it needs. This problem is also relevant for Windows 7. You can clean system folders of unnecessary garbage either manually or using special programs.
Windows 7 system folders: the need for cleaning and possible consequences
Each of the system folders has its own purpose and stores information of a certain kind. Before cleaning the disk, carefully read what function a particular folder is responsible for, otherwise you may lose important data or severely damage the operating system, which will lead to its failure:
Video: what files can be deleted on the system disk
What not to do when cleaning system folders
Please read the features of the above folders carefully. Before you empty one of them, consider whether you might need its contents in the future. Some folders, such as Windows or System32, should not be touched at all. And don't try to empty folders by simply deleting their contents. This will lead to the fact that remnants of them are stored in the computer’s memory, which in the future will begin to clutter and overload the system. There are only a few folders that can be cleaned manually:
Under no circumstances should you delete the folders themselves, this will lead to critical errors in the system; you only need to erase their contents.
Also, before clearing system folders, make sure you can free up memory using other methods, for example, by uninstalling third-party applications and games.
Methods for cleaning up Windows 7 system folders
If you still decide to clear your hard drive of accumulated third-party files, then the easiest way is to use the built-in functions of Windows. There are two initial options - standard and advanced cleaning.
Standard cleaning
system restore points.
 Right-click on the drive you want to clean and go to the “Properties” section.
 In the window that opens, go to the “General” section.
 Under Disk Cleanup, select the files you want to get rid of and click OK.
 Also, if you go to the “Advanced” tab, you can delete all system restore points except the last one. To do this, under System Restore and Shadow Copies, click the Clean button.
Click the “Clean” button in the “System Restore and Shadow Copies” section
Advanced Cleaning
system update log - files designed to eliminate errors that occurred when updating Windows.
 Launch Command Prompt as administrator
 We write the command cleanmgr
 Select the disk on which to perform cleaning
 Selecting the files to be deleted
Video: disk cleaning using Windows
Disk cleanup using third-party programs
Before you start manually cleaning each folder individually, you should use special third-party programs designed to automatically search and clean the disk of unnecessary files:
 Download the CCleaner application
 Go to the “Cleaning” section
 Selecting the partitions to be cleaned
 Click the “Analysis” button
 Before deleting files, you can view information about them
Video: Removing system files using CCleaner
Features of cleaning individual system folders
If the previous cleaning methods did not solve your problem or you need to clean one of the folders selectively, then find it in the sections below and follow the instructions provided.
But many folders are hidden by default to prevent the user from accidentally damaging them. To show hidden folders in the general list, follow these steps:
 Open Explorer
 Expanding the “Service” menu
 Go to the “Folder Options” section
 Go to the “View” section
 Changing the settings for hidden folders
Winsxs
Cleaning the Winsxs folder on Windows 7 is done through standard disk cleanup. This method has already been described above. Before you start cleaning, you are presented with a list of files that can be deleted. Check the section “Update package backup files” in it.
 Check “Update package backup files”
Video: how to empty the Winsxs folder in Windows 7
System Volume Information
To clear the System Volume Information folder, you must first access it:
 Open the properties of the System Volume Information folder
 Go to the “Security” tab
 Click the “Change” button
 Click the “Add” button
 Enter the username
 Granting full access to the folder
 Go to computer properties
 Go to the “System Protection” section
 Click the “Configure” button
Consistently click the “Apply” button, OK.
DriversStore
To remove outdated drivers from a repository called DriversStore, follow these steps:
 Open the command line
 We write the command pnputil.exe –e
 We write and execute the command
Installer
The Installer folder may contain files necessary for the system or programs, but there is a special third-party application, PatchCleaner, that will automatically determine what content can be removed:
 PatchCleaner searches for outdated update files and allows you to move them to another media or completely delete them
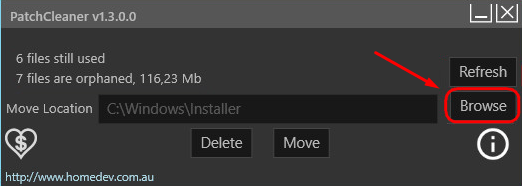 Click the Browse button
 Specify the path to the Installer folder
 Click the Delete button
 Confirm the action by clicking on the Yes button
Pagefile.sys
If you are confident that your computer will cope with the required tasks without the Pagefile.sys page file, you can remove it by following these steps:
 Go to the “Advanced system settings” section
 Click the “Options” button
 Click the “Change” button in the “Advanced” tab
 Set the required parameters
 Reboot the computer
Folders with history, cache and browser cookies
Browser files can take up a large amount of disk space. The easiest and safest way to remove them is through the settings of the browser itself:  Marking the files. which should be deleted from the browser history
 Set the “All time” parameter and clear the history
Problems with disk cleanup
If, after you have deleted any files from the system folder, errors appear or the computer begins to slow down, there is only one thing left to do - perform a system restore. This could happen if the disk was cleaned incorrectly or necessary files were deleted. System recovery is only possible if there are restore points on the computer:
 Start the computer in safe mode
 Open the System Restore application
 Click the “Next” button
 Selecting a restore point
Video: Restoring Windows 7
What to do if there is no “Clean up system files” button
If, when trying to free up disk space using the standard cleaning method, you are faced with the absence of a “Clean up system files” button, this means that you have UAC (User Account Control) disabled, and the program immediately starts with the ability to clean up system files. That is, clicking the “Clean up system files” button gives you administrator rights and with them the ability to edit and clean up system folders. But if UAC is disabled, then you have immediate access to changing system files and do not need to press any additional buttons.
 If the "Clean up system files" button is missing, User Account Control is disabled
If you want to clean up disk space or are sure that part of the virus remains in the system files, then in this case the operating system itself has a standard and advanced disk cleaning function. You can also use third-party programs or clean each folder separately. But you shouldn’t delete everything, otherwise it will damage your computer, and the only way out will be to roll back the system to the last restore point.
 Order 343 mail. Order by Russian post. Consequences of failure to appear in court when summoned
 How to put a password on a folder on a Windows computer without and with programs
 Pluton – Free Bootstrap HTML5 One Page Template
 History of ZX Spectrum: Myths and reality New Spectrum
 Voice assistant Siri from Apple Siri functions on iPhone 6s
 How to roll back to a previous version of iOS?
 Unlock iPad in four days