Installing a DNS server on the local network. Quickly and easily raise your DNS Creating a DNS server
Child and custom DNS servers eliminate the need for clients to point domains to other companies' DNS servers. This tutorial will help you create a child and custom DNS server.
Types of DNS servers
A vanity nameserver allows you to use your domain without setting up zone files. A DNS server whose name contains a domain is called a child server. Accordingly, the domain is the parent domain in relation to such a DNS server. The child DNS server of the example.com domain looks like this:
ns1.example.com
ns2.example.com
The name of such a DNS server must also include an IP address.
A custom DNS server (branded nameserver) requires a little more configuration but gives you complete control over your domain's DNS. However, this can cause some difficulties in managing your DNS. You will need to deploy at least two VPS with specialized software such as BIND, PowerDNS or NSD (DNS server daemons). Good comparison software DNS servers can be found on Wikipedia.
When setting up, you can use any naming scheme, but the manual uses standard schemes:
ns1.example.com
a.ns.example.com.
Requirements
- Registered domain. You can use GoDaddy services; NameCheap; 1 NetworkSolutions; Register.com, etc.
- Linking records: Define the domain registrar's procedure for creating linking records. Different registrars refer to linking records differently. Some refer to them as hostnames. Other providers call this process "registering a DNS server" or "creating a host record." Gap records help clients find your DNS servers and prevent circular references from occurring. Circular links lead back to the same page they are on. If you can't figure out how to create linking records with your domain registrar, you'll need to contact tech support for help.
- IP address for the child DNS server.
To increase control over a user's DNS server, use a minimum of two VPS to act as the primary and secondary DNS servers.
Read also:
Note: Technically, one VPS can act as a primary and secondary DNS server at the same time. However, this approach is not recommended due to its negative impact on security and fault tolerance. Keep in mind that the number of DNS servers for one domain is not limited. Only the domain provider can impose restrictions here.
Creating a child DNS server
Open your hosting provider's control panel and add your domain to the DNS manager.
Create an A record for the child DNS servers and point to the ISP IP address for ns1.hosting-provider.com; ns2.hosting-provider.com; ns3.hosting-provider.com.
Create a new A record for ns1.yourdomain.com. (hostname must end with a dot). In the IP address field, enter the provider's IP address for ns1.hosting-provider.com, ns2.hosting-provider.com, ns3.hosting-provider.com.
Eg:
A ns1.yourdomain.com .
A ns2.yourdomain.com .
A ns3.yourdomain.com .
Correct NS records:
NS ns1.yourdomain.com .
NS ns2.yourdomain.com .
NS ns3.yourdomain.com .
Note: Remember the dots at the end of hostnames.
Then everything depends on the domain name registrar. Open your domain name registrar's control panel and register your DNS servers' IP addresses by creating linking records. These records will associate the ISP's IP addresses with the host names of the DNS servers.
For example, with GoDaddy you simply open your domain name control panel and find the area where you can enter hostnames. Click Manage → Add Hostname and enter NS1 in Hostname and provider IP address; Click Add Hostname again and enter NS2, then repeat the process for NS3.
All that remains is to check the operation of the DNS servers.
Creating a custom server
The easiest way to set up DNS is to use a DNS manager, if one is provided by your hosting provider.
However, if this is not possible, you will need to deploy a DNS server such as BIND. The complete configuration of the zone file is beyond the scope of this manual. The general process looks like this:
- Create A and NS records for ns1.example.com. and ns2.example.com. remember the dots at the end.
- The zone file must contain the following entries:
ns1.yourdomain.com. IN A 1.2.3.4
ns2.yourdomain.com. IN A 1.2.3.5
yourdomain.com. IN NS ns1.yourdomain.com.
yourdomain.com. IN NS ns2.yourdomain.com.
- Specify the IP addresses for the A records ns1 and ns2 and connecting records. A minimum of 2 VPS is required to support DNS servers.
- Open your domain registrar's control panel and create glue records for all the DNS servers you want to deploy. Just make sure you are using the correct server IP addresses.
After this, you can test the DNS servers. However, keep in mind that depending on the registrar, changes to DNS servers can take up to 72 hours.
Tags:There are several ways to configure a DNS server on a VDS or VPS server. Moreover, if the provider has not limited you in how to configure DNS, then you, as the owner of the server with root rights, you can configure the DNS server on the VDS/VPS server in several ways.
What is DNS, in brief
DNS is a domain name server (Domain Name System). Domain name servers combined into hierarchical structure support and allow you to obtain information on how computers can search for each other on the Internet. It works like this: You type the resource address into your browser, your ISP checks it through the DNS (domain name server) of the entered domain to know where to send the request you made.
http://www.domain.com → check in the DNS system → DNS by domain looks for the IP address of the resource domain.ru = IP: XX.XXX.XXX.XX → You receive the contents of the site.
Therefore, in order for your website to be found on the Internet using your domain, it needs to be linked to DNS servers. On VDS/VPS servers this can be done by any of possible ways existing on the Internet.
Linking a domain using the provider's DNS servers
This method of domain binding can be used by any provider. You need to look at the DNS server addresses of the VDS provider and enter them at the name registrar in the “DNS Management” tab. You can also link a domain name to the DNS servers of the name registrar.
Configure DNS servers on a VDS/VPS server via IP
Yours has its own unique IP address. Since the IP is unique, you can link your domains to it. This is done at the registrar of names. First, attach your domain to the registrar’s servers, and then in the “DNS Zone Management” tab, create three records: [@], , and [*], type A.

Create your own DNS servers
The good thing about a dedicated server is that you can perform any necessary operations on it.
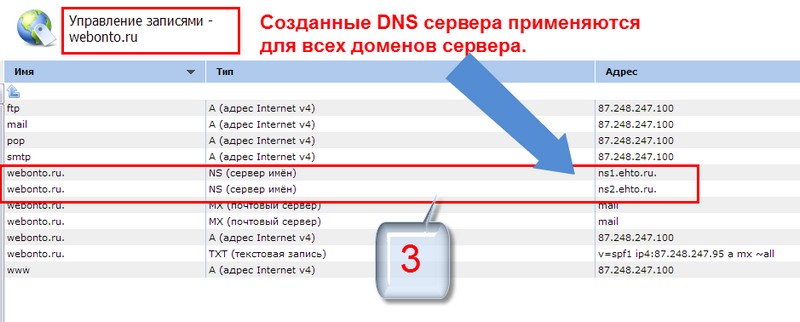
You can configure the DNS server on the VDS/VPS server to your newly created DNS servers. To do this, you need any domain, you can use the domain on which you install WordPress. Each DNS server is created on a separate IP address. You have one IP address and it is the main one. We create a primary DNS server (ns1) on the main IP address of the server. One DNS server will not be enough, so to create a secondary DNS (ns2) you need to purchase another IP address from your provider. The created DNS servers (ns1 and ns2) are used for all domains created on the VDS server.
It is better to create your own DNS servers before creating and. To create your own DNS servers in, in the “Domains” tab, select the desired domain and open the “Records” of the domain. We make two new type “A” records, linking ns1 and ns2 to specific IP addresses.

Next, in the same records, we change the “NS name server” type records. In the “Name” field, enter the domain with a dot at the end. “Record type” select “NS (name server). In the “Address” field, instead of the provider’s DNS servers, we enter our created subdomains ns1 and ns2 DNS servers.

The created DNS servers can be used for all server domains.
DNS stands for Domain Name System, that is, “Domain Name System”. This is a system in which all server domain names are distributed according to a certain hierarchy. Let's figure out what DNS servers are for, how to configure them on Windows 7, what to do if the server does not respond, and how to fix possible errors.
What is DNS and what is it for?
The DNS server stores information about domains. What is it for? The fact is that the computer does not understand our letter designations for network resources. For example, yandex.ru. We call this the site address, but for a computer it is just a set of characters. But the computer perfectly understands IP addresses and how to access them. IP addresses are represented as four numbers of eight characters in the binary number system. For example, 00100010.11110000.00100000.11111110. For convenience, binary IP addresses are written as identical decimal numbers (255.103.0.68).
So, a computer, having an IP address, can immediately access a resource, but remembering four-digit addresses would be difficult. Therefore, special servers were invented that stored a corresponding symbolic designation for each resource IP address. So when you write a website address in search bar browser, the data is sent to the DNS server, which looks for matches with its database.
DNS then sends the required IP address to the computer, and then the browser accesses the network resource directly. When setting up DNS on a computer, the connection to the network will go through a DNS server, which allows you to protect your computer from viruses, install parental control
, ban certain websites and much more.
How to find out if the DNS server is enabled on your computer
You can find out whether the DNS server is enabled on your computer and its address through the “Control Panel”.

How to install
Video: setting up a DNS server
Why do you need to change the DNS server? Of course, your provider also has its own DNS server; your connection is defined through this server by default. But standard servers are not always best choice
In addition, standard DNS servers only have the functions of determining IP addresses and converting them to symbolic ones, but they do not have any filtering functions. Third-party DNS servers of large companies (for example, Yandex.DNS) do not have these shortcomings. Their servers are always located in different places, and your connection goes through the nearest one. Thanks to this, page loading speed increases.
They have a filtering function and implement a parental control function. If you have children, then this is the best option - dubious sites that are not intended for children will become inaccessible to them.
They have a built-in antivirus and a blacklist of sites. So, scam sites and sites containing malware will be blocked and you won't be able to accidentally catch a virus.
Third-party DNS servers allow you to bypass website blocking. It sounds a little absurd, because we said that DNS servers are designed to block unwanted resources. But the fact is that Internet providers are forced to deny access to sites banned by Roskomnadzor in their DNS servers. Independent DNS servers Goggle, Yandex and others are not required to do this at all, so various torrent trackers social media and other sites will be available for visiting.
How to configure/change DNS

Here you can configure the order in which DNS servers are accessed. Inexperienced users should be explained that there is no one such server that would store all existing Internet addresses. There are too many websites now, so there are many DNS servers. And if the entered address is not found on one DNS server, the computer turns to the next one. So, in Windows you can configure the order in which you access DNS servers.
DNS suffixes can be configured. If you don't know this, then you don't need these settings. DNS suffixes are a very difficult thing to understand and are more important to the providers themselves. In general terms, all URLs are divided into subdomains. For example, server.domain.com. So, com is the first-level domain, domain is the second, server is the third. In theory, domain.com and sever.domain.com are completely different resources, with different IP addresses and different content. However, server.domain.com is still located in the domain.com space, which, in turn, is located inside com. The DNS suffix when accessing the server is domain.com. Even though the IP addresses are different, the server can only be found through domain.com. In Windows, you can configure how suffixes are assigned, which has certain advantages for internal networks. As for the Internet, the creators of DNS servers have already configured everything necessary automatically.
Possible errors and how to fix them
What to do if the server is not responding or is not detected
What should I do if, when I try to access a website, I receive the error “The computer settings are configured correctly, but the device or resource (DNS server) is not responding”? It is possible that the DNS service has been disabled on the computer for some reason. The DNS server you are using may have stopped working.

Doesn't resolve names correctly
If the DNS server does not resolve names or resolves names incorrectly, there are two possible reasons:
- DNS is not configured correctly. If everything is configured correctly for you, then perhaps the error is in the DNS server itself. Change the DNS server, the problem should be solved.
- Technical problems on the telecom operator’s servers. The solution to the problem is the same: use a different DNS server.
DHCP server: what is it and what are its features
The DHCP server automatically configures network settings. Such servers will help in home network, so as not to configure each connected computer separately. DHCP independently assigns network parameters to the connected device (including host IP address, gateway IP address, and DNS server).
DHCP and DNS are different things. DNS simply processes the request as a symbolic address and passes on the corresponding IP address. DHCP is much more complex and smart system: It organizes devices on the network, independently distributing IP addresses and their order, creating a network ecosystem.
So, we figured out that DNS servers are designed to transmit the IP address of the requested resource. Third-party DNS servers allow you to speed up the Internet (unlike the provider’s standard servers), protect your connection from viruses and scammers, and enable parental controls. Setting up a DNS server is not difficult, and most problems with it can be resolved by switching to a different DNS server.
Recently, I began to notice some strange slowdowns in completely different cases related to the Internet. Not only banal page browsing began to feel somewhat more cumbersome, but also access to various resources not directly related to browsing. This slowdown was irregular and difficult to categorize, but became annoying over time.
After some simple research, the supposed culprit was found - the DNS server of my provider. In principle, he works quickly, but sometimes he thinks a lot. I was able to prove this to myself using namebench, which checks the resolution speed not using synthetic tests, but using the history of your wandering around boarding schools.
Despite the fact that the average speed was not bad, the peaks of braking reached almost a second, which is undoubtedly disgraceful. Of course, it’s cheap and cheerful to just change the DNS to a different one, for example Google 8.8.8.8 / 8.8.4.4 or opendns or whatever you like (namebench offers a list of alternatives), but since I took up this matter, I decided to bring it to its logical end - create your own caching DNS.
Setting bind or its alternatives manually is certainly not our way. The easiest way is to look for a suitable docker image and, if not found, make it yourself.
Fortunately, there is already one and it even works. There is bind and webmin inside for GUI management. I added a little to its docker-compose.yml to pass the password for webmin and disabled IPv6, which led to resolution errors. This is the resulting compose:
Bind: image: sameersbn/bind:latest container_name: bind log_driver: "json-file" log_opt: max-size: "10m" max-file: "5" environment: - ROOT_PASSWORD=something-very-secure ports: - "53 :53/udp" - "10000:10000" volumes: - ./data:/data restart: always command: /usr/sbin/named -4
If IPv6 doesn't bother you, just remove the command line.
To get this thing up and running, you just need to save it in a suitable place (for me /srv/bind) as docker-compose.yml and run something like this:
Cd /srv/bind docker-compose up -d
After launch, set your DNS to the address of the computer that runs the container with bind and everything should work. If, for some purpose, you need to locally translate your internal names into addresses (and/or vice versa), then this can also be done almost easily via webmin. An example of such use is drawn both in the form of pictures and with a clear explanation.
As a result, all this works, the problem of irregular braking has disappeared and namebench happily offers me my own server, which, naturally, breaks all remote options.
P.S. Of course, I tried to use the DNS support provided by my ZyWall USG20, but it worked slowly and somehow strange.
Some providers suffer from intermittent (or constant) DNS problems. For a home user, if it is not possible to change providers, the problem can be solved either by (ideologically incorrect) using other people's DNS servers (addresses can be found on the forums), or by launching your own DNS server, which is not as difficult as it might seem at first glance.
A built-in DNS server exists in the server version of Windows, but thanks to the efforts of Microsoft marketers, it is not available in the desktop edition (Windows 2000/XP/Vista), so, as often happens, let’s turn to the generous world of Unix. The most famous DNS servers are BIND, djbdns, PowerDNS, MaraDNS and Unbound. There is no desire to consider BIND, djbdns, due to its features, is strictly tied to Unix, the Windows version of PowerDNS is not updated, so MaraDNS and Unbound remain. You can try one or the other, but keep in mind that they won't work at the same time.
The manual will be in the style of a short HowTo for a trained user (more likely a system administrator), so if nothing is clear, call a computer geek you know.
If you don’t really understand how DNS works, but really want to understand what we’re doing here (we’re running a DNS cache that can accept recursive queries and send iterative ones), you can read the chapter of the manual (in Russian).
Unbound
We go to the website http://unbound.net/ in the Downloads section, find the lines:
Windows 32-bit version compiled from the source.Installer:
Using the link (at the time of writing - unbound_setup_1.3.0) we download the distribution kit. Run the file, click “Next”, read license agreement, if you agree, click “I Agree”, uncheck the “DLV - dlv.isc.org” box (we don’t need to check DNSSEC signatures), click “Next”, “Next”, “Install”, “Finish”. The service is automatically installed and starts. Everything you need to get started (including README.txt) is located in C:\Program Files\Unbound.
MaraDNS
Launching MaraDNS under Windows, as it turns out, is quite a non-trivial task, so if you really want to, you can try it yourself.
Windows setup
So, we have installed and launched the DNS server, we now need to configure Windows.
In the properties of the Internet connection (“Start”, “Settings”, “Network connections”, the desired connection, context menu, “Properties”) on the “General” tab, open “Internet Protocol TCP/IP”, if the setting is “Obtain DNS server address automatically”, you need to change it to “Use the following DNS server addresses” and enter the address 127.0.0.1. If you have activated the “Use the following DNS server addresses” option and specified the addresses of the provider’s DNS servers, delete either both or one of them (after writing it down on a piece of paper) and enter the same 127.0.0.1. There is no need to specify the same address (127.0.0.1) twice. Click “OK”, “OK”, wait until everything is saved and try to open some site. Another verification method is for real admins. We go to the console, launch nslookup, then execute:
> server 127.0.0.1 Default Server: localhost Address: 127.0.0.1 > www.mail.ru Server: localhost Address: 127.0.0.1 Non-authoritative answer: Name: www.mail.ru Addresses: 194.67.57.26, 194.67.57.126, 194.67.57.226, 194.67.57.20 > exitIn this case, we successfully resolved the (A-type) record for www.mail.ru.
If that doesn’t work, check that you have an Internet connection by ping the provider’s gateway (you can find out via ipconfig /all). If connected, look in the Task Manager to ensure that the DNS server process is running. If it is not running, look at the “Services” snap-in (run services.msc in the console): try to start the service and check that it starts automatically. If it doesn’t help, either read the documentation (DNS server), turn on the log and check your firewall and DNS server configuration file (although it should already be configured by default), or call someone more qualified, or delete the program and return settings back, and [sad | let's go for a walk | drink beer | ...].
However, theoretically there is nothing complicated in the described process, so it should work (like the author).
Notes:
- Usually all servers come with relatively secure settings by default, but it’s a good idea to check that your DNS server is listening 53 TCP ports and UDP to 127.0.0.1, not 0.0.0.0 (all local addresses). This can be done using TCPView. In Options, enable the Show Unconnected Endpoints option and deactivate Resolve Addresses. Find the DNS server process, there should be two entries for it: TCP with Local Address 127.0.0.1:53 and State LISTENING and UDP with the same address and an empty State field.
- The author does not use DNS servers under Windows, and accordingly, the material in this article is not used in practice, so please do not write letters in the style of “it doesn’t work for me, what should I do?”
- To write this article, the author used Windows XP, if you have another Windows version- adapt paths and commands to your OS version.
- If you are trying to do this on a computer in an organization, then the best solution will ask your system administrator to set up an office Internet gateway under GNU Linux/*BSD with a real (under Unix) DNS server, and if he cannot do this, find such a person.
- The article is extremely simplified, so if you find an error, inaccuracy or unclear point - write, if you think that the material is not disclosed widely enough (for example, the difference between recursive and authoritative/authoritative DNS servers is not described) - you should not write , there are plenty of DNS manuals on the Internet (including documentation on program websites).
- Windows is not the best platform for running a DNS server (at least ported from Unix), so all this may not work perfectly (primarily in terms of speed).
- In the usual case of communication “desktop - provider’s DNS server” to resolve a name, in the vast majority of cases one request is sent and one response is received. In our case, there will be several times more requests and responses, since we take over the functions of the provider's DNS server. This will have a minor effect on overall traffic, since DNS requests and responses are very small, but it may affect the speed at which sites start opening. But, since requests are cached, this will most likely be noticeable only in the first minutes of working on the Internet.
That's all, thanks for your attention.
 Order 343 mail. Order by Russian post. Consequences of failure to appear in court when summoned
 How to put a password on a folder on a Windows computer without and with programs
 Pluton – Free Bootstrap HTML5 One Page Template
 History of ZX Spectrum: Myths and reality New Spectrum
 Voice assistant Siri from Apple Siri functions on iPhone 6s
 How to roll back to a previous version of iOS?
 Unlock iPad in four days