Installing an ssd in a laptop instead of an acer dvd. Replacing the HDD in a laptop with an SSD - instructions. Comparison of HDD and SSD. Speed characteristics of the SATA Revision specification interface
Every user would like to install a modern SSD drive on their PC for better productivity and higher system speed. Installing an SSD on your computer is incredibly easy, and the process itself is usually not accompanied by any difficulties.
By the way, there was a similar article earlier, but in it we only needed to remove a small cover on the back of the case, which does not create any difficulties.
But install an SSD in a laptop instead DVD drive, is much more difficult, because first you need to carefully disassemble it. And many users already have difficulties at this stage. So let's look at the whole process in more detail.
What is required for installation?
First, you should familiarize yourself with the characteristics of your laptop to understand what components you need to purchase. As practice shows, in most modern models with a CD drive you can easily install an additional HDD. Therefore, there should be no problems.
Before you start, you should make sure that you have everything you need for full-fledged work.
You will need:

Special attention should be paid to the last point, so let's look at it in more detail.
How to choose an adapter?
The drive size comes in two types and differs in thickness - 9.5mm and 12.7mm. Before purchasing an adapter, carefully measure the thickness of your drive and only then buy the appropriate adapter. Otherwise, the SSD drive adapter simply will not fit into the laptop in place of the DVD drive.

You should also pay attention to the interface through which the drive is connected. If the interface is SATA, then using an adapter with an adapter to mSATA, you can easily install an SSD instead of a disk drive. But if your DVD drive is connected via IDE, and this is an outdated technology, then to connect the SSD you will need an adapter from IDE to SATA.

As mentioned above, the adapters differ only in thickness, while their shape and width are the same. The adapter usually comes with a disposable screwdriver, screws for securing the hard drive, and a plastic cover. The latter is needed for installation on the adapter to close free space, which is formed after removing the drive.
Disassembling a laptop
After we have prepared everything necessary for replacement and purchased a suitable adapter for the SSD, we can begin opening the laptop and then replacing the drive.
You can do this as follows:

After the battery is disconnected, you need to remove the installed hard drive.
For this:

Under the cover there is a hard drive and memory modules. We need to remove the hard drive, since a solid-state drive will be installed in its place.
If you ask why we install the SSD here, and not instead of the drive, then there is a simple explanation for this.
When the speed of the bus to which the hard drive is connected is faster (in this case, the hard drive is connected via SATA 3, while the drive has SATA 2), then the SSD is installed in place of the HDD.
To properly remove the drive, you must carefully follow the following instructions:

We put both drives aside; we will return to them later.
Removing the Top Cover
Now we need to remove the top cover of the laptop by unscrewing all the fixing screws. You should take into account the fact that they come in different sizes and you definitely need to remember where they were unscrewed from.
After all the screws are unscrewed, the matter remains with the pick. Now you need to separate the bottom and top of the laptop. You need to be extremely careful when opening it, as most models have unreliable latches that can easily break. Check again that all screws have been removed, otherwise there is a risk of damaging the device case.
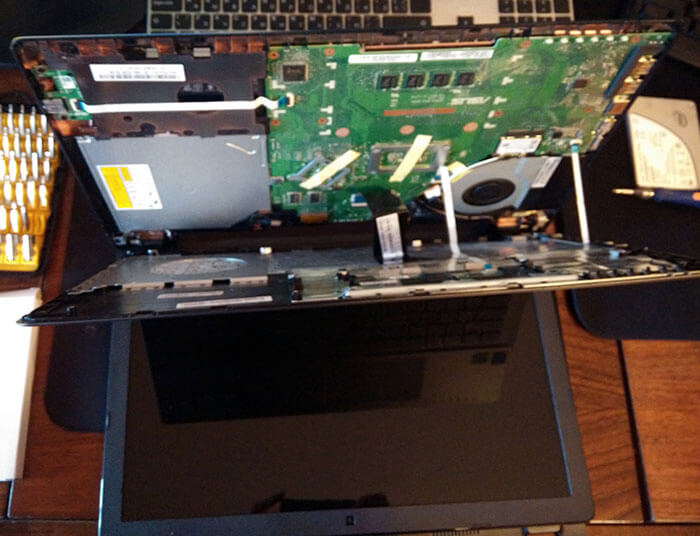
To remove the cover, you need to insert the pick into the slot that is located between the top and bottom covers, and slowly turn it to release the latches located inside the case. You should start from the front of the laptop, where the indicator lights. It is necessary to walk the mediator around the perimeter of the entire body.
After you separate the top cover from the bottom, do not lift it up suddenly. Both parts are connected by cables and you can damage them.
When working with some devices, you do not have to disconnect the cables, since sometimes you can replace the DVD drive without removing the top part of the device, which can significantly save your time.
DVD drive
Now unscrew the DVD drive. We will need a short screwdriver to remove the screw that secures the drive to the case. Once it is unscrewed, you can remove the drive without any problems.

Then remove the plastic cover from the DVD drive. To do this, you need to open it. To do this you will need a paperclip or a needle. Find a small hole on the front panel of the device and insert a paper clip into it. After lightly pressing, the drive carriage will move out of the housing, and you will have full access to its lower part and can easily separate the plug from the carriage.

Once the plug is removed, it will need to be placed on the adapter.


After this, we install the adapter in place of the drive we previously removed and tighten the fastening screw.

All that remains is to turn the laptop over and install the SSD drive in place of the old HDD. Close the cover removed at the beginning of disassembly and tighten the remaining bolts around the perimeter of the device, insert the battery.
The laptop is now assembled and ready to use. We installed two hard drives: we put the old HDD in an adapter and connected it instead of a disk drive, and a new solid-state drive was mounted in its place.
Software settings
The next step will be Bios setting, namely the inclusion AHCI mode. This mode allows you to increase the speed of the drive, mainly due to the advantages of NCQ technology. It also opens up other possibilities, such as hot swapping.

Now you know how to install an SSD in a laptop instead of an old DVD drive, and you can do it yourself without any problems, following our instructions exactly.
By the way, you can completely transfer the system without losing its functionality using special programs, for example, such as Acronis Universal Restore, Macrium Reflect and others. They have wide functionality and will help you in this situation.
Every day more and more users are thinking about the question: how to replace the HDD in a laptop with an SSD? This topic is especially relevant now: a hard drive as in mobile computer outlives its own.
To change or not to change? That is the question
For many years, there has been a debate about whether the hard drive will be replaced by solid-state drives or not. Advanced users SSDs are valued for speed and reliability. However, every medal has two sides, so it should be noted that the reactivity of the drive is very expensive.
The high cost of SSDs for the most part prevents them from becoming widely used. Many owners of PCs and laptops, whose activities require the best performance indicators, still renounce HDDs.
Pros and cons of SSD and HDD
The fact is that HDD has a number of disadvantages compared to SSD:
As a rule, it is because of them that many decide to replace them, and one cannot ignore the advantages hard drives in front of SSDs:
- Volume. On this moment ordinary users have access to from 320 GB to 10 TB. And the same SSDs in regular stores can be found with a maximum capacity of 2TB. We are not talking about drives for industrial or server equipment, but only about those that can be bought at the nearest computer market.
- Price. She is much lower. If you compare the cost of a popular 2 TB hard drive with an SSD of the same capacity, it turns out that a solid-state drive is 16 times more expensive than an HDD.
- With SSD, it is almost impossible to recover deleted data due to the storage method. The maximum that can be done is to take the drive to a laboratory where the necessary equipment will be available.
Based on the above, we can conclude that if the speed and security of data is more important than its volume. Do you value low power consumption? You can safely switch to an SSD drive.
What HDDs are used in the laptop?
Currently used in laptops hard disks form factor 2.5 inches. This means that inside there are “pancakes” of this exact diameter. Some MacBooks have 1.8″ hard drives, but this is a separate topic and we won’t talk about them.
Each disk has a set of characteristics, such as:
- manufacturer;
- volume: the amount of data that can be stored, usually in GB;
- buffer memory: fast memory or cash;
- rotation speed: the number of revolutions per minute made by the spindle;
- connection interface: connector through which the drive is connected to the board.
The price of the HDD depends on the set of these characteristics and their quality. The most common hard drive option at the time of writing has:
- connection interface - SATA III;
- volume - 2 TB;
- - 5400 rpm;
- buffer memory - 32 MB.
What SSDs can be installed instead of a hard drive?
The main difference between a solid-state drive and an HDD is that data is written non-mechanically. Simply put, information is recorded on microcircuits. Due to this, high and low noise levels are achieved.
Such drives have 4 common form factors:
- PCI-E AIC (add-in-card);
- M.2 2280;
- mSATA;
- 2.5 in.
In the context of this article, which is devoted to the question of how to replace the HDD in a laptop with an SSD, all attention will be paid to drives of the latest format, i.e. 2.5 inches. They and the HDD have the same shape and SATA III connection interface. A similar view allows you to remove the disk and install an SSD in its place, screwing it to the same slide and closing it with the same lid.
SSD form factor mSata
Some laptops also support mSata. They have on motherboard There is a special III and two places for screws to secure the drive. Such SSDs can be used either as independent storage devices or in combination with one, depending on the design of the laptop.

In many Lenovo models, such an SSD drive acts as additional storage (as a cache). There are laptops that have mSata installed in conjunction with the hard drive and used as a system partition, that is, on it, except operating system, nothing is installed. Thanks to this solution, the loading of the OS is accelerated, and the data storage volume remains quite large, since the information is written to disk.
SSD form factor 2.5″
For successful replacement HDD to SSD you need to choose the right drive. At the moment, we managed to decide that it should be 2.5 inches and connected via SATA III. It is also worth paying attention to the thickness of the SSD, since for hard drives it ranges from 5 to 9.5 mm. If you buy an SSD that is too thick, the disk lid on your laptop may not close properly.

Then it's a matter of taste. For home use, 100-300 GB is considered sufficient. According to Tom Hardware, the best SSD for users is recognized with its affordable price At under $100 it has great features. If you are an inexperienced user, just look for something similar in description and you won’t go wrong.
Replacing an HDD with an SSD in a laptop
The process of changing a hard drive to an SSD is the same as installing a new hard drive.
The first thing to do if the old hard drive is working is to copy the information from it to another medium. Important data must be transferred to the cloud, to a USB flash drive or removable drive.
You can buy a case for HDD 2.5, install the old hard drive in it and use it in the future as a mobile storage medium.
Replacement process
First you need to remove the battery. If it is non-removable, turn off the computer, remove the cover, and remove the battery connector from the motherboard.
- Unscrew the screws that hold the disk cover in place and remove it.
- Remove the screws holding the hard drive slide.
- Pull the slide away from the connector to disconnect the HDD and remove it from the case.
- Remove the screws securing the drive to the slide and remove it.
- Take the drive, install it in the slide in the same way as the hard drive was, and tighten the screws.
- Lower the SSD and carriers into the case and slide them into the slot to connect the drive.
- Screw the slide fasteners into the housing.
- Close the cover and tighten the screws.
- Connect the battery in the same way as you disconnected it and close the cover if necessary.
- Turn on the laptop and check the functionality of the SSD.
The minimum check would be to go into the BIOS or UEFI and see how the drive was detected. In most laptop models, this can be done by pressing the DEL or F2 key (in some Enter) immediately after turning it on.

If the drive is working and installed correctly, its name and serial number. Additionally, you can run tests using the utility and check other things, for example, recording speed.
The first thing to do is copy the information. This is written above. The principle of operation for all computers in this regard is the same.
1. Disconnect the battery from the HP laptop. If the battery is removable, like this model, then you can do it simply:
- unlock the battery lock;
- pull the second latch;
- remove the battery from the connector.

2. Using a Phillips screwdriver, remove the screws that hold the hard drive cover in the case. In most models it is small, about ½ of the entire back surface. Remove the cover; you may have to apply a little force, as it may be secured with additional latches from the inside.
3. Unscrew the screws that hold the hard drive carrier. There may be 2 or 4 of them. Move the hard drive away from the connector to disconnect it.

4. Pry up the mount and remove the screws. If the hard drive is disconnected from the connector, this will be easy to do.

5. Unscrew the screws that hold the HDD in the slide. Usually they are located at one end and the other, 2 pieces each.

6. Install the SSD in the carrier instead of the hard drive and tighten the screws on both sides.

7. Install the disk mount along with the drive into the case and push it into the slot. Screw the slide screws back in.

8. Close the housing cover and install the screws in the same order in which you removed them.
9. Connect the battery, that is, install it until it clicks. Push the battery lock back into position.
10. Turn on the laptop and check that the SSD is detected in the system; you can perform additional testing.
This is how the HDD in a laptop is replaced with an SSD. In the vast majority of models, this work is done the same way. The differences usually lie in the way the battery is disassembled and disconnected.
In this section, we will look at options for upgrading a hard drive to an SSD drive in laptops manufactured by Acer. For clarity, an example will be given of a model in which the battery is built-in, and almost complete disassembly is required.
First of all, we still copy important data. Here the amount of information was small, so the transfer was made to a USB flash drive. Turn off the laptop and start replacing.
1. It is necessary to remove the back cover of the case. To do this, remove all the screws from the back side.

2. Remove the back part, carefully prying it around the perimeter. If the cover does not budge on any side, stop and check that all screws are removed.

3. Disconnect the battery; to do this, remove the cable from the connector by gently pulling it towards you. Do not break the plug, otherwise you will have to completely replace the battery.

4. In this model, the hard drive is not secured in the slide, but is simply inserted into the connector on the board between the case mounts. In order to replace the HDD with an SSD in a laptop, just remove the old disk by pulling it away from the connector. Then put the drive in its place.
5. Reconnect the battery. Make sure that the connector is straight and not damaged.
6. Replace the housing cover and tighten all screws. Make sure that the back does not pinch the wires.
7. Turn on the laptop, check the functionality of the solid-state drive in any way. If the computer does not respond to the power button, you will have to disassemble it again to check the battery.
In this way, the HDD in a laptop is replaced with an SSD for some models from the manufacturer Acer. You can rely on these instructions if you need to update other computers with a built-in battery.
Replacing HDD with SSD in Lenovo laptop
You won’t be able to find a big difference here from the previous two options. It can be noted that replacing the disk with an SSD drive in this option combined the two previous ones. In this Lenovo models removable battery, but the HDD mount is located under back housings. There is no separate cover here.
Following the main principle, you need to transfer the necessary data to another location or prepare an HDD case to mount your old disk into. This time we won’t copy anything, we’ll insert the hard drive into the Case and start using it as a portable “flash drive”.
1. First you need to disconnect the battery. The battery of this model is removable, so you need to remove the lock and remove the battery.

2. Unscrew all the screws located at the bottom one by one. Be sure to check if your model has additional screws on the side.

3. Carefully remove the cover, unsnapping each fastener one by one. If the case does not budge, check that all screws have been removed.

4. Remove the screw that holds the hard drive carrier. In this example there is only one. Lift the HDD mounts and remove it from the laptop.

5. Use a screwdriver to remove the screws that hold the slide to the hard drive. In this model, the mounts have shielded foil, which protects the disk controller from shorting to the case.
6. Install the new SSD drive into the HDD mount and return it to its place, securing it with a screw.

7. Close your laptop bottom housing, carefully snapping all the fasteners into place. Tighten the screws in the same order and connect the battery.

8. Turn on the laptop and test the drive in Bios or with some utility, for example, Victoria.
The ways to change an HDD to an SSD in a laptop can be listed endlessly. The fact is that each model has its own disassembly principle. Therefore, if you are not qualified and have no experience in this matter, it is recommended to turn to professionals.
Replacing your hard drive with a solid state drive will increase your laptop's performance by an order of magnitude. However, be sure to take into account the processor parameters and volume random access memory. If you have a very weak CPU installed and no more than 2 GB of RAM, then the system will slow down in any case, even with an SSD.
Evaluate your computer adequately, make only the necessary changes to it, and it will serve faithfully until you buy a new one.
Good day! We all know that PC is much more more convenient than a laptop in terms of upgrade. To be honest, my PC case is over 10 years old. I only change the filling in it, and I changed the monitor once. I wish laptops could also be easily upgraded, but often, if a laptop is outdated, you just have to replace it with a new one. For some there is nothing complicated about this. And someone’s laptop is a whole work station with many programs (possibly licenses) and settings. In this case, go to new laptop a little problematic. And for a long time.
But fortunately, we are not completely limited in terms of laptop upgrades. We can do something. We can add RAM, we can replace it, sometimes we can replace the processor with a slightly more powerful one but from the same line. We can even connect if you wish. This all sounds pretty harmless except for the replacement hard drive, because the system will have to be configured again.
There is an exit! There is an excellent solution - you can insert secondHDD insteadDVD drive. By the way, this could also be . Don't skimp on the drive; I doubt you'll use it.
Replacing a DVD drive with an HDD (SSD drive)
In order to replace DVD with HDD, we need a special adapter (adapter ), which looks very similar to a DVD drive. When choosing this adapter, pay attention to its thickness. Disk drives come in thicknesses of 9.5mm and 12.7mm, and so do the adapters, respectively.

Hard drive adapter
When searching for an adapter, it is better to call it " hard drive adapter" You can buy it in specialized stores in your city. In this case, it will cost you about 1000 rubles. Or you can order it at aliexpress. It will cost you about 200 rubles, but you will have to wait 2-3 weeks. Judging by the reviews, delivery takes about this long. By the way, judging by the same reviews, the quality of the adapter is no worse than the one you would buy at 5 times the price.
How to insert an SSD instead of a DVD drive in a laptop?
It's time to get down to business - repeat what I will describe in the stated order, and you yourself will be able to install an SSD drive (or HDD hard drive) instead of a DVD drive. There is absolutely nothing complicated about this.
First, completely turn off the power to your laptop. That is, disconnect from it Charger and remove the battery.
Remove the disk drive from the laptop. To do this, you will have to remove one screw at the bottom of the laptop that holds your drive. Finding and recognizing this screw is not difficult.

Unscrew and pull out the drive
Next, you need to carefully insert the SSD drive (or hard drive) into the adapter and screw it with the screws that came with the adapter and additionally secure it with a special plug (it will also be included).

The fastening is simple: unscrew, screw on
After this, you will need to move the mount and the external panel from the DVD drive to the adapter. With the fastening everything is simple: unscrew it, screw it on. And handle the socket very carefully, because it is a fragile creature.
That's it. Insert the adapter into the laptop and screw it on. Everything should have taken you no more than 5 minutes. Let's recap how to insert an HDD or SSD instead of a DVD drive:
- Disconnect the laptop
- Remove DVD drive
- Insert HDD or SSD into the adapter
- Transfer the mount and outer panel to the adapter
- Insert and screw the drive
If you want to install an SSD drive instead of a DVD drive, then for better performance It will be useful to make a slight castling of the laptop. Place the SSD drive in the space reserved for the hard drive, and insert the hard drive into the adapter.
This is due to the fact that modern laptops have connectors for the drive. SATA 3, and for the drive they are usually limited to the connector SATA 1. Well, it’s clear that in order to unlock the full speed potential of an SSD drive, it will not have enough bandwidth for the SATA 1 connector. A little more detail about SATA types is written in the article about.
That's all I have for today. I hope the article answered all your questions. If you still have questions, I will be happy to answer them in the comments.
Did you read to the very end?
Was this article helpful?
Not really
What exactly did you not like? Was the article incomplete or false?
Write in comments and we promise to improve!
After installation in your laptop ssd Instead of hdd, I began to experience a catastrophic lack of space on the first one. Purchasing a sata-usb adapter made it possible to expand my media library onto an old hdd. A couple of months passed and this option no longer suited me, namely, I was tired of carrying this “appendix” with me, and the speed left much to be desired. After some time, I came across a number of articles about installing a second drive using an ESPADA adapter. This miracle device with a second disc was inserted instead of the original DVD drive and delighted users. A search in electronics stores led to the understanding that this device is an unaffordable luxury for me. Prices start from 800 rubles here, from $6 in China. Next, on the hub, I found articles on how to independently remake a DVD drive for installing a second disk, but I was sorry to break the drive for such experiments, and then it started... At work, I took a dead hdd, a sata cable, a molex-sata from an old power supply.
Just my apartment was undergoing renovation and I had a lot of tools to “adjust” some parts for my idea.
Using an angle grinder, the sata connector was upgraded to Slimline SATA.

On the power side, 5 contact pads were left and other areas we did not need were cut down.

By removing unnecessary contact pads, I finally got the connector I needed, exactly like in a DVD drive.

In advance, a pinout diagram for the contacts was found on the Internet.

Armed with a soldering iron and a lot of patience, I soldered the whole thing into a SATA (ODA)->SATA (HDD) adapter.
 Having filled everything with ordinary shoe glue (well, I don’t have hot glue) and wrapped it with electrical tape, I got a completely aesthetic-looking wiring. After waiting for the glue to dry, I began to try to assemble the whole thing. I taped the HDD with double-sided tape, thereby creating a “cushion”.

I connected everything and inserted it tightly inside.

With my fingers crossed, I turn on the laptop and immediately run to the BIOS.

Hooray! WDC has decided.
I boot the system and everything is fine.
There are no limits to joy and pride! It turns out how easy it is to connect a second drive to a laptop at a minimum cost.
(early 2011) at home.
There is a crisis outside, and dreams of buying a new Macbook are dissipating like smoke. In these harsh times, when a kilogram of ordinary cucumbers costs as much as a kilogram of Israeli apples, it’s time to take out a screwdriver and update your faithful aluminum comrade with your own hands.
If you don’t have a screwdriver, hands, or lack the courage, please turn to the professionals of modding and repair. Trusted professionals live in the company ModMac, who, with unwavering hands, will mercilessly disassemble any gadget, repair it and put it back together without any unnecessary remaining parts.
On a winter Saturday morning, from the pattern of clouds in the sky, I realized it was time! Having made a backup, we and my MacBook Pro, went to workshop for rejuvenation surgery. The plans included replacing the original HDD cable with a new one, as well as replacing the optical drive with a super-fast SSD drive using a special Optibay tray.
Few people know, but if you install an SSD drive instead of the native HDD, and install the native HDD as a second hard drive instead of a CD drive, then in this situation the system will work a little slower. It’s better to plug the SSD drive in place of the optical drive, and leave the original HDD in its place. Productivity will be higher.

Upon arrival at the place, my laptop immediately passed into the hands of the specialist, and I got the small role of an impassive extra who recorded on camera every movement of the specialist’s hands.
Preparation
So, the MacBook Pro sat on the table, turned upside down, revealing its defenseless belly to our eyes. With deft movements of a Phillips screwdriver, 10 screws were unscrewed around the perimeter back cover. And then, without much effort, the lid was removed and carefully set aside.


Once again, I marveled at the ergonomic arrangement of all the components inside the brainchild of Steve Jobs. How fascinating it is that all the filling fits together!

The first stage has been successfully completed, we move on to the next level.
Replacing the HDD cable
In my MacBook, the hard drive is very easy to remove. In some models, for example, to remove the HDD you must first remove the battery, but this is not our case. So, what needs to be done, point by point:
1) Disconnect the cable leading from the battery to the board;


2) unscrew two screws and pull out the clamping bar;


3) gently pull the hard drive by the special tab and use your fingers (a mediator, a special plastic spatula) to disconnect the cable from the hard drive.


The hard drive cable is very fragile; tugging, tearing or twisting it strongly is not recommended.

Why do you need to change the cable to a new one: sometimes (rarely, but still) after replacing an ordinary HDD with an SSD, the MacBook disk begins to behave strangely. It seems that disk utility sees the new SSD, formats it and does not find any errors; The operating system is downloading, but all installation attempts are interrupted gray screen with a flashing folder icon or question mark.

In this case, replacing the hard drive cable helps. The operation is very delicate and requires confident movements and some skill in such actions. Here's how to replace the HDD cable:
1) Carefully disconnect the cable connector from the board, unscrew the two screws that secure the cable in the case and the two screws that secure the black strip on the front inner wall of the case.


Using your fingers, carefully pull out the black strip to which the HDD cable is glued and you will be horrified by the miniature size of the connector, which must be carefully removed.

At this stage you need to gather all your concentration and use tweezers to disconnect the connector from the HDD cable. You can’t swear at your mother, it’s advisable to breathe every other time.


After this dangerous procedure you can breathe out and relax, the HDD cable has been completely removed.

So, at this stage we have removed the original hard drive and completely disconnected its cable. To install a new cable, all the above steps must be repeated in reverse order. Again, the hardest part is connecting the small connector to the connector of the new HDD cable.
Replacing an optical drive with an SSD drive


Carefully disconnect the cable responsible for Airport/Bluetooth and the camera cable from the board. These cables (like most others) are quite fragile and breakable.


Then carefully remove the cable around the perimeter of the CD drive and disconnect the antenna connector.


The easiest thing left is to unscrew the three screws holding the optical drive, carefully remove it, and disconnect the cable connector. That's it, half the job is done, now you need to insert an SSD drive into the resulting void.
SSD and Optibay


Everything is simple here. Take an Optibay tray, insert a brand new SSD drive into it, tighten two fixing screws on the side, insert a short cable from the CD drive into the tray, which was removed in the previous step, and insert the entire resulting structure into place. Finally, repeat all the above-described manipulations to remove the drive in reverse order.

At the very end, the main thing is not to forget to connect back the battery cable, which was disconnected at the very beginning of this instruction article.
Note to the hostess

After “upgrading” the MacBook master from ModMac can set up something like Fusion Drive.
Fusion Drive is a technology that combines a conventional hard drive (HDD) and a solid state drive (SSD) with 128 GB of flash memory into a single logical volume. Mac OS X automatically manages its contents, so frequently used files such as applications, documents, photos (and so on) are dynamically moved to flash memory for faster access. For example, if a program is used frequently, it will automatically be moved to the SSD drive to speed up access to it. As a result, startup times are reduced, and as the system accumulates data about the computer's usage profile, program launch and file access speeds up.
– Wikipedia
Through clever manipulations with terminal commands, the guys from ModMac can configure a MacBook so that the system will see one shared disk with a capacity of 768 gigs (total SSD capacity and HDD drives ) as if it were one SSD drive.
Productivity increases, nerves are saved, and the owner is happy. I highly recommend it. The only caveat is that you need to avoid emergency shutdowns while using the laptop; Fusion Drive may “crumble” and you will have to restore all the information again ( so you need to always remember about backup!).

 Order 343 mail. Order by Russian post. Consequences of failure to appear in court when summoned
 How to put a password on a folder on a Windows computer without and with programs
 Pluton – Free Bootstrap HTML5 One Page Template
 History of the ZX Spectrum: Myths and reality New Spectrum
 Voice assistant Siri from Apple Siri functions on iPhone 6s
 How to roll back to a previous version of iOS?
 Unlock iPad in four days