Installing Windows XP via BIOS. Installing Windows XP from disk. Launching and installing Windows XP. Steps before installing Windows XP
Many PC users believe that installing Windows XP on a laptop or a computer is an impossible task for them and that a person with special education, high-level knowledge, etc. can do it. Based on this, they take their computers to service centers or invite specialists to your home, although they cannot find an answer to the question how to install Windows XP correctly You can do it yourself.
In fact, the installation process of the most common operating system Windows systems XP is so simple that even a person with minimal computer knowledge can handle it. You should not think that the process of installing (reinstalling) Windows is a task that can be done by some programmers or hackers who sit at the monitor from morning to evening.
Minimum system requirements – this is the minimum configuration that the computer on which we are going to install the system must have. For Windows XP they are as follows:
- processor with a frequency of 300 MHz or more;
- 128 MB random access memory or more;
- 1.5 GB of free hard disk space;
- Super VGA video card with 800 X 600 resolution or higher;
- CD drive;
- mouse and keyboard.
The first thing we must take care of before installing the OS is that our computer boots from a CD-ROM (by default it boots from hard drive). To do this, you need to make some settings in the BIOS. Just don’t think something like “well, it all begins...”, there is nothing complicated here and you will see this now. To go to the BIOS, restart the computer and at the time of initial boot, when the hardware testing process begins (this process is called POST), when this message appears at the bottom of the screen “Press DEL to enter SETUP”, you should quickly press the “Delete” key several times. It should be noted here that on laptops or on different versions of BIOS this may be another key, for example, on my laptop it is the “F2” key).
Just make sure you don’t miss this moment, everything needs to be done here quickly (I remember how many times I missed this moment). If you didn't have time, restart your computer and start again. If everything was done correctly, then the BIOS SETUP interface should open in front of you (blue letters on a white background or vice versa).

It should be recalled once again that different versions The BIOS interface may look different and the menu may be presented differently. But this shouldn't scare you. They all have the same principle.
Here we are interested in only one parameter (at least for now, for installing the system) - Boot. In different BIOSes it may be called differently - Boot, Boot Device, Boot Priority or something like that. If you cannot find the parameter you are looking for, then simply “walk” through the BIOS using the “up”, “down”, “left”, “right” keys and press “Enter” to go to the desired section.
In our case (see picture above) Boot menu located in the "Advanced Setup" section. By going to this section, you can find our menu, here it is called “Boot Device Priority” , press “Enter” to go to the menu .

Now we need to make the first device the CD-ROM from which the computer will boot, i.e. change the “1 st Boot Device” parameter from HDD (as seen in the picture) to CD-ROM. To do this, place the cursor on the corresponding item and use the cursor keys, or the “Page Up” and “Page Down” keys, or simply press “Enter” and select CD-ROM. You can make the HDD the second device by changing the “2nd Boot Device” item. What is it for? So that if suddenly there is no disc in the CD drive, the computer will immediately start booting from the hard drive and you don’t even have to “climb” into the BIOS and change anything.
After all these operations, we should save all these operations and exit the BIOS. To do this, you must select the “Save & Exit Setup” item, otherwise our changes will not be saved. In your version of BIOS it may be called differently, but in any case the word “Save” must be present.
So, we have dealt with the BIOS, now we should go directly to the Windows XP installation itself.
Before installing (reinstalling) the system, we will need to do the following:
- purchase an installation (installation) disk - this is a disk on which the operating system files are located, as well as drivers for some PC components. Installation is done using special program installation and copying files from the CD to the hard drive partition we specified. This program is located on the installation CD itself and without it the installation process is impossible. The installation disk should only be purchased in specialized stores, because... in markets or other stores they may give you a pirated version. If you have a laptop, then the installation CD should be supplied with the laptop by the manufacturer. Also included with the disc is serial number, which we must subsequently enter in the appropriate field. As a rule, the serial number is printed on the CD cover itself.
- Next, we need to make sure the CD drive (CD-ROM/DVD-ROM) is working. You should make sure in advance that the operating system is installed from a normally working CD drive, otherwise the installation process or completion of the installation will be impossible.
- Besides installation disk we also need to have a driver package for the hardware installed on the computer. When purchasing a computer or individual components, as a rule, driver discs should be included. As a last resort, they can be downloaded from the manufacturer’s website. Each piece of hardware or PC component should have its appropriate drivers installed, otherwise problems may arise due to device conflicts and the system will not start at all.
- The next step is saving the information. You must take care in advance of the safety of valuable information on your hard drive. In general, it is desirable that the disk on which the system will be installed be empty. All existing files should be moved to another logical drive.
Immediately after starting the installation procedure, you should pay attention to one detail - the fact is that for some computers containing cool hard disks SCSI or something RAID array special drivers are required (HDD controller driver). To do this, the program will display a message and ask you to press the “F6” key. Just don't miss this message. If you don’t know or aren’t sure whether you need it, then most likely you don’t need anything. If you see a message on the screen like “The installation program did not find hard drives on your system", then you should install it. These drivers are supplied by manufacturers on CDs; in extreme cases, they can be downloaded from the manufacturer’s website (which is what I did when I installed Windows XP). So take care of this in advance and if such an error appears, press the “F6” key and follow the instructions on the screen.

After the first copy necessary files The first menu will appear, in which we will be offered further actions step by step.

There is nothing complicated here, read carefully and choose necessary options by pressing the appropriate keys. In this case, to continue the installation, press the “Enter” key.

Having accepted license agreement We have reached the point where we need to choose which partition of the hard drive to install the system on, and here you can also create a partition, change its space, and format it in the desired file system. For newbies, this may be a little shocking. What are the sections? What the file system? So let's take a closer look at all of this.
Let's first understand what hard disk partitions are. In order to write data to a new disk or to a disk from which all data has been deleted, you need to prepare it, or, as they say, format it. Formatting is the preparation of a disk for creating partitions on it. When formatting a disk, absolutely all data is deleted from its surface.
A partition is a logical area on a hard drive used by a file system (NTFS, FAT32). One disk can contain several partitions. In other words, disk partitions are like mentally divided areas, in fact there is only one disk. Each hard disk partition can have its own file system.
Each section is marked with Latin letters (C, D, E, etc.). This is necessary to redistribute information between disks; in addition, this is necessary if two operating systems are installed on your computer (the files of each OS must be recorded in a separate partition). Another good thing about partitions is that if suddenly something happens to one partition (the disk was accidentally formatted, data was deleted), then the data will be saved on the other partition. Therefore, it is recommended to make backup copies very necessary files and keep them in a partition of the hard drive free from the operating system.
Well, this is the end of the lyrical digression and let’s go back to our setup. We need to partition the disk. If your computer already has partitions, then simply select partition C (place the cursor and press “Enter”), because Basically, the OS is installed on logical drive C.

As shown in the picture, we have no partitions (this is indicated by the inscription “Unallocated area”). As written, in order to create a partition in an unallocated area, press the “C” key.
When partitioning a disk, I would advise you to allocate at least 30 GB for the system (the logical disk on which the OS will be installed), because As you work on the computer, the size of the operating system will grow. If your hard drive volume is small, for example, 100 GB, then you can do less - 15-20 GB.
And so, next you must indicate the size of the partition to be created in megabytes. Enter the required size and press “Enter”. Thus we created the first section. In our case, there is only one. If you still have plenty free space, then you can create several more in the same way. If you suddenly make a mistake with the size, then you just need to press the “D” key to delete the created section. In this case, the unmarked area will appear again and you can start all over again.

If everything was done correctly, then place the cursor on the created partition C and press “Enter”.
So, we created a partition and chose to install the OS in it. Next, we need to choose which file system our disk will use. To install Windows XP, you can use two file systems - NTFS and FAT32. The file system is like a database that contains all the information recorded on HDD.
Today, the NTFS file system is used to install Windows XP, because... FAT32 has long been obsolete (it is compatible mainly with Windows 95-98). Essentially, the FAT32 file system has a number of disadvantages. The main ones are the limitation on the maximum file size; you cannot write a file larger than 4GB to a disk with the FAT32 file system, and this, I think, will not suit many people; The performance of FAT32 is much lower than that of NTFS, this can be noticed already when copying files from disk to disk; A hard disk partition containing the FAT32 file system cannot exceed 32 GB.
Based on the above, we forget about FAT32 and do not mention its name in a company where such issues are discussed, so as not to be laughed at.
The NTFS file system is the ideal choice for a user who decides to install the Windows XP operating system. Compared to FAT32, NTFS has greater stability and security at the file level, because... NTFS was developed as a complete replacement for FAT32.
Everything is clear with the file system, now let's move on to formatting.

If you remember, we select NTFS and our partition will be formatted with the creation of the appropriate structure. Let me remind you that formatting deletes all data. There are two formatting options - quick and full. It is recommended to perform quick formatting because... full is used when the disk is damaged, and it takes less time.

After the partition is formatted, the installer will copy the files to the disk, after which the computer will automatically restart and begin a new phase of the graphical installation.


The entire OS installation process, from the graphical stage to the last system reboot, takes on average 30-50 minutes (depending on the PC configuration).
After restarting the computer, we will see the familiar Windows splash screen, but the installation process is not yet complete. For some time, the installation program will configure drivers and configure the necessary services and devices, without requiring any action from us. After some time, we will be required to answer some questions. There is nothing complicated here either, let’s look at everything in order.
In the first window we will be asked to configure language and regional standards settings. If you install the Russian version of Windows, then Russia will already be selected by default in the regional standards and there is no need to touch anything.

I will not dwell on this in detail, because... All these language and regional format settings can be configured later, after installing the system. Moreover, there is nothing complicated here and you can understand it more fully yourself.
Go ahead. In the next window we need to enter our name and the name of the organization. Here it doesn’t matter what name you enter, you can use any name, and in the “Organization” field you can simply enter Home or enter nothing. After all this, click “Next”.

In the next window we need to enter a product code that will assign us this copy product. You can find this key on the cover of the disc or on the certificate that comes with the product. The code must be entered in Latin letters in each field, then click “Next”.

In the next window we should enter the computer name and administrator password. By this computer name, your computer will be visible in local network. If you don't intend to connect your computer to a network, the name doesn't matter here. But just in case, you can enter it. Who knows, suddenly there will be an opportunity to fight online in Counter-Strike or Underground. Also enter your password and password confirmation and remember it, or better yet, write it down somewhere.

Having entered the computer name and password, click next and the following window will appear in front of us in which you need to configure the date, time and time zone. Select your time zone and be sure to check the box “Automatically switch to daylight saving time and back” so that we don’t have to manually switch to summer and winter time, the computer will do it for us. Have you set it up? Click “Next”.

In the next window we should indicate network settings. Here we leave the switch on “Regular settings” and Windows will configure everything automatically. Otherwise, select “Special settings”.

Here again, I will not describe all these parameters in detail; I will write about this in another article. All these settings can also be made after installing the system. As a rule, by selecting the usual parameters, the OS finds all drivers, network components and protocols itself, because has a very solid library of drivers for a wide variety of devices.
The next window - we must indicate whether the computer will log into working group or domain. Select the first radio button if your computer is or is not part of a network and does not have an Active Directory domain configured for it. If the computer is connected to a network, then you should specify the desired workgroup. The default is WORKGROUP.

If this is your home computer, then leave the switch at the upper value and enter nothing in the field (leave the WORKGROUP value unchanged). After everything, click “Next”.
Now we are gradually approaching the end of the installation.
By selecting a workgroup and clicking on the “Next” button, the program will install the remaining files and then the computer will automatically restart.
With the first boot of the system, the monitor resolution is automatically optimized (monitor and click “Ok” twice). After this, the first launch wizard will open with an animated screensaver and a pleasant melody. Here we also read carefully and answer questions.


It is recommended to select the first radio button. When automatic updating occurs, the OS update service starts. The update makes the OS more protected from all dangers and viruses, and also increases its performance. If you suddenly need to disable this function, you can do it later.
In the next window, we will be asked to register our copy of Windows (Attention, if you purchased an unlicensed copy of Windows, then registration is out of the question). By registering your copy, you can stay tuned for release news new version Windows XP. Otherwise, it's of no use. Decide for yourself and click “Next”.
Now a window will open in front of you in which you need to enter a name account the main user (administrator), as well as the names of those who will also use the computer. In fact Windows developers came up with a wonderful feature to create an account for each user.

By registering each under his own name, the user receives his own individual desktop settings, software installations, various other settings, and much more. etc. If no one else uses the computer except you, then simply enter your name in the “Your account name” field and you will have administrator rights. You can add another user to the system later.
All this was the last step of installing the Windows XP operating system.
After we have installed Windows, we should then install all the necessary drivers for the chipset motherboard and all other devices, as well as additional software.
During the OS installation process, some drivers are installed automatically. But for stable operation of the system, you should install the package of “native” drivers included with the device.
First of all, we will install all the necessary drivers on the motherboard, namely on the chipset. To do this, insert the disk with a set of drivers from the motherboard (included with the computer) into the CD drive and follow the instructions. We also install drivers for the video adapter, sound adapter, network card and other devices. During installation, the computer may require a reboot, follow the recommendations and continue with the installation.
If you do not have a disk with drivers at hand and you downloaded all the drivers from the Internet, then they should be installed in the same order as described above.
Having installed all the necessary drivers, you can begin installing programs. You should not install all programs in a row. Install only those that you need. The fewer programs are installed on the PC, the more stable the system will work.
Programs can be taken anywhere: bought in a store; borrow from a friend; if you have high-speed Internet, then you can download them from the network.
Attention! After installing Windows, drivers and everything necessary programs It is recommended to optimize the OS and then create a restore point ( backup copy). This way you will protect yourself from unnecessary work in the event of a system crash.
In this article we will tell you in detail how to install Windows 7 on Windows XP. Late last year, Microsoft announced that XP would no longer be updated. In this regard, this issue remains very relevant.
What is needed for this
There are still many users who are loyal to XP. This is largely due to the fact that the “seven” is very demanding and old computer it is impossible to install it. In the era of rapid development of high technology, even software products have become very demanding.
Owners of old hardware have no choice but to use an outdated system. This allows the system to operate normally. Those users who decided to install “Seven” were sometimes dumbfounded by the terrible sluggishness of their computer.
Nevertheless, having updated their equipment, the lion's share of people immediately decide to update Windows. This allows you to take advantage of all the innovations of modern technologies.
- processor with clock frequency not less than 1 GHz;
- 1 GB of RAM (for 32-bit) and 2 GB (for 64-bit);
- at least 16 GB of free hard disk space. If your version of Windows includes additional software(office, antivirus, drivers, etc.) you will need much more;
- Internet access (for further registration);
- a video card that is compatible with DirectX version 10 or higher;
Advice: this condition is only necessary for modern games. If you only intend to use office programs, then it can be omitted.
- Some functions may require additional hardware (for example, a TV tuner or flash memory);
If you are confident that your equipment fully meets these requirements, you can proceed with installation. You can view all the parameters through the control panel, then the “system and security” item, in which we select the “system” tab.
BIOS setup
First of all, you will need to make some settings in the BIOS. To many inexperienced users, this seems like a complicated operation, but in fact, everything is quite simple.

We do the following:


That's all, now the next time you start the computer the system will start with desired device and the installation will begin. Also in BIOS you can immediately make additional settings, for example, increase the intensity of coolers. However, if you are not very familiar with BIOS, it is better not to do this in order to avoid mistakes.
How to install Windows 7 if you have Windows XP
Before installation, you will need to transfer all files from your computer to removable media, because it is better to install the OS by formatting the disks. If you don't have enough space, you can upload some files to a file hosting service.
Having completed all the preliminary manipulations, it’s time to begin the main procedure. Almost everything latest versions OS is installed in automatic mode, so this usually does not cause difficulties even for less experienced users.
Once you start the installation, you can go do other things. The system will do everything itself, and you will only need to specify some additional parameters.
Installation process
After turning on, the computer will immediately begin installing the operating system. Almost the entire process occurs automatically, so usually there are no problems with it.
The only thing you need to do is make some settings:
- the language in which the system will operate. However, it can always be changed through the control panel;
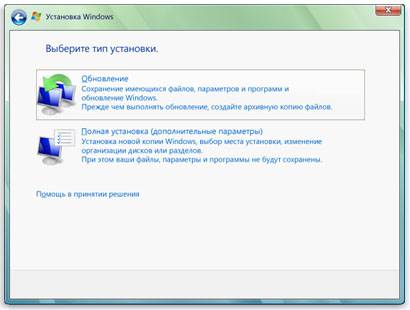
Important! Select full installation, as this will save you from additional difficulties
- creating partitions. You can divide the entire disk space into several parts. It is recommended to make a separate partition for Windows;

That's all. Now all you have to do is wait until the installation is complete. When finished, a window will appear in which you will need to enter your username and password (if necessary).
Some versions themselves enter the username at the end (usually the standard “Administrator”). If desired, you can edit this parameter.

If you did not format the partitions, then in one of them (most likely in C) all the XP files were saved. They need to be removed to avoid errors in the future.
This is done like this:
- Open Start and enter “Disk Cleanup” in the search menu. A list of found items will appear, among which you need to select the very first one;
- The disk selection window will appear. You need to select the one on which the previous OS was installed and click “ok”;
- in the window that opens, select “clean system files”;
- Next, you need to check the box next to “previous settings” and click “ok;
- When finished, click “delete files”;
- After a few seconds, the unnecessary folder will be deleted.
Install the drivers
Now all that remains is to install drivers for all existing devices (video card, chipset, network, sound, etc.). If you have a disk with drivers specifically for your computer (it is usually given upon purchase), then all you have to do is insert it and trust the instructions.

However, if it is missing, you will have to select drivers for all equipment.
You can do this in several ways:

Now you can judge with confidence that all the work is finished and you have completed the task. Don't forget that you will have to reinstall all software again. Therefore, get distribution kits in advance so as not to experience problems in the future.
In addition, software products that run on XP may not work on Windows 7. Therefore, before switching to this system, you should acquire more modern software products.

As you can see, this is a completely simple process and by strictly following all the instructions, you will certainly cope with it. If necessary, you can supplement the system with various additional utilities.
>Before starting work, make sure that you have all the necessary drivers for this particular system. You are unlikely to find them for new equipment, because Windows XP is no longer officially supported. Prepare an empty flash drive and save all important data somewhere. First you need to download the system image:
Then - the program Novicorp WinToFlash to upload it to a flash drive:
Very detailed creation process bootable flash drive reviewed in , we recommend that you read it. In short, you need to unpack the image with Windows XP into a separate folder, run WinToFlash, select this folder in it and wait for the process to complete.
Installing Windows XP
Now you can start installation. Since we are installing Windows XP from a flash drive, and it was originally designed for installation only from CD/DVD disks, there will be several nuances. When booting from a USB drive, a boot menu appears with two options: text and graphical installation. At the beginning, select the 1st item, and after an automatic reboot (after copying the files), boot again from the flash drive and select the 2nd.
- We enter Boot Menu
to select the device from which we want to boot. To do this, immediately after turning on the computer, press the key F10.
If you have difficulties at this stage, we recommend that you read the instructions. - Select a USB drive from the list, in our case Patriot Memory and press Enter.

- Select the first item. This will launch Windows installer XP.

- A greeting message will appear. Click Enter.

- We wait until the bootloader initializes the necessary drivers and prepares the files.

- Accept the license terms by clicking F8.

- Now the most important thing is to create a partition for installation. We will install the system on new hard disk, so choose to create a new partition by pressing the key C.
 The main thing at this stage is not to delete or format sections with your data (photos, music, documents, etc.). Most users use the D: drive for storage; it should never be touched. We format only the C: drive, deleting all files and the old system from it. In any case, it never hurts to backup important files before reinstalling.
 - We will create only one partition, enter the maximum possible size and click Enter.
 Here you can create two or more partitions; to do this, simply enter the required size and proceed to step No. 7. It is recommended to use a minimum of 20 GB of disk space for the system partition.
 - Select the partition to install the system and click again Enter.

- Select quick formatting. If the hard drive is very old or there are doubts about its reliability, it is better to choose a full format.

- We wait until the partition is formatted, then we wait until the files are copied.


- Once the copying is complete, an automatic reboot will occur.

- Now a very important point!
You must boot from the flash drive again and select the second menu item (as in steps 1 to 3 at the beginning), otherwise the installation will not continue. When installing from a CD/DVD, you don’t need to do anything, everything will work just fine.
 - If everything is done correctly, the installation will continue in graphical mode.

- The Regional Settings window appears. We don’t change anything, we press "Further".

- Enter the username, preferably in Latin letters.
 "Further".
 - We refuse to enter the key, press "No".

- We do not change the computer name, but leave the password blank for now.

- Set the correct time zone and time.

- Network configuration. Our computer is connected to the network through a home router, so we leave "Regular Settings" and press "Further". In any case, the network can be configured after installation.

- A window for connecting to your homegroup and domain will appear. For home use, you don’t need to change anything here again, just press "Further".

- The computer will restart again. You no longer need to boot from a flash drive; it has served its purpose. Now the initial Windows setup, in the welcome screen, click “Next”.

- Despite the fact that Windows XP is no longer officially supported, we include automatic update systems. When connected to the Internet, important updates released after SP3 will be downloaded and installed.

- We indicate to the setup wizard that our computer is connected to the Internet via a local network and click "Further".

- Once again we refuse to activate the system.

- Enter the computer user name, you can do the same as in step No. 16.

- This completes the installation of Windows XP, click the button "Ready".

- The familiar desktop appears, and you can begin setting up the system and installing the necessary software.


Initial system setup
- Update the system (just connect to the Internet, it will update automatically);
- Install the missing drivers using
A fairly convenient option when loading Windows XP onto a device is to use a special flash drive. Here the WinToFlash program will provide the necessary assistance. When it starts for the first time, you must agree to the user agreement and click OK. Next, the main application window appears, which looks like this.
Since the program is completely translated into Russian, the process of working with it is significantly simplified. To create a bootable USB flash drive, you must use the wizard. It involves support at all stages of this process. There is another approach to accomplishing the task. To do this, open the “Advanced Mode” tab and click on “Transfer Windows XP Setup to a Drive.” You should select the appropriate drive if it is not specified. After this, click the “Create” button.

Now you need to set the location Windows files XP. There are various options - they can be located on a hard drive, a CD, or as an image. The last point deserves separate consideration. In the presence of ISO image, you should open it with any archiver and then unpack it. 
The next step is to specify which flash drive should become bootable. Be sure to take into account the fact that this will entail the deletion of all data without the possibility of restoring it in the future. It is recommended that you first save important information to your hard drive. The conversion process itself takes some time and you just need to wait.
As can be seen from the written manual, creating a bootable Windows flash drives XP using WinToFlash is no problem. The application provides two main modes for performing this task. The wizard guides the user and is a classic approach. Advanced mode allows you to set certain parameters. For example, this includes choosing the type of bootloader, specifying the correction of some errors, and more. If this doesn't mean anything to you, you don't need to use the advanced mode.
You can download the program on the official website of the developer //wintoflash.com/home/ru/
Creating a bootable USB flash drive using - WinSetupFromUSB
It is quite popular when creating bootable flash drives. WinSetupFromUSB program. It is free software and offers a simple process to complete the task. This application provides the possibility of use for a wide range of purposes. 
Let's take a closer look at the process:
- The flash drive must be inserted into USB port device and launch the program.
- You need to specify the path to the flash drive. If it is the only connected storage device, it will already be set by default. When the location is specified, Bootice is clicked.
- A special Bootice window appears, where you need to click “Perform format”. There will be several options to choose from, among which you need to specify USB-HDD mode (Single Partition). A formatting message appears and must be confirmed. As in the previous case, it is recommended to save all important entries in advance.
- When formatting is completed, you need to click “Process MBR”, where you select the “GRuB for DOS” item and click the “Install / Config” button. When the process is complete, Bootice can be closed.
- Now you need to specify where the Windows XP operating system files will come from. As with the previous method, there are several approaches, but the principle of action remains the same. Once the location is specified, the "Go" button is pressed and waits until the task is completed.
The main advantage of WinSetupFromUSB is its in-depth approach, which allows you to use a lot of functionality. The program is great for advanced users.
Preparing the hard drive during Windows XP installation
Before you begin the process of installing Windows XP on your computer's hard drive, you need to prepare it. Please understand that installing multiple operating systems onto one logical drive is impossible, since in this case none of the systems will be able to work correctly. Therefore, before starting the installation, it is necessary to format the HDD partition on which we will install.
We start from the previously created bootable flash drive, 
After which the message “Installing Windows XP Professional” will appear on the monitor. At this time, the process of downloading drivers that are necessary for the OS installation program to work occurs. 
After this, a window appears that offers you to choose one of several options for continuing work. We need to start installing Windows XP, so press the Enter key and agree with the first point.

We read the license agreement from Microsoft and agree to it by pressing the F8 key. 
After this we see a window in which we are asked to restore previous version Windows. You will see this message only if you already have one of the versions of Windows XP installed on your computer. In any case, we recommend not performing a system restore, but proceeding with installing a new version, since only this option can solve all problems and ensure stable and reliable operation of the computer. To do this, press the Esc key. 
Now the installer shows us a list of logical partitions on the hard drive. It is recommended to install a new Windows versions XP to the same partition in which it was previously installed old version, as a rule, this is drive C. Select this partition and press the Enter key. 
Now we have to select the type of file system that will be created on the logical drive after formatting. For modern computers, in most cases, the NTFS file system is best suited, so select the “Format partition in NTFS system" and press the Enter key. 
After this, the installation program will display a window warning that all information from this partition of the hard drive will be deleted during formatting. If all important information you have transferred it to other sections in advance - feel free to press the F key.
The formatting process begins, which may take quite a long time, depending on the volume logical drive. 
Once the formatting process is complete, Setup will automatically begin copying Windows XP files to your computer. 
After this, the computer will automatically restart. The system will start booting from the computer's hard drive and the Windows XP installation process will begin in graphical mode.
The Windows XP installation process - the main stage
This section will directly answer the question “How to install Windows XP.” This information is absolutely identical both for the process of installing Windows XP from a CD, and for installing Windows XP from a flash drive on a laptop. The “Information Collection”, “Dynamic Update” and “Preparing for Installation” stages occur without our participation. After this, we are asked to configure the language, regional standards for displaying numbers and currency units. To do this, click on the “Configure” button in the “Location” section. Select your country from the drop-down menu and click OK. After that, click on the “Customize” button again, but this time in the “Language” section. In the first drop-down menu we can select the language that will be used by default when the computer boots. Below you can add input languages by clicking on the “Add” button (by default, two languages are available, Russian and English). If we click on the “Keyboard Options” button, we will be taken to a menu where we can set a key to disable Caps Lock mode, as well as change the keyboard shortcut to switch the keyboard layout. After completing the language settings, click “Next” and move on to the next window. 
Here we are asked to enter our own name and the name of the organization. Enter absolutely any data and click “Next”. 
Now you need to enter the 25-digit license key to yours copies of Windows. This key is located on the box if you use licensed copy. In the case of pirated products, it must be in text file. Enter given key, check the correctness of the input and click the “Next” button.

After this, a window appears for setting the computer name and password for a user with administrator rights. In case of work on home computer, you independently choose the name that will be assigned to your PC in the future. home network. If you are working on a corporate computer, check with your network administrator. The administrator password that you set in this same window should be remembered or written down, since it will be needed every time you start Windows. 
In the next window we are given the opportunity to set the date and time. Choose required settings and click “Next”.

After this, go to the “Configure network settings” window. It is best to skip the local network setup at this stage and do it later, after the installation is complete. To do this, select “Regular settings” and click the “Next” button. 
Leave the work group unchanged "WORKGROUP" and click next. 
After this, copying begins system files to your computer's hard drive. Wait until the installation process completes, after which the first Windows startup XP. If it starts at this time automatic setting monitor - wait for it to finish and click OK. 
In this window, left-click on “OK” 
After this we will see an animated window Windows greetings XP. 
After this, a window appears asking you to enable the automatic Windows updates. Based on experience, it should be noted that it is better to leave automatic updates disabled. And update the system manually.

Next, we will be asked to set up an Internet connection and activate a copy of the OS. You can skip this step for now. 
Are you ready to register with Microsoft? To this question we answer “No, some other time” and click next.

The next window prompts you to enter your account name, as well as the names of other users who will also work on this computer. Note that accounts named Administrator and Guest were created during the OS installation process. 
At this point, the installation of Windows XP is complete, click the “Finish” button and enjoy the clean operating system.

So, first you need configure BIOS. To do this, turn on the computer and immediately press the key "Delete"(on some keyboards, short “Del”) on the keyboard until we get to BIOS(by the way, I almost forgot, your Windows XP boot disk should already be in your CD/DVD drive).
Your BIOS may look different. It depends on the manufacturer and. But don't be afraid, the settings are basically the same. In BIOS we will work with the arrow keys ←→↓ . So, we went into the BIOS, then go to the tab Advanced BIOS Features:
The name of the tab may be different in your BIOS. If so, then go through the tabs and find which one contains device boot options. In my case, this is what the device boot parameters look like:

Now our task is to make sure that the computer boots from the disk, i.e. on "First Boot Device" we will deliver CDROM. Let's do it like this (select the option opposite First Boot Device , press Enter on the keyboard and use the arrows to select CDROM):

It should look like this:


Maybe this confirmation will appear. Click "Y" on the keyboard, which means "Yes"(Yes), and press Enter:

Next there will be a reboot. We are waiting for such an inscription to appear "Press any key to boot from CD", which means « press any key to boot from CD« . Press any key:

And the installation program will start. After checking your system configurations, you will be given the option to Restore your existing system or install a new OS. Choose "ENTER=continue":

Then we accept the license agreement by pressing the button F8:


Then select the partition on which Windows will be installed. This is usually the section C:

Don't be afraid, click WITH:

Choose "Format partition in NTFS system":

Confirm with the key F:


File copying will then begin automatically:

After this, the computer will restart. Never click on "Enter - restart computer", otherwise the installation will be interrupted. Let the computer reboot itself:

After the reboot you will again be prompted to press any key, nothing don't press and then you will start the installation again.

After the reboot, the installation will continue, but in a more attractive environment:


Set the time, date, time zone and move on:

If this message appears, click OK:

Click again OK:


Select an item "Delay this action":

We write the account name. You can have up to five if there are several users:


That's it, the installation is complete!

Hope Windows XP installation was successful. All that remains is to install the drivers for normal operation of the computer. Good luck!!!
 Order 343 mail. Order by Russian post. Consequences of failure to appear in court when summoned
 How to put a password on a folder on a Windows computer without and with programs
 Pluton – Free Bootstrap HTML5 One Page Template
 History of ZX Spectrum: Myths and reality New Spectrum
 Voice assistant Siri from Apple Siri functions on iPhone 6s
 How to roll back to a previous version of iOS?
 Unlock iPad in four days