Installing windows on a new computer from a USB flash drive. Installing Windows from a USB flash drive via BIOS. OS version selection
Good health, my dear readers and computer enthusiasts!
Yesterday I dealt with a friend's laptop, who asked to demolish the tenth Windows and return the seventh to him. I didn’t have a free disc, and I decided to resort to such a step as installing Windows 7 from a USB flash drive. Well, by tradition, I installed it myself - I shared it with friends! Today I will tell you all the secrets of installing this operating system from a USB drive.
When do I need to reinstall the OS?

Imagine you have installed an operating system, work, install various programs, a month, the second, the third. And in the end, you understand that the visual shell starts to slow down a lot, especially in demanding toys or software like Photoshop. It is virtually impossible to fix the problem automatically. Constant cleaning of the registry will not endlessly save the situation either.
Professional system administrators are advised to reinstall the OS once a year. They argue that even with the right skin care practices from Microsoft, someday it will still be littered with bugs, reports, and other nonsense.
And all of this will greatly reduce performance. Believe me, even the updates that the graphics platform downloads from the official sites can also fill the general registry with bugs, for example, with a crooked installation or a bit of a package of files.
What do you need to prepare before taking action?
First, you need to take care of the files you need. You don't want to lose them, do you? Therefore, I offer you several options. If your hard drive is partitioned into logical disks, then transfer everything you need to a hard drive that does not have a system. Typically, these discs are designated by the letters " D" and " H". Just copy all archives, photos and music with movies to them. Of course, if there is enough space.
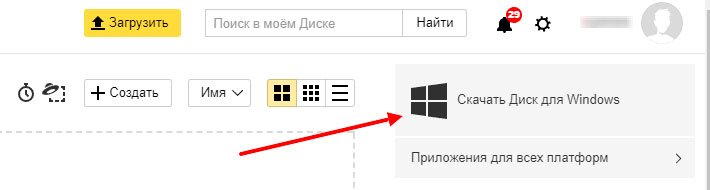
If it is not enough, or the hard is not divided - do not worry, it will come to the rescue storage from Yandex... Come here, register and either click here and load the info.
Or download the client.

After installation, you will have a shortcut like this.

Open it and work as with a laptop and a network drive. Please note that the software has become, as it were, a part of your computer.

And if you like Google more, then that way.

Everything is very simple, just like above, you either download the client, or load it through the drop form on the site itself.

Well, if this option did not suit you, well, then you can rewrite everything on a disc.
By the way, on the hp laptop I was working on, I generally used both virtual storages. There is an unmeasured amount of files.
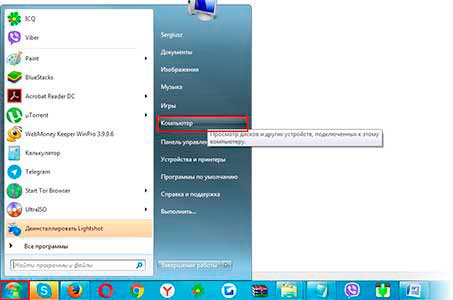
Now take the USB stick and insert it into the port. Now you need to format it. This is how it is done. Open my computer and right click on your flash drive.
And you click the word " format».

And now you will have a photo of such a window.

You need to change the file system to NTFS and to start the process click on the button of the same name.
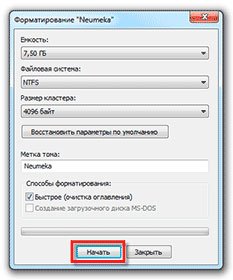
In this plate, click " Yes».

As soon as everything is over, such a sign will automatically pop up.

That's it, now you can leave the device unattended and go to the software.
From here we swing torrent program... A from here system distribution kit. Then here you take Ultraiso program - and put it on.
Now let's move on to the preparatory work on recording the system.
Burning an operating system to a USB flash drive
So, the time has come for the most important aspect. Open the Ultra ISO program. Then open the system image.
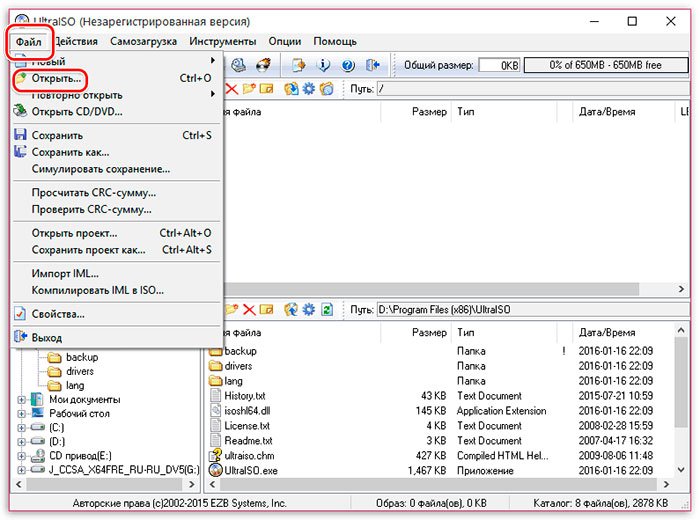

A new window will pop up. I advise you to format the flash again.

Now you write it down.

BIOS setup
Another important aspect. BIOS is a set of firmware that is responsible for the hardware in your laptop. If you do something wrong, you will create problems, or even burn your laptop altogether. Read the article carefully and do as I show.
We need to build a boot e from the hard drive and from our flash drive. It is not difficult, you do not need to be careful. BIOS can be of various configurations. Let's take a look at the different versions and and setup principles.
Award BIOS
The simplest and old enough. It features a bright blue screen background. To get into it, you need to press DEL or F2 on the keyboard immediately after restarting the computer. You will have this image.

Now goes to the First Boot Device tab. And in this line, put the USB HDD indicator in the first place from the column. That is, the computer will initially load external devices, and only then hard, which is what we need.
AMI BIOS
Now the same, but in a different bios version. Let's go here first.
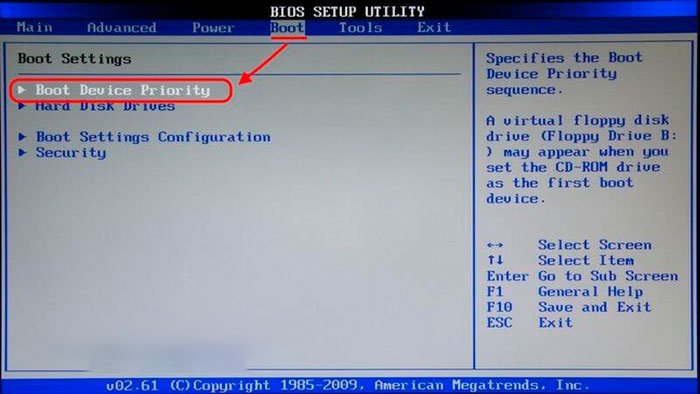
Then select the third line and move it to the very top. Like this

Everything. Now press Form 10 and we leave. We have configured everything we need through the BIOS.
Installing the system
Well, now it's time to start the installation itself. As soon as the laptop turns on, you will see this image.

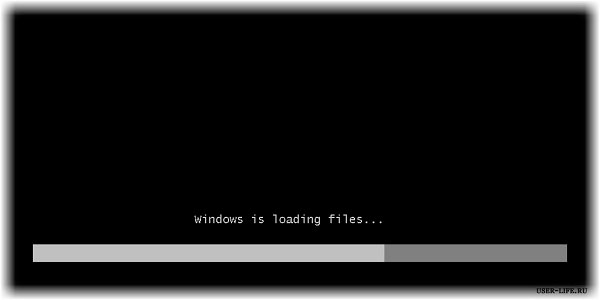
As soon as the scale reaches the end, the interface itself will open.

You need to select the Russian language everywhere (if you are not a foreigner) and click on.
And now " install". There is only one button, so you can't go wrong.

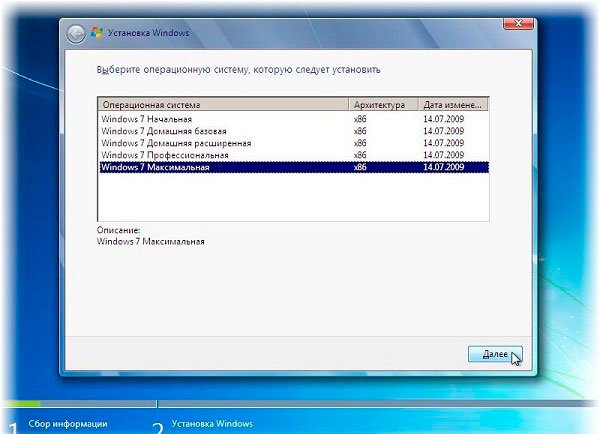
If you have the assembly that I offered you. Then you will be prompted to select the edition of the operating system. Choose the one that suits you. If you have a computer with two or more cores, then the bit depth is 64 bits, if not, then 32.
Now you need to select the bottom line. The top one is the update. Automatically it will just restore the system, but we want to rebuild it from scratch? So we need a complete installation.

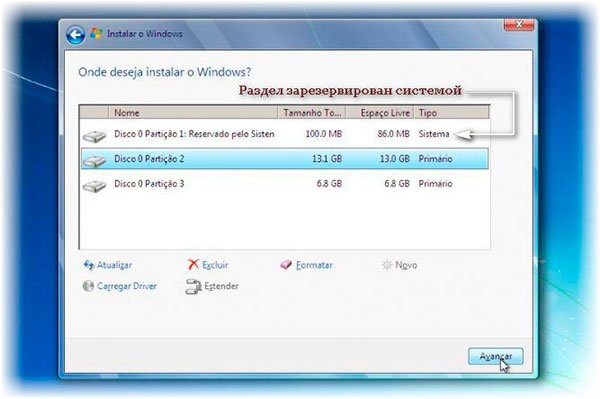
The hard disk interface will now open. If you don't have it separated, just format it. If there are several, completely erase the one where the system was. In general, you can divide it later, for example, the acronis program will help with this. But more on that later. Once everything is ready, select a new blank section and press Further.


The installation process will now begin. The files will be copied first, then unpacked. Next is the installation. You will have enough time to have a hearty lunch or at least drink tea, as it takes quite a long time. Wait for the first reboot.

As soon as the computer is rebooted, immediately remove the USB flash drive. It will boot from the hard drive and you will see this interface.

Fill in the stitches and go to the next step.

Here you can skip everything while installing the OS without activation. Click Further.
Now security settings. If you are not a secret agent and your personal computer, then choose the first line.

Configure your time zone.

Select your home network.

That's it, you just installed Windows yourself. Congratulations, but that's not all.
Final measures
So, we already have Windows, we have the Internet. But we cannot do without drivers. We climb over here- and download the booster driver.

Install and press the scan button.

Once everything is found, click " update all". Then everything will be done automatically.
Now restart your computer. Everything should get better, faster, brighter, juicier.
Since you will most likely have to deal with ISO images, you will need the Alcohol 120% program. Take her can be here.
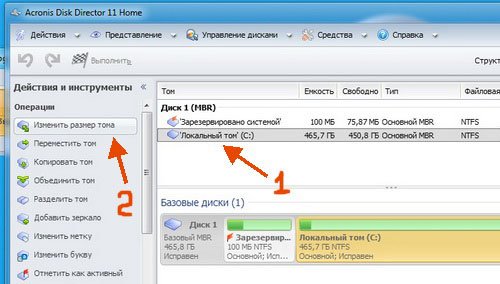
Division of the hard drive
Above, I said that it is best to always divide your hard drive into several parts. Just so as not to lose files, and it is more convenient to work. The section for Windows remains exactly for it, so there will be no garbage on it (well, except for system errors). We need a program Akronis Disk Director... The software is very useful and really cool. Not free, but there is a trial period, so you need to do everything quickly and immediately.
Run the software.

Now select your hard and click on resize the volume.
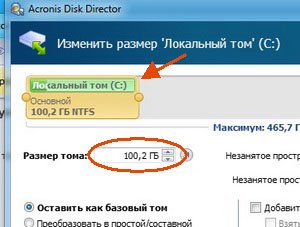
Either drag the slider and indicate how much space should be on each hard drive, or write down how much should be on the local HDD that you are creating.

I advise you to leave the operating system water a hundred gigs. This is not a little, but also a little. Quite enough for normal work.
Now click on the section that has just been displayed and click on the tab “ create volume».

Now choose “ base"And go on.


Now we put the file system, the letters of the volume and the name and click on the pip " complete.

Go to the top of the interface and click here.

We click to continue.

And now OK.

That's it, the computer will reboot, and then you will have your new hard drive. By the way, here is a video that will help you.
Conclusion
That's all, my dear readers! Now you can do all this on your own, and even teach your friends. By the way, share this article with them on social networks and messengers, it will be useful to everyone.
I want to remind you that all programs must be run as administrator. You can install anti-virus programs, they will help you avoid infecting your machine. On this I say goodbye to you! Subscribe to my blog to keep abreast of new useful materials that I write especially for you. All the best and see you soon!
Installing from a bootable USB stick is not only the only way to install win-based operating systems on netbooks and laptops without DVD-ROM, but also the ability to significantly reduce the time spent on the operation.
Before you learn how to reinstall Windows 7 from a USB flash drive, make sure that the computer's motherboard supports installation from USB:
- reboot the system, at the time the system boots, hold down the key indicated on the screen that opens access to the BIOS settings;
- in the menu that opens, you need to find the tab responsible for the boot order of devices. (boot device priority or similar inscription);
- make sure the USB item is present and prioritize it first;
- leave the BIOS with the obligatory saving of the settings.
If the motherboard does not support reinstalling Windows from a USB flash drive, all your subsequent actions will not bear any fruit.
Making a USB flash drive a bootable device
The method I use assumes the use of operating system software and does not require downloading third-party programs.
You will need:
- USB 2.0 flash drive with a volume of 4 GB or more. The faster the speed of the device, the less time it will take to prepare, and in the future, to install the system. I recommend using a drive with a read speed of 30 MB / s and a write speed of 10 MB / s;
- a disc containing Win 7 or an ISO image;
- a computer running under the Windows operating system;
- careful following step-by-step instructions.
Attention! Make sure to copy all the necessary data from the USB stick before proceeding! In the process of preparing the USB flash drive for reinstalling Windows, it will be formatted.
1. Insert the USB stick into a working USB port on your computer or laptop.
2. Click on the "Start" button and in the "Find programs or files" field enter cmd.exe. You will see the corresponding shortcut in the results output field at the top. Click on it with the right mouse button and run it with administrator rights
For simplicity and convenience, copy the commands directly from the guide (select with the mouse Ctrl + C), and paste them into the command line using the Ctrl + V key combination. Press Enter on your keyboard to apply the command after insertion.
3. In the window that opens, enter the command
4. To access the list of disks connected to the system, enter the command list disk.
5. The displayed list will show us the hard drives and flash drive connected to the system. Based on the size of your flash drive, select it with the command, changing # to the number assigned by the system to the USB drive.
Attention! The volume of the device can be displayed not in GB, but in MB. Make sure to select the correct drive, as the next command will erase all information from it.
6. Enter the command clean and we are waiting for the completion of cleaning the flash drive .
7. Create a primary partition with the command create partition primary(press Enter), select it with the command select partition 1(Enter) and activate with the command active(Enter).
8. To format the flash drive, enter format fs = NTFS.
9. Let's give the device a letter designation to avoid confusion. I recommend choosing letters from the end of the Latin alphabet, for example assign letter = X.
10. We exit the utility with the command Exit.
This completes the difficult part of preparing to reinstall Windows 7 from a USB flash drive! If you did everything correctly, the USB drive now appears as a removable drive X.
Copying a distribution from a disk or image
If Windows 7 is recorded on a disk and the computer you are using is equipped with a disk drive, it will be enough to insert the CD into the DWD-ROM, open it and copy the contents to the USB flash drive.
If you do not have an optical disc drive, use an ISO image of your operating system. Download it from a torrent tracker you trust. I recommend that you use "clean" images, not authoring assemblies.

If you rarely work with images and a utility like DAEMON Tools Lite is not installed on your computer, I suggest you use the free 7-Zip archiver. Just unzip the ISO image onto the prepared USB flash drive.
If you have already configured the boot priority in the BIOS according to the instructions at the beginning of the article, restart your computer to start the system installation. Further steps are similar to installing the system from disk.
Congratulations, you have learned how to independently reinstall Windows from a USB flash drive and change BIOS settings.
Computer failures are not uncommon. Either the antivirus will miss, and viruses will settle in the system, then the program will not install correctly and start sending spam in the form of error messages, then after the next Windows update it will retire. One way or another, reinstalling Windows is still one of the solutions. It seems to be simple: we swam, we know, we used the installation disk more than once. Only this tricky trick does not always work now. Netbooks do not have DVD drives. So the question comes to mind, but how to reinstall Windows from a USB flash drive on a PC? It's actually very simple.
Step # 1: Prepare your computer
Let's start with a trivial action - copying data from the local drive C. For someone, it may and will turn out to be news that after reinstalling Windows, all information on the hard drive will be deleted. But you and I are well aware of this and therefore do not forget to take care of the backup of important documents and files from the working disk C in advance.
Step # 2: create a bootable flash drive
It's no secret that you can make an installation one from an ordinary flash drive in a variety of ways. One way or another, all the original data on it will be deleted regardless of the method used. In this case, the most commonly used methods to write a bootable Windows image to a USB drive are:
- configuration via the command line;
- processing in the Rufus utility;
- writing an iso image to a USB flash drive via DAEMON Tools;
- recording in the UltraISO program;
- preparation with the program Windows 7 USB / DVD Download Tool;
Each of these methods, of course, has its own advantages. However, the easiest way is, perhaps, to use utilities such as Rufus and DAEMON Tools. If you want to try other methods, read on.
Option # 1: DAEMON Tools Ultra
You can download the program directly from the official website. In fact, it is paid, but the developers provide users with the opportunity to test it absolutely free for 20 days. Agree, during this time, not only one, but a whole ton of flash drives can be prepared.
How to work with DAEMON Tools Ultra? Simple enough. Open the program, go to the "Tools" menu and select the "Burn boot image ..." item in it:

After that, we insert a USB flash drive with a memory capacity of 8 Gb or more into the computer and alternately perform the following actions in the program:
- select a USB drive;
- we register the access path to the bootable Windows image;
- set the MBR parameter for writing;
- put a tick in front of the "Format" item;
- select the file system. For those who do not know what is the difference between FAT32 and NTFS and which of them to give preference, let us explain. The first type of file system is suitable for computers with a standard BIOS. In UEFI, devices with NTFS are often unreadable. But FAT32 can be used in both BIOS versions;
- if necessary, prescribe the volume label (rename the USB flash drive);
- check the availability of free space on the USB-drive and press the "Start" button.
This process looks like this:

In principle, this is all that is needed, so after clicking on "Start" the Windows image will begin to be written to the USB flash drive in automatic mode:

All that remains is to wait until the Windows is written to the USB flash drive, and then click the "Finish" button:

As simple as that, isn't it?
Option # 2: Rufus
It is no less convenient to create a USB drive with a Windows iso image using the Rufus 1.4.12 program. You can also download it absolutely free of charge from the official website of the developer. The instructions for it look like this:

Step number 3: Configuring the start of the computer
After the USB installation media with the Windows image is ready, you can safely start editing the computer boot process. Note that you can set up a launch from a flash drive in different ways:
- using hot keys;
- through bios.
In the first case, when booting the PC, it is enough to press a special button, and then select from the options offered to start from a USB drive. As a hint:

In the second case, in order to enter the BIOS, at the time the computer boots up, you will need to press F1 / Del / F2 / F3 / Tab + F2 / Esc on the keyboard. Keyboard shortcuts may differ depending on the PC manufacturer, as well as the options for action after opening the program itself. True, the reason for the discrepancies will be different - a different interface in the BIOS versions (Award, AMI, Phoenix-Award, UEFI).
Hello, friends!
Today I will answer the three most popular questions that arise among users who decide to install Windows 7 or Windows 8, 8.1, 10 for the first time from a USB flash drive.
How to install Windows from a USB stick?
How to make a bootable USB flash drive?
How to boot from a USB flash drive?
Recently, the issue of installing Windows from a USB flash drive has become especially relevant. The share of so-called netbooks is rapidly growing in the computer market. Compact netbooks with no optical drive are mobile and handy.
That's fine, but what if the DVD drive is missing? In fact, the absence or malfunction of the drive does not mean at all that you will not be able to install Windows or any other operating system. This problem has a simple solution: you need to write the installation files to a USB flash drive and install from it.
The very process of installing an operating system from a flash drive is much more convenient and faster. Why waste time and money buying a disc when you have a USB drive at home. In addition, there is no guarantee that you will get Windows on the disk the first time, therefore, this is an extra cost. All we need is a 4GB or larger USB stick.
How to install Windows from a USB flash drive
In fact, the process of installing Windows from a USB flash drive is no different from. The only difference is the media, in this case the USB drive, from which the installation will be performed. Accordingly, before installing Windows from a USB flash drive, you need to transfer all important data from the partition to which you are going to install the system, usually Disk (C :), to another partition. Also, don't forget in advance. Nowadays, when a computer is used for payments, I recommend it right away. And, to completely close the installation issue, (follow the link for a guide on how to do it right). I also recommend that you pay attention to the good one. In short, serious work lies ahead. Hopefully after all this, you won't look. 🙂
How to make a bootable USB flash drive?
There are plenty of ways to prepare your USB stick for the subsequent installation of the operating system. I decided to stay on the most reliable and proven method: by means of command line.
It is suitable both for preparing a USB flash drive with the subsequent installation of Windows 7, and for installing Windows 8 (Windows 8.1). Don't be confused by the abundance of screenshots and the seeming complexity of this method. This is not so, you will soon see for yourself. This method allows you to create a bootable USB flash drive directly from the Windows 7 operating system itself. Let's get started.
Attention: to install Windows from a USB flash drive, you will need to fully format it, respectively, all the stored information on it will be deleted, so copy important files to another disk in advance.
In this case, we will prepare a bootable USB flash drive with Windows 7, but in the same way you can make a USB flash drive with Windows 8 (8.1).
First, insert the USB flash drive into the laptop and launch the command line. To do this, click on the Start menu → Run or the key combination Win + R with the output of a dialog box, where we type the command cmd and click OK.
A dialog box will appear that looks like this.
In this administrator dialog box, you will need to enter a number of commands, which I will give just below, and always confirm the action of the commands by pressing the Enter key. Let's get started. For convenience, commands can be copied here and pasted into your dialog box.
Enter the command diskpart and press Enter:
Now you need to display a list of storage devices, for this we enter the command list disk and press Enter:
Disc 0 size of 232 GB → this is my hard drive, we do not need it, but Disc 1 29 GB in size → this is my flash drive. By the way, if your flash drive is 4 GB or 8 GB, then do not look for exactly this size, as a rule, the system can show 3822 MB or 7640 MB, respectively.
Be careful!! 1 -> this is my disk number. If you have a flash drive number 2 (respectively, Disc 2), then we enter the command select disk 2... This is extremely important, otherwise you can easily erase the entire hard drive.
Since I have this flash drive Disc 1(I remind you that you may have a different number), then we enter the command select disk 1 and press Enter... Disk 1 is selected.
Enter the command clean, it clears the selected drive, and press Enter:
Next command create partition primary and click Enter.
You need to format the flash drive to NTFS format. Let's get started. Enter the command format fs = NTFS and press Enter... We are waiting, it will take some time. There is a team for the impatient format fs = NTFS QUICK.
When the formatting is complete, we enter the assign command and a letter is automatically assigned to the USB flash drive, in my case (J).
It remains to complete the work. Enter the command Exit and press Enter.
The most interesting is over. By the way, this is how our flash drive now looks like in the system: Removable Disk (J :).
Now we copy all the files from the Windows distribution disk to the USB flash drive. If you have an ISO image with a distribution kit, then I recommend using the DAEMON Tools Lite utility.
Install this utility, select iso image with Windows and double-click the left mouse button, the image is mounted, then you need to open the folder to view the files.
Now we just copy all these files to the previously prepared USB flash drive.
You can also use the 7-Zip utility. Run the utility and select the ISO image with Windows, click on the "Extract" button and specify the USB flash drive.
That's all. Our Windows 7 bootable USB stick is ready to install. If you did everything correctly, then by running the file setup located in the directory of the flash drive, the Windows installer will open.
Let's move on to the next step. Now we need to boot the computer from the USB flash drive and start the installation of the Windows 7 operating system.
How to boot a laptop from a USB flash drive?
So that we could boot a laptop from a USB flash drive, disk or other media, so-called ones were invented, allowing you to get into the boot menu bypassing the BIOS settings.
I will give an example of how to get into such a boot menu on various laptop models. We reboot the laptop and, depending on your model, press the corresponding hotkey at the start of the boot. In my Asus laptop, this is the ESC key.

Hello dear readers! It is obvious that even neat and not the most active PC users sooner or later need to reinstall the operating system. A computer that has been running on the same OS for a long time starts to work slower, new errors appear and make it difficult to work properly with the device.
That is why it is recommended to periodically re-install the system. Here the question arises: how can you do this if the distribution kit is not at hand on the disk? There is only one answer - using a flash drive. This guide will help you quickly figure out how to properly reinstall Windows 7 from a USB flash drive without any problems - debriefing will take a maximum of a few minutes!
Preparation for the upcoming procedure
Before starting the reinstallation procedure, you need to prepare:
- Copy from the system drive (usually "C") all the necessary and valuable information for you to another partition of the hard drive, or better to removable media. During the reinstallation process, the data from the local drive "C" is erased as a result of formatting, so it is recommended to duplicate the necessary information.
- Prepare all the drivers necessary for the operation of your devices in advance. It often happens that after Windows is reinstalled, some external devices will stop working for lack of drivers. In order not to face this problem, you will have to look for drivers yourself before the procedure.
- Make sure that the bootable USB flash drive with the OS distribution was recorded correctly. Check if all the files from the image are on the media - just compare the number of files and the size. If there is not all the data on the flash drive, it is recommended to overwrite it so that there are no problems during the installation.
Now that everything is ready, you can start installing Windows 7 from a USB flash drive. Do not be afraid ahead of time - this procedure is performed much easier and faster than it might seem to the user, especially the inexperienced.
BIOS setup for correct OS reinstallation
BIOS is the place where all the parameters of your PC are registered, be it a computer or a laptop. These include the system boot settings. In order for the device to start from a flash drive, you need to configure the BIOS to work with it. This is quite easy to do - just follow the instructions below:
- Insert the media into the USB port and restart your PC.
- Press F2 during reboot. In some models of BIOS, you need to press F11 or Delete. More detailed information can be found at the start of the OS - everything will be written in white on a black background.
- In the BIOS menu that opens, select the BOOT item (the name may differ). After that, a list with devices from which the system can boot will open. Select your media and rearrange it to the first place using the keys on your keyboard. Save the changes by pressing F10 and confirming the exit from the BIOS.
After setting up the BIOS, you can proceed directly to such a thing as installing Windows 7. How to do this?
Reinstalling your system in a few easy steps
In fact, you have already done the most difficult thing in the previous stages - the installation of the system itself is carried out almost automatically. We still recommend that you read the following instructions:
- Insert the media into the USB port and restart your computer. The download should go from your USB stick.
- Wait for the welcome window of the installer and follow the instructions that it offers you.
- At the stage of choosing a disk for installation, select the system partition, format it and click "Next".
- Wait while Windows 7 is installed on your PC - this procedure is performed automatically.
During the installation, the PC will reboot several times. At the final stage, you will be asked to specify the PC name, date and time settings, and administration settings. There will be no problem at these stages.
After you specify all the data, you will need to wait a few more minutes - after configuring the OS, you can get to work - this is the end of the procedure for reinstalling the operating system!
Share the article with your friends using social networks - they will be grateful to you when they learn to install the system from a USB flash drive! Subscribe to updates to stay up to date with the latest blog articles!
 Moving and copying cells, rows and columns How to move the cursor down on the keyboard
 B6. The concept of an algorithm. The executor of the algorithm. The system of commands of the performer (by the example of the training performer). Algorithm properties. Algorithm recording methods; block diagrams. Informatics and information technology The algorithm of which is a computer
 Algorithm Types - Knowledge Hypermarket
 Distress Alert Methods
 Document Model Text Formats
 Abstract "Measurement of information
 Microsoft Word word processor