Windows xp on a new computer. How to install Windows XP from a disk. How to install Windows XP from a disc the traditional way
Installing Windows XP, and Windows in general, is a simple but long process.
I will tell you how to do this without the help of specialists/computer friends. So, the whole process is divided into 3 logical stages:
- Stage I: Preparation
- Stage II: Installation
- Stage III: Setting up
Stage I: Preparing to install Windows
Before you begin installing Windows, you need to copy all important information and settings so as not to lose them.
There are many different ways do this, and I will not consider all the options, but will focus on the most basic ones.

At this point, our preparations are completed, and we can proceed directly to the installation.
Stage II: Installing Windows
So, now we are prepared and we can proceed directly to the installation.
We insert the disk with our treasured Windows XP into the drive and... no, we don’t install it. Don't even think about installing the Operating System from within the Operating System itself! We need to reboot and enter bios suspended animation (from the word B asic I nput/O utput S system). To enter it, you need to press the Del button when you boot your computer, or F2 if you have a laptop. Although in some cases you need to press other keys, so look at what is written at the bottom of the monitor screen. there will be a message like "press del to enter setup".

Finally, Windows has installed, you have rebooted, now you can remove the installation disk and proceed to the third stage.
Stage III: Setup after installing Windows
We take out our installation disk and start setting up.
- Drivers and what to do with them.
First of all, you need to install drivers so that the computer knows what to do with what, and in general can feel comfortable.- Insert the disc from motherboard. It is important for us to install 3 drivers: chipset (chipset), audio (audio) and Internet (ethernet). But if the program offers you more, then we agree to this courtesy and install it. Reboot so that the drivers are fully installed.
- If there are no disks, then we remember where we downloaded our drivers from the official sites and install them from there.
- We insert the disk from our video card. As you may (or may not) notice, if you drag windows, you can see that they move in jerks. This indicates that your video driver is not installed. So install the video driver from the disk and reboot.
- Next, we follow the same scheme and install the rest of the equipment. For example, a scanner, printer, tablet, mouse, keyboard, etc.
- Successfully Installed or how to determine if everything is in place
We need to make sure that we haven't forgotten anything and that all the drivers are installed correctly. This is not difficult to do. Let's go to Control Panel --> System --> Hardware --> Device Manager. As you can see, we have all of our installed equipment listed here. If there is a question mark next to something, this means that the driver for this device is not installed and the system does not know what to do with this equipment. If you find such an icon, then read what it says next to it and install the driver for this device. Ideally, there should be no question marks at all, as, for example, here:
3. Optimization or freeing up memory.
For more comfortable work, in the partition where you have Windows installed, nothing unnecessary should be installed; it is also advisable not to have a swap file on it and temp folders. This is what we will do now.
- Doesn't let me access the internet?
Remember when we wrote down strange numbers on a piece of paper? Now you need to write them back in. To do this, follow step 3 of the first stage
This completes the whole process. You now have a brand new Windows, which is also already configured. Can be used
Afterword
It seems as if all this is very complicated and incomprehensible, but after 10-20 identical actions and Windows settings, you will do it instantly. And there’s really nothing complicated about installing an OS, it just takes a little more time and attention
Now I would like to mention some points that are somehow not included in the scope of this article.
- When writing this article, I only considered a disk with an official copy of Windows XP. I do not consider various assemblies, like Zver, Philka, etc. And, although installing assemblies is practically no different from installing licensed copy Windows XP, You install the assembly at your own peril and risk.
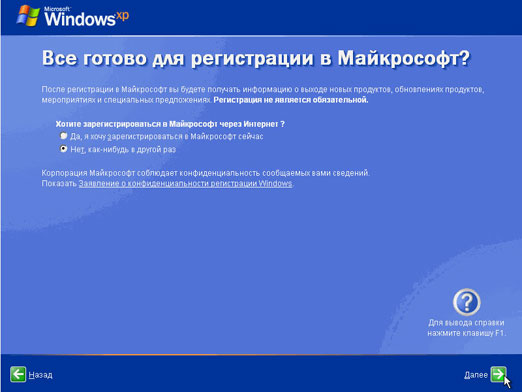
- The reason I didn't cover registering your Windows XP is because the process is pretty straightforward whether your key is printed on the box or mailed to you.
- I haven't considered installing drivers from special programs, because I don’t think this option is safe enough.
PS: The article was written by a person hiding under the nickname “barn4k” (friend and project assistant). For which I thank him very much.
“How to install Windows XP on a computer you assembled or purchased as an assembly!?”
To get started, of course, you need an installation CD with Windows XP. It’s up to you to buy a license or use a pirated version, I’ll just say that I didn’t see much difference between these options. The only significant difference, in my opinion, in favor of a licensed copy is the absence of problems with registration and updates. In short, whatever you choose this instruction suitable in any case.
Installing Windows XP. Step 1.
So, you have: new computer and CD or DVD with Windows XP. Turn on your computer and insert the Windows installation disc into the CD or DVD-ROM. If the installation has not started after 1-2 minutes, and a message like “insert system disk and press any key” is displayed on the screen, you need to restart the computer and go into the BIOS (setup). Why press the “DEL” or F2 button during the initial boot of the computer (in different versions BIOS differently) to change the computer boot options.
This is what it looks like BIOS menu. Why approximately, yes, because as I said above, different versions versions may have different interfaces. But this should not scare you, the option we are looking for has approximately the same name.
In this example, to change parameters, select the Advanced tab - Advanced BIOS Features.
This is what you should see on the screen:
Even if you have a different BIOS, the “First Boot Device” option should still be there, or it should be very similar in name. The BIOS settings are default and you don't need to change anything there. You are only interested in one line - First Boot Device. In the column to the right of this line, change the value to .
Next, exit the BIOS by pressing the F10 key, while confirming in the pop-up window to save the changes (press the Y key).
The computer will begin to restart again and begin booting from the CD.
Program Windows installations XP will do necessary actions to prepare your computer for installing the operating system. After this you will be asked to read license agreement to ensure that you accept all terms of use of the purchased product. To continue, you need to confirm it. Next you will be asked to select and format the partition hard drive, on which the OS will be installed. The hard drive must contain at least one formatted partition. I recommend that you create two sections C and D.
It is advisable to allocate from 10% to 30% of the capacity of the entire disk to drive C. This is at your discretion, for example, if the disk is large, 250 GB or more, then take 10-15%, if less than 250 GB, then it is advisable to allocate 20-30%. After you select the partition to install, the program will continue copying files. When this operation is completed, the computer will automatically restart.
Installing Windows XP. Step #2.
After the reboot, Windows installation will continue and you will be prompted to enter serial number– Serial Number. It must be indicated on the box with the disc, or on a special sticker.
After you enter the "key", a dialog box will appear asking you to install. Here we accept everything by default, so click “Next”. Now a window with installation parameters will appear on the screen.
Set your language options and keyboard layout. By default, the system will be installed on your active disk, in our case it is “C”. But to change this, click the " Extra options" A settings window will open with two fields. The first contains the path and name of the folder with files for installing Windows XP (the value of this field should be the default from the CD). The second field indicates the folder in which the system will be installed (also by default, but if you want to rename the folder, you can do it here). Accessibility features do not affect the installation, so click “Next”.
In the next window you need to indicate your personal data - Name (“Name”) and Organization (“Company”). The Name field is required, but the Organization is optional. Fill it out and click “Next”.
The next dialog box will ask you to select your place of residence (“Location”). The form of recording the date, time, the image of some icons (for example, a currency icon), as well as many values that are set by default according to the country of residence (for example, language) depend on this. In addition, most programs written for Windows XP adapt to the settings specified during installation for more convenient work. Keep this in mind! Therefore, select your country of residence from the list and click the “Next” button. Windows XP installation will now continue in automatic mode and will not require your participation. Depending on the speed of your computer, installation may take from 20 to 50 minutes. You don’t have to sit in front of the monitor all this time, you can calmly go about your business, the computer will reboot itself after the installation is complete.
Installing Windows XP. Step #3.
After installing Windows XP and restarting the computer installation program will produce automatic setup systems depending on the specific hardware of your computer. She herself will try to determine its composition and, if possible, install the necessary drivers. Unfortunately, Windows XP does not (and in principle cannot) have a complete set of drivers. Therefore, you will have to use the CDs that came with your computer. There is nothing complicated in this procedure, the main thing is to take the disk on which the drivers are located, this can be determined by the inscriptions on the disk itself. I have modern disks graphical interface and a button like “Install All”, so there shouldn’t be any difficulties. During the driver installation process, the corresponding drivers will be displayed on the screen. dialog boxes, and possibly several reboots.
That's all! Now go ahead and install necessary programs, games and other interesting things. And so the operating room itself Windows system XP is ready to go.
P.S.
IN this moment There are many installation disks with Windows XP, in which much of what is described happens automatically, these are the so-called Windows builds. In addition, there are installation disks complete with a driver database.
P.P.S.
Reinstalling Windows XP is a slightly longer and more complex process, it all depends on the situation in which you had to reinstall it. I’ll write about this later, but I won’t be able to get rid of this with just one post.
Detailed description Windows reinstallation Xp on a computer or laptop
Perhaps you were looking for:
How to install/reinstall Windows Xp without a disk (from a flash drive)
Step #1. Burning a disc
If you have a disk with Windows XP, then you can safely skip this step and go to [step No. 2] since here we will talk about what to do if you do not have a disk with Windows, but have a key (for example, you bought a laptop with on which the OS was installed, there is a piece of paper pasted on the back or side of it, on which is the key that we need, or another situation, but as a result you should have a key to Windows). We copy the key number onto a piece of paper so that it is at hand, and move on. Select one of the versions of Windows Xp. Both versions are time-tested
or 
Now search the Internet licensed disk Windows Xp Sp2 Professional. Since distribution is illegal, we have no right to provide a link to Windows. But I will give you a link to the ORIGINAL VERSION of Windows xp sp3 proffessional - By the way, if you want a pirated version, I will give you a link, but considering, again, that I do not have the right to post files on my resource, I will give you a link to a torrent with Windows Xp sp3 Simplix Edition
Original version of Windows Xp Sp3
Download Windows Xp Simplix Edition
After you have downloaded the Windows Xp image, download the program to burn our image to disk
To do this, download a program to burn our image to disk
Download Portable ImgBurn
After the Windows image and our ImgBurn program have loaded:

Step #2. The disk is ready. Set the BIOS to First boot device CD-Rom
So, after Step #1 we have a disk with Windows Xp. At this stage our
the task is to get into the BIOS and set it to initially boot the disk with
installed Windows XP. To do this: Reboot or turn on
computer and press the delete key (there are other options, for example
F1,F2,F8,Ins. 
The initial splash screen should usually show you which key to press to enter the BIOS 
As a result, we must get to blue screen BIOS, in our case it looks like this 
We set the first boot from the Disk to do this, go (with the usual arrows) to Advanced Bios Features -> First Boot Device, select CD-Rom, press enter, then esc, go to save&exit setup, press enter, then Y and enter again. 


Note: if you have a different BIOS, the essence does not change. The main thing is to find the First Boot Device and select CD-Rom. After step 2, the computer reboots itself and if you did everything correctly, then when you reboot, the message Boot from Cd/Dvd will appear on a black background: 
And after a while Press any key to boot from Cd.. 
(press any key on the keyboard to boot from the disk), press the key. If a blue screen appears with the Windows installation at the top, then at this stage you have done everything correctly. If the keyboard cannot be pressed, you need to go into the BIOS and set SUPPORT USB: YES 
Step #3 Formatting the partition. Installing XP or answering the question: " How to install Windows Xp for a teapot«
Now we wait (2-5 minutes) until a blue window appears with the inscription “Welcome to the installation program” 
Press Enter, then read the agreement and then press the key F8
A) If you already have a partition where we will install Windows Xp formatted and created (if not, read point b) -> select the partition 


If you see the message “The installation program is copying files,” everything is done correctly! Let's move on to point c 
B) If the disk is not formatted 
Select it and click on D
Attention: with this action we delete all data that is on the disk C:
Click L
Next, click “Unallocated area” WITH to create a new partition 
Enter the size of our partition in megabytes 
Select it from the list 
Format to NTFS system(fast)
If the message “The installation program is copying files” appears, everything has been done correctly and you can now continue starting from point in
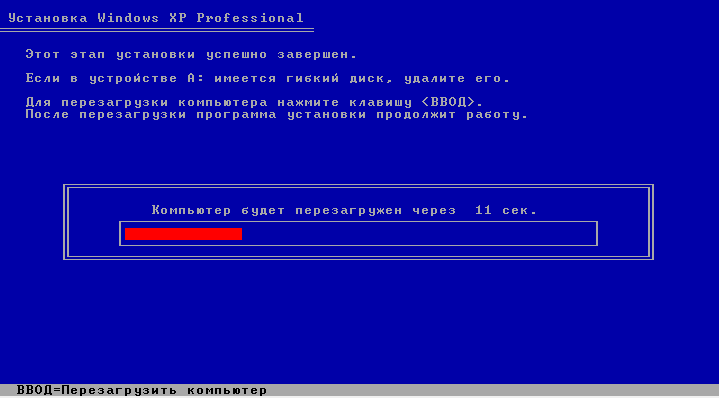
C) When the installation load reaches 100%, the computer will reboot itself. (When the reboot is in progress, we DO NOT PRESS ANYTHING, we just wait) 
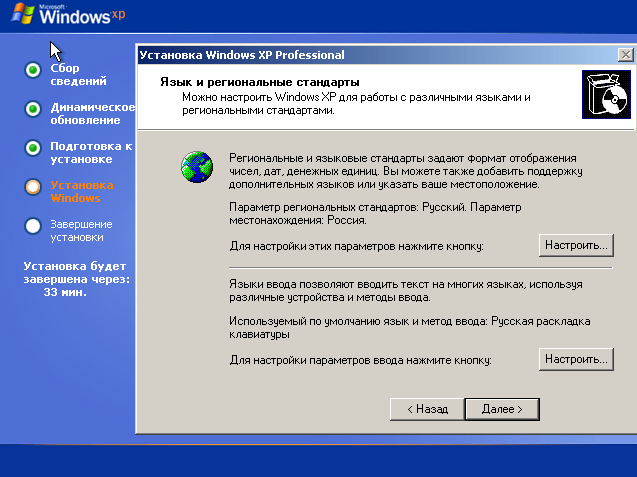
At the 33rd minute, fill in the language parameters 
Enter Name and Organization 
Product Key 
After you have entered the key, the installation will continue and Windows will be installed for at least 10-15 minutes and we will not take part in this. When Windows is installed, the computer will reboot again and we will only have to fill in the account name, which Internet you use, etc. 

Congratulations, Windows XP has been successfully installed!
Probably every second computer-related website has an article about how to install Windows XP operating system. I thought that let my blog be no exception and remain on it Windows XP installation instructions.
You can install Windows on a clean HDD; on top of an already installed system; or as a second (third, etc.) operating system. Each of these options has its own characteristics. Today I want to tell you how to completely reinstall your existing operating system while formatting the system disk.
In general, you can start installing Windows XP in two ways: 1) by booting from the installation disk; 2) directly from the installed system. The first option is preferable, and we will consider it.
A small digression: I did not take the screenshots used in the article myself. I borrowed them from the site compbegin.ru. I hope the author won’t be offended by me for this :)
So, for installation we need boot disk with Windows XP operating system. Only such a disk contains a special hidden section with important system files that will allow the computer to boot directly from this CD.
We turn on our computer and first of all go to the BIOS to configure booting from disk. To do this, immediately after turning on, press the key on the keyboard Delete or F2(other keys may also be used, so you need to carefully watch the prompts on the screen).
Once in Bios, you need to find the section with the word Boot, and then change the order of boot devices in it so that the CD-ROM is in first place. Depending on the BIOS version, the device from which the computer will boot is either selected from the list or moved to the top using the keys F5/F6, +/-
.
After the changes have been made, we exit the BIOS, saving the settings. Before leaving, you need to insert a disk with Windows XP into the drive so that the computer can boot from it.
If you already have any software installed on your computer operating system Windows, then after rebooting you will see “” on the screen (this means “Press any key to boot from CD”). Accordingly, you need to press any button on the keyboard. If you wait more than 10 seconds, the current operating system installed on the hard drive will begin loading (then you will have to restart the computer again).  The Windows XP installer shell will appear on the screen. The OS will check the hardware installed on the computer and begin downloading installation files.
  At the end of this process, a window will appear asking you to begin installing Windows. Click Enter on keyboard.
  Next, accept the license agreement by clicking F8.
 It will then search for previous copies of Windows installed on your computer. If any are found, you will see a screen with a list of these systems.
 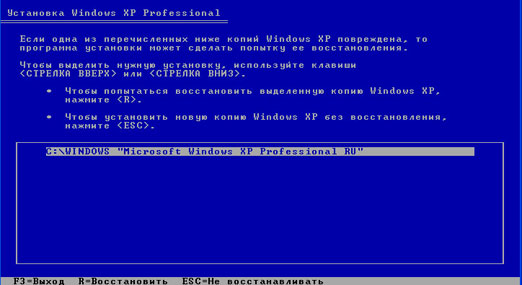 Here you will also be offered:
1) Restore the found copy of Windows by pressing the R key .
Recovery can help in case of damage, deletion or replacement of infected system files Windows files.
If you select this item, you will have to go through the full system installation procedure, during which everything system files old copies will be replaced with new ones from the CD. All your data, settings and installed programs however, they will not disappear anywhere.
2) Install new copy Windows by pressing the Esc key .
Because we want to install new Windows XP, then press now on the keyboard Esc.
List box installed systems you will not see if you install the system on new hard disk, and also if the previous copy of Windows has a different edition or service pack.
Because in my case, the operating system was already installed on the computer, and the hard drive was already distributed into logical drives. Therefore, a window appears listing all found partitions.  If the current partition of your hard drive does not suit you, you can delete existing partitions by pressing D(you can select the desired section using the arrows on the keyboard). After deleting a partition, the area it occupied becomes unallocated, and all data located on it logical drive are deleted.
The existing structure of the hard drive suits me, so I use the arrow on the keyboard to select the partition in which the system will be installed. Let it be C: Section2 (SYSTEM). Then I click Enter.
If the following window appears, just click Enter. Then select “Format partition using NTFS” and click Enter.
 The formatting process will begin:
 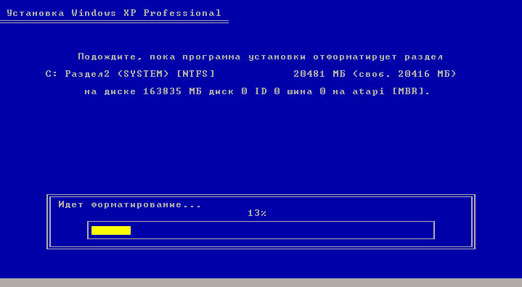 When it’s finished, Windows XP files will begin copying to your hard drive:
 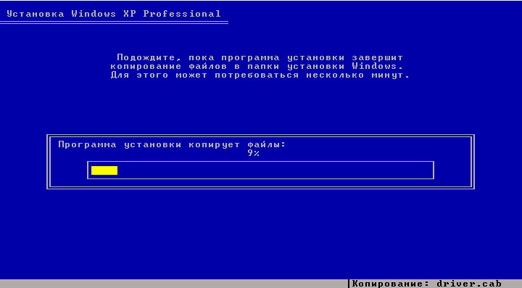 After the copying is completed, the computer will reboot. If after rebooting a screen appears that says “”, do not press anything (just wait 10 seconds). Otherwise, the installation will start again.
Next, Windows will offer to configure the language and region. Click “Next”.  In the “Setting program affiliation” window, enter some name (for example: Ivan) and the name of the organization (for example: Nome). Click “Next”.
  The “Product Key” window will appear, in which you must enter the Windows XP serial number.
  Next, come up with and enter the name of the computer under which it will be visible on the network (use Latin letters). The administrator password can be left blank.
  In the “Setting time and date” window, check all the settings and click “Next”.
  You will see the next two windows only if the Windows XP distribution contains a driver for your network card. In the first of them, we leave the marker in the “Normal settings” position, and in the second we agree with the name working group WORKGROUP and just click “Next”.
 Windows will then begin setting up the network and copying files. After the installation is complete, the computer will restart and offer to automatically adjust the screen resolution - click “OK”.
  A welcome screen will appear - click “Next”.
  The next window will ask you to enable automatic update. You can select “Delay this action” and click “Next”.
 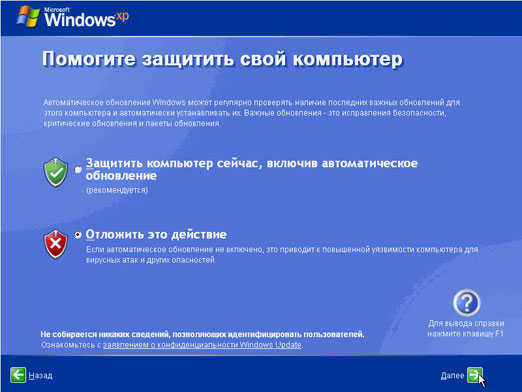 If a network card driver was installed during installation, two more windows will appear in front of you. In the first “Test Internet connection” click “Skip”. And in the second, put the marker in the “No, some other time” position and click “Next”.
 The account creation window will appear. In the “Name” field account”Enter any name in Latin letters and without spaces. You can also create a second, third, etc. now. users, but for now one is enough. Click “Next”.
  This completes the installation of Windows XP. After clicking the “Finish” button, the Desktop will appear.
 Do not forget to return the computer to boot from the hard drive in BIOS.
Preparing a disk with a distribution kit is the first stage of installing Windows XP. If you already have such a disk in your hands, you can skip this point, but if you downloaded a system image from the Internet in ISO format– you will need to use special programs (Nero Burning ROM, UltraISO and analogues) to burn it to a CD or DVD.
The Windows XP boot ISO file is a ready-made system image containing a complete set of installation data. It does not require any preliminary preparation, but is transferred to the CD unchanged.
Let's look at the process of burning a Windows distribution to DVD using UltraISO as an example.
- Launch the application.
- Press the key combination “Ctrl” + “O” and open the Windows ISO image that you have prepared to transfer to disk.
- Click on the “Burn CD image” icon in the toolbar at the top or press the F7 key.

- Place a blank or rewritable DVD in the optical drive.
- Make sure that the distribution you need is selected in the “Burn Image” window. Check the “Check” option if you want the disc quality to be checked after burning. Select the appropriate recording speed. Even if your laser drive can write at maximum speed, we recommend choosing medium or low. This will ensure good readability of your disk by any drive, including old ones.
- A rewritable disc must first be erased by clicking on the button of the same name, and you can immediately start writing to a blank disc by clicking “Record”.

After 20 - 30 minutes, depending on the speed of the drive, the preparation of the installation disk will be completed. You can move on to the next stage.
How to install Windows XP from a disc the traditional way
The traditional installation is normal process system installation, which requires active user participation. Most often, Windows XP is installed in the traditional way.
At this stage, we have already prepared everything we need. In order to install Windows from a disk, we only need the disk itself and a computer with an optical drive on which the system will be installed. If you don’t have a drive, you can use an external one that connects to a USB port.

BIOS setup
To boot your computer from a CD or DVD, you need to go to the settings BIOS Setup Set the CD drive to be the first boot device. To do this, enter the settings menu by pressing the designated key (Del, F2 - F12, etc.) immediately after starting the computer. Which one you can read at the bottom of the motherboard splash screen (displayed on the screen almost immediately after turning on the PC).
Once in the settings, go to the “Boot” or “Advanced BIOS Features” tab - in older versions of Award BIOS. Use the arrow keys to navigate to select the laser drive from the list of devices. In our example it is listed as CD-ROM Drive, but sometimes this list only lists hardware models.

After selecting the desired device, press F10 (option to exit the BIOS menu and save the settings).
Booting from disk and the Windows XP installation process
- Place the laser disc in the drive and restart your PC. System installation begins by loading Windows XP files into the computer's RAM.

- Next, Windows will greet you and offer you the option to continue the installation, exit the program, or restore itself using the recovery console. The second and third points do not suit us.

- By pressing Enter you will continue the installation. The next step will ask you to accept the Microsoft license agreement for using Windows XP.

- Next, select a location on the hard drive for the system partition. Click “C”, which means “Create partition”.

- Let's determine the size of the future drive C. In our example, it is maximum, but you can set anything, preferably at least 10 Gb.

- Now let's look at the list of hard drive partitions and agree to install Windows in one of them by pressing Enter.

- Let's format the new partition in NTFS ( quick formatting will suit us quite well).

- And wait until the installer copies the distribution files to the disk.

- Once the copying is complete, the computer will restart.
- Next Windows boot XP will no longer be run from a CD or DVD, but from a hard drive. This means that the system bootloader has been successfully created and is working correctly.

- From now on, our participation will be required again. Here we will have to specify the default system language, our location and additional languages if needed (although language packs can be installed later).
- Next – your name and organization. The name is required; the organization can be skipped.

- Entering the serial number of the Windows distribution during the installation process is voluntary. You can always enter it later.

- The computer name and administrator password also need to be specified now. The name will be suggested by default, but you can change it. The password can be left blank.

- The date, time and time zone are also set at this stage.

- Special network parameters we will not appoint, let them remain with us by default.

- Leave the workgroup name as is. You can always change it after installation.

- The installation is almost complete. Next, the screen will be configured and one or more user accounts will be created, the first of which will be designated as the computer administrator. You will also be prompted to activate Windows XP right now.
But now it’s really almost everything. There are a minimum of settings left - and the system is ready to work.
Automatic installation of Windows XP
Creating an answer file using Windows tools
Agree, installing the system for about an hour without leaving the computer and constantly clicking “Next” will get boring for anyone. To simplify this work for those who have to do this often and for a long time, they came up with a way Windows installations without user intervention. To do this, a script is created in advance - a response file, which contains all the information necessary for the installer program.
The time has come for you and me to figure out how to create such scenarios. The Windows XP distribution includes a utility Setupmgr.exe, which is in the archive deploy.cab, stored in the SUPPORTTOOLS folder on installation disk. Let's extract this utility from the disk and run it.
- The “Installation Manager” wizard will help us create the answer file. With its help, we can either create a new or change an existing script. Since we don’t have any preparations, we’ll select “Create”.

- We will leave the installation type as default – “ automatic installation”.

- Product version – Windows XP Professional.

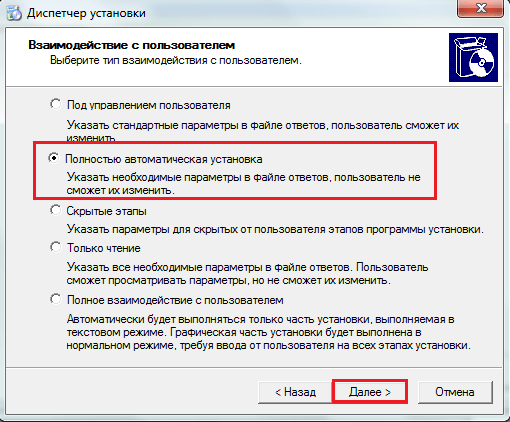
- User experience – “Fully silent installation” (if we do not plan to change the parameters in the answer file).
- Next, select “Install from CD”.

- Let's accept the license agreement and proceed to filling out the same forms and fields that we filled out when installing Windows from disk. First window: “Name and Organization”.

- Screen options. They can be left as default (use Windows defaults).

- Timezone.

- Serial number (required!). Without entering the serial number here, you will not be able to proceed with creating the answer file and installing the system.

- The names of the computers on which Windows XP will be automatically installed using this scenario.

- And also: administrator password, network components, name of the workgroup or domain where this PC will belong, telephone code countries and cities, locale standards, language support, initial settings Internet Explorer, Windows installation folder, printers and a number of other settings - in separate program windows.
Upon completion of the wizard, a file will be created unattend.txt- this is our script, thanks to which we can install Windows XP completely automatically.
If you install the system from a CD, you need to rename unattend.txt to winnt.sif.
Once you've created your answer file, you can add your own commands to it, which you can learn about in this article.
That's probably all. As you can see, there is nothing difficult about installing Windows XP according to a script without your own active participation. All that remains is to save the resulting file in the i386 folder of the distribution disk - in the same place where winnt32.exe - the Windows installer - is located.
If your PC has a floppy drive, you can place the answer file in the root directory of a floppy disk and insert it into the computer during system installation. In this case, the installer will prioritize executing the script from the floppy disk, even if there is another one on the CD, in the i386 folder.
Automation of installation by alternative means
Windows' own tools are not the only tool that allows you to install it “in one click.” There are also third-party applications for this, for example, Advanced Windows Unattended Installer. Create scripts with this simple and free program much faster and easier than using Windows. The only drawback of Advanced Windows Unattended Installer is the lack of a Russian-language interface.
To use this tool to create a disk that allows you to automatically install on Windows computer XP, you only need to do three steps:
- Copy the contents of the Windows distribution to a separate folder or mount its ISO image into a virtual drive.
 Order 343 mail. Order by Russian post. Consequences of failure to appear in court when summoned
 How to put a password on a folder on a Windows computer without and with programs
 Pluton – Free Bootstrap HTML5 One Page Template
 History of ZX Spectrum: Myths and reality New Spectrum
 Voice assistant Siri from Apple Siri functions on iPhone 6s
 How to roll back to a previous version of iOS?
 Unlock iPad in four days