Xerox phaser 3100 mfp activation card
The Xerox Phaser 3100MFP/S monochrome MFP is equipped with a control system consumables. This system will notify you when the print cartridge is running low on toner. Messages will appear on the screen of the machine when less than 10% of the toner is left, and also when the toner runs out:
TONER LOW
TONER EMPTY
MOVE OK
You can refill your old cartridge or buy a new one at any time (even without waiting for the toner cartridge to run out). Whether you're buying a new cartridge or refilling an old one, you must have a dedicated . The card is needed to reset the toner counter in the printer.
Follow the instructions below to replace the cartridge.
1. Insert the smart card into the printer as shown.

2. A message will appear:
EAMENIT B TONER?
YES=OK - NO=C
3. Click OK. A message will appear:
OPEN FRONT COVERS
EAMENA TONER
4. Stand in front of the machine. Press the cover on the right and left sides at the same time, pull it towards you.
5. Install a new or refilled cartridge in the compartment intended for it (if you have an old cartridge in your device, then lift it up a little and remove it from the printer).

6. Close the lid. A message will appear:
YOU HAVE AMENITED
TONER? OK
7. Click OK. A message will appear:
PLEASE
PLEASE WAIT
At this time, the smart card is read. After reading, another message will appear:
NEW TONER
REMOVE CARD
8. Remove the smart card from the machine. Your printer is ready to print again.
Refill Xerox phaser 3100 MFP cartridgequite simple: you need to unscrew the screws on the left side of the cartridge. To do this, you need a special screwdriver with a 6-pointed asterisk. If one is not at hand, these screws can be cut for a flat screwdriver. After removing the side cover of the cartridge, you need to open the plug, which is clearly visible and fill in the toner. Suitable toner Xerox PHASER 3120 or Samsung ML-1710 BULAT. The main problem is not this.Since in recent times office equipment manufacturers, including Xerox, are trying in every possible way to protect their cartridges from the possibility of refilling them, after installing a refilled cartridge, users encounter an unexpected nuisance: the message "Install a toner card" appears on the Xerox 3100MFP display. The device is blocked. |
The program for flashing the 24C16 chip for the Xerox Phaser 3100 MFP.

Ready firmware for EEPROM 24c16 MFP Xerox Phaser 3100 mfp in Ponyprog format can be downloaded here: download firmware for EEPROM 24c16. After flashing this EEPROM, your device will not be blocked by toner until the counter counts 12,000 prints, i.e. You will be able to refill the cartridge three or four times without buying a toner card. After 12,000 prints, the machine will lock again. Then you will need to repeat the flashing procedure using the same fill.
As you can see, refilling the Xerox Phaser 3100 MFP cartridge itself is not very difficult, but frankly, the procedure for flashing the 24C16 chip is time-consuming and painstaking. Not everyone dares to do such experiments with their rather expensive device. At present, the original Xerox Phaser 3100mfp 106R01460 refill kits for 3,000 prints have already appeared on sale. This kit includes: a toner container for 3000 prints, an external sticker, a new plug that closes the toner hopper, an activation card (smart card) of the cartridge, and instructions for refilling the Xerox phaser 3100 MFP cartridge.
True, the cost of this kit is about $35-$40, although it is about 3 times cheaper than buying a new cartridge. The choice is yours...
If the device has version 2.07m, then there is a similar solution, but it was decided not to upload it to the public, but to distribute it for a fee (write to the mail, who is interested) in order to somehow restrain its distribution on the network. Distribution in the network will inevitably lead to plugging this "hole" with a copier, as was already done in version t. This solution is also suitable for Konica-Minolta PagePro 1480MF 1490MF, Philips MFD 6020(6050), OKI B2500MFP.
The solution for version 2.07t is made, but not sold, in order to avoid putting it on the net, as was the case with version m. We say special thanks to one poster on his blog. The only option available to you is:
if the device has version 2.07t, then at the moment, the solution for the Xerox 3100 MFP with and without fax, version 2.07t and miniboot 3.01 is to resolder (or reprogram) the chipset 24c16 and 29LV wired for version 2.05w with miniboot 0.01 (Provided service of sending a set of already programmed microcircuits on professional equipment with subsequent data verification). If you live in Russia, then write to the address [email protected]- The set will be sent the next day after payment. The cost of one set is 500 rubles. When ordering, be sure to tell which device you need the kit for (with fax or not, because the flash is different), your full address (including the postal code) and the last name, first name, patronymic of the recipient of the parcel - otherwise the parcel will not be given to you by mail. Shipping is free. When ordering from five sets, the cost of each is 400 rubles.
Also, the problem with the T version can be solved by installing a new smart card and, after resetting the device, block the basket and 24c16 as shown at the beginning of the article (if jumpers on the microcircuits were installed before, then they must be removed and everything returned to its original form, otherwise resetting the smart card will not work). Naturally, this method new card works on all other versions. After blocking the microcircuits, the counters will be reset to zero after the device is turned off.
Attention!
Now a set of microcircuits can also be ordered for residents of Ukraine. If you live in Ukraine, then write to the mail - fliper0468(no spam)mail.ru. Prompt shipment within one day after payment! The prices are different.
The presence of a set of programmed microcircuits is a good insurance in case something went wrong with the device, everyone who is closely involved in the repair of office equipment and 3100 in particular should have such sets. Of course, you can purchase blank microcircuits and program them yourself, but not everyone has programmers for about 10,000 rubles. plus a socket for a couple of thousand, for such cases our service for sending these kits is suitable.
Please pay attention:
If, after altering the device, the screen displays FLASH ERROR - FLASH PLUG INIT, then this means that the device cannot read 24s16. This is due to poor-quality soldering or (much less often) a malfunction of this chip.
If after soldering the 29LV chip, black squares are displayed on the screen, this means poor soldering (or less often a malfunction due to overheating during soldering) of this chip. Also, due to not missing 29LV, an inscription may appear waiting file.
Sometimes the device writes - reading the card is temporarily suspended, turn off the device for a day. After that, turn it on, the inscription should disappear.
It is possible that after soldering a 29LV flash with version W to a device that previously had version T or M, a sheet with a background comes out when copying:
This happens because, starting from version M, other scanner lines are installed in the devices than in previous models. The solution to the problem is to perform the "calibration" item of the scanner from the menu, after performing the calibration the result is:
There may be such a situation that calibrating the scanner may not help, then you need to do the following, as soon as the printer has started working after soldering 29LV, raise the version of the device using the suite to M or T.
Another unpleasant moment is that there may be such a situation - the device prints well from the computer, but copies badly:
First you need to calibrate the scanner (from a simple menu and from the service menu), reset the settings, but often this does not help. I get out of the situation in the following way - I replace the photoconductor in the cartridge with a photoconductor from HP 1100 (and not necessarily from HP1100), with a gear shift, of course. This procedure takes 5-10 minutes, the same copy of the device after replacing the photoconductor:
| For Xerox 3100 MFP smartcards version 2.07t and below. and cards OKI MB260/280/290 and Philips MFD 6020W, 6050W, 6080. You can order / buy cards
|
||||
| Xerox Cards 3100 work with all devices, BUT! Some Xerox 3100 machines with version 2.07m do not see them. This will be fixed by flashing the device to the next version 2.07t The firmware can be obtained from the Xerox website, or downloaded from the link For non-fax machine Xerox 3100S Now our map is guaranteed to work. There are no problems with OKI MB260/280/290 and Philips MFD 6020W, 6050W, 6080 printers. |
||||
|
||||
|
In the 24c04 microcircuit, we fill in the firmware from the file that corresponds to this particular card. There will be questions write. |
||||


Version 2.07t eats the smart card at any time.
Whether the MFP is locked or not.
Those. If you insert a smart card into a machine that is ready to print, it will prompt you to replace the toner immediately.
2.07m - works with the card only when it is already blocked by the toner and asks for the card.
After feeding the card, turn off the device and remove the right sidewall.

you will need to modify two microcircuits.

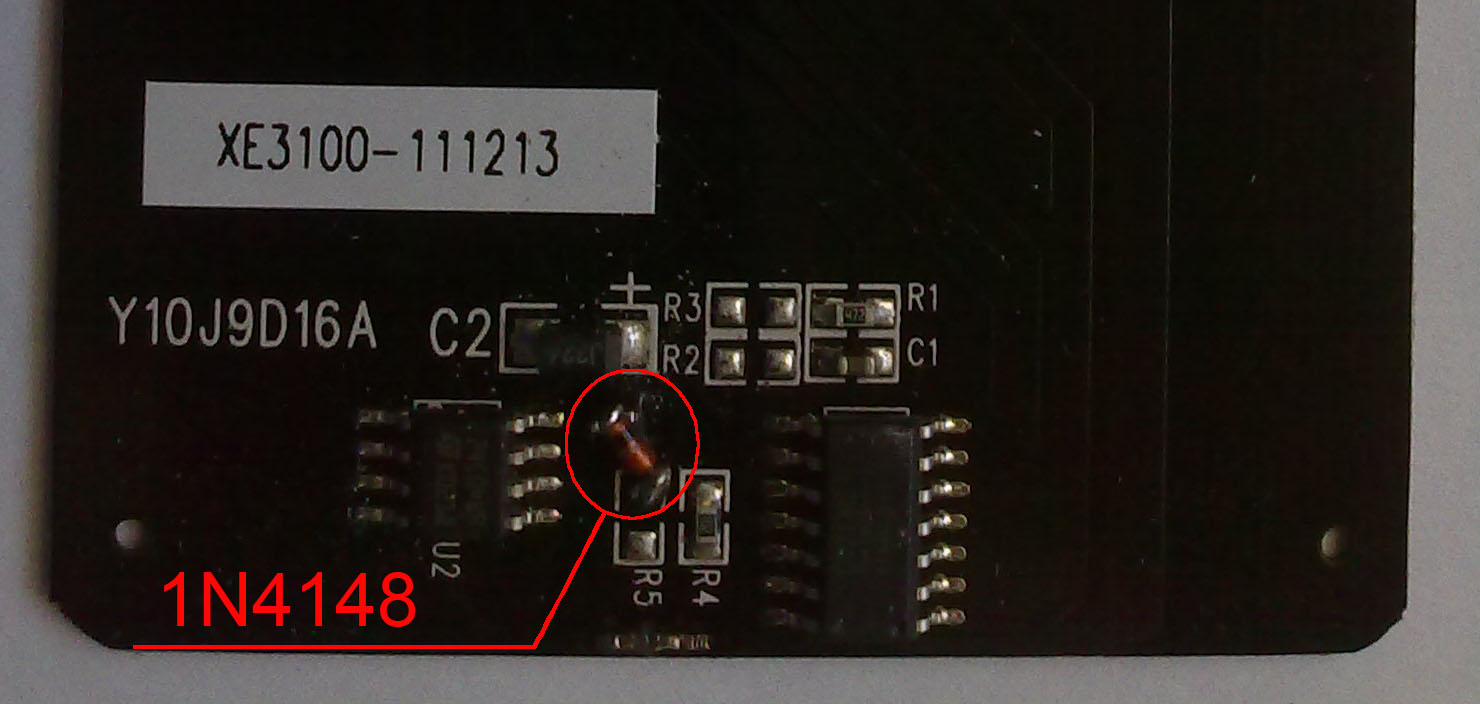
Solder the jumper as shown in the figure.

We bite the leg of the microcircuit.

We collect, check, record meter readings, print, look at the increased counters, turn off, turn on, look at the counters.
The readings returned to the state after revision.
ATTENTION!!! NOT TO ZERO!!!
But each time after turning off the power, the counters and % of the toner will be restored to the values after refining. Toner 99%, the number of sheets .., how many he printed there before revision. Basically, it doesn't matter anymore. It will work reliably, the card will no longer be asked.


Removing a Xerox Phaser 3100MFP Toner Block http://www.startcopy.net. All names, trademarks, etc. mentioned above and below belong to their rightful owners. If you have not done such a procedure before, it makes sense to familiarize yourself with the theoretical foundations. For example, here. It makes sense to get acquainted with the datasheets, of which there are a great many on the page http://www.alldatasheet.com . Do not be afraid to use search engines :) Everything that you will do, guided by this material, you will do at your own peril and risk. If you follow the instructions, everything should go smoothly, but all sorts of accidents are not ruled out. 1. Check: what version of the software is installed on this device. At the time of writing this article, there are 3 firmware versions available for 24C16 for software versions 2.04u, 2.05w, 2.07g. To view the software version number, press [down arrow], [*], V in sequence. If you have a different software version on your MFP, you need to update / roll back. This procedure is done using the Xerox Companion Suite program, which is supplied on the disk with the drivers. 2. Now you can heat up the soldering iron and open the device. Unsolder the 24C16 chip from the formatter board. It is not recommended to work with this m / s directly on the board. Although, if you have an extra formatter... :-) We hang it on the programmer. We pre-read the contents (so, just in case). Then we fill in the dump corresponding to the software version of your device into mikruha. We remove the m / s from the programmer, lift the 7th leg to the top and solder it back to the board. You can, of course, solder the 7th leg along with the rest, but why? The logical "1" on this leg means the prohibition of recording (which is why we hang it later on the feeding 8th leg). Logic "0" (leg soldered to the ground or hanging in the air) allows recording. Hence, why solder/desolder multiple times? A few words about software and hardware: there are no strict restrictions here. Some solder m / s to the chip board (for example, Samsung 4200) and work with it through PonyProg. Others cling to the programmer. Personally, I use a self-soldered JDM-compatible programmer and the ICPROG program for this purpose. Instead of this item, you can feed the device a new smrt card - the work with the soldering iron will be reduced. And sometimes (I didn’t come across it myself, but there were complaints) only a new card can help you. 3. We check the quality of soldering (possible with a magnifying glass). Joints during soldering can cause an error (for example, flash plug init), kill a microcircuit or a board. If everything is in order, turn on the device, wait for the inscription: "Ready". We check the counters of scans / prints, toner (%). If you used one of the dumps below, it should be 0/0, 100%. We turn off the device. We close the 7th leg 24C16 to the 8th (see the figure above). Please note: the 7th leg should not come into contact with its native site on the board. If you have a file with a software version other than those listed above, then it makes sense to save a dump from 24C16. To do this, we do the following: until we close the 7th leg to the 8th. We hook the device to the computer, do the necessary software update / rollback. We unsolder m / s from the board and then according to the instructions, starting with step 2 (read the contents, solder to the board ...). Thus, dumps were obtained for 2.05w and 2.07g. 4. Now we pay attention to another element of the formatter board: m / s 93AA46B This is a 1K Microwire Compatible Serial EEPROM. We act with it, as we used to do with some models of printers from one well-known company: we shorten the 1st and 4th legs with a jumper. There are devices that have Atmel U934460 installed instead of 93AA46B. Judging by what I found on the Internet - a complete analogue of 93AA46B. The device can also work with 93C46 (but these are different microcircuits in terms of supply voltage, so anything is possible). Without this m / s, it goes on alert, but when you try to do something, it says "printer error". After installing the m / s in place, the error disappears. More experiments on devices showed that 9346 is a kind of intermediate link. And the subject can perfectly do without it if you put a short between the 1st and 4th hole. But this octopus is very hard to solder. That is, the jumper 1-4 does not block the entry into the microvar, but gives the "Data Out" signal on the leg, which is necessary for operation. 5. Turn on the power. And we have the following: all counters are zero, toner - 100%. We make a print - the toner is already 99%. Print, copy, scan... Turn off/on: again all counters are zero, toner is 100%. We put the caps on their places, tighten the screws... Long-term experiments with sabzhe devices showed the following: We turn on the new device from the box and use it... Once we receive a message: "Toner is empty" and then the most interesting begins. You can buy a new cartridge (original refill kit) with a smart card. You can buy a compatible smart card (and fill compatible toner). You can change the device, for example, as it is written in "Refilling Xerox Phaser 3100MFP Cartridges". Note: keep in mind: the network appeared a large number of dump versions 12K-98%. But not all of them are working. If you have chosen the last option, do not flatter yourself. Due to the large resource of the firmware (12 kilocopies), the toner counter counts the percentage very imperceptibly. But one day the device will complain about a small amount of toner. Blocked or not - I do not know, but many people do not like this inscription. IMHO, the following happens: during operation, the device writes to 24C16 and 93AA46B at the same time. When the MFP receives a new smart card, the toner counters on both m/s are reset to zero and the countdown starts again. If the device receives a new dump at 24C16, and no work is done from the second m / s, all sorts of miracles come to light. Especially if the dump does not match the software version. If you make a short circuit 1-4 on 93AA46B, and do not short 24C16 (7-8), the counters safely count their own; the toner counter in this case also rewinds % down. What started it all. The device arrived with the inscription "Toner Empty". I fill the dump to 12K, ON / OFF, close 7 to 8. The device is ready. After a while he returned. Guess what was written on the screen? Correct: "Toner empty". I repeated the procedure with flashing 24C16 - it did not help. Reset everything that was possible from the service mode. Played enough with software change. And the subject does not care, he writes his "Toner is empty." I had to feed him the original refueling kit (with a branded smart card). After such a procedure, it was a sin not to change it into the 2.04 at hand, followed by reading the dump from 24C16. From that moment, global experiments with the 3100 model began. The result is before you. Dumps for 24C16 Xerox 3100/S software Xerox 3100/X software dump-0-2.04u.hex Phaser3100MFP-3-in-1-noFax-v2_04u.fwf Phaser3100MFP-4-in-1-Fax-v2_04u.fwf dump -0-2.05w.hex Phaser3100MFP-3-in-1-noFax-v2_05w.fwf Phaser3100MFP-4-in-1-Fax-v2_05w.fwf dump-0-2.07g.hex Phaser3100MFP-3-in-1-noFax -v2_07g.fwf Phaser3100MFP-4-in-1-Fax-v2_07g.fwf All dumps are zeroed, i.e. counters: copy/print/scan: 0/0/0, toner - 100% On this page you can download Xerox Companion Suite in reduced form (without drivers) - 57Mb. Drivers can be downloaded from the official website of the manufacturer. The link is working at the time of writing. Dumps for 93AA46B (Firmware Version 2.04u) toner empty 9346-empty.hex Content corresponding to state: "Toner empty" toner 100% 9346-full.hex Content corresponding to state: toner - 100% with jumper 1-4 And this lady read from 93aa46 with a jumper installed between the 1st and 4th legs. The same thing is read if on the programmer panel instead of ms you put a jumpik 1-4. This once again confirms the above: the jumper does not block writing to 9346, but only sets the required logic level on the "Data Out" pin. I will not say for sure, but there is an opinion that this device is a clone of Sagem MF 5461 / MF 5481. It has brothers named Ricoh (C), OKI (C), etc. By the way, on the reverse side of the formatter board there is an inscription "Sagem". A chip with the inscription "Ricoh" is soldered on the front. In addition, the pickup roller from the main tray is very similar to the rebound. Here is such a hodgepodge :). To date, I have (so far a single) experience of a similar procedure on the OKI B2500MFP. The formatter board is somewhat different there. Instead of 24C16, it costs 24C64 - the same, only a larger capacity, and instead of 93AA46B - 93C45 (there is information that other chips are also encountered). The photo below shows the OKI B2500MFP formatter board. By the way, there is a jumper on the board (shown in the photo), by shorting which we will force the device to print the grid. The same jumper is on the Xerox 3100. It works even on a device blocked by toner - it has been verified. Moreover, the device, which, after the update, began to require an initialization card (so far has not won), with this short circuit, also printed a grid. A sort of analogue of "sailor" from HP and Canon. And, of course, the long-awaited dumps for 24C64: backup-24C64-25-06-2010.bin - The name speaks for itself. This is a dump from a locked device. 99-percent.bin - Dump read from 24C64 after resetting the counters, but before shorting the 7th leg to the 8th. In addition to the above: the Xerox "a 3100 has another brother. His name is Konica-Minolta PagePro 1480MF. The official website does not say much about him. But nevertheless, the drivers are present. Recently, a message appeared in the StartKopi conference about the successful feeding of this beast card and then reading the memory chips. The information was sent by Sergey (aka SeN). I will quote the text indicated in the message (comments are in italics). "ATMLH93616B chips (i2c memory) and ATMLU93846D (microware memory) were installed in the device. A card was installed (not the original ) and immediately after receiving it, the device was turned off and the microcircuits were read. 46 was read for statistics Software version v2.07d, Firmware V. 1.2 220V". Given that Sergey posted the dumps in the public domain on a file sharing service, I will allow myself to be duplicated within the framework of this project. contents ATMLU93846D The pads were torn off. What to do? This section is dedicated to those who have not learned to be friends with their hands and soldering equipment. If you do not know how to solder, before taking on the above work, "train on cats" (C). If you didn’t have cats and you tore off the playground, I hope this material will help you. Note: for a more detailed review of the photos, it is recommended to save them to your computer. Or use the zoom function of your browser. As you can see from the photo, the 1st, 2nd and 3rd legs are closed to each other. The connection point is easy to find on the back of the board (see next photo). The 4th leg is soldered to the "ground" of the formatter. I won’t explain how to find the land - if you don’t find it, then all the text above and below is not for you! The 5th and 6th legs are soldered to the resistors located above (see photo). The 7th leg is "ms write protection". If you hang it in the air or solder it to the "ground", the recording will be allowed. If you apply a supply voltage ms to it, the recording will be blocked. It remains to apply the supply voltage (Vcc) to the microcircuit. The photo below clearly shows the point where to solder the wires. Speaking of flash memory 29LV160. The markings may be different, but the essence is the same. This is a 16 Mbit flash memory (2 MB 1 word = 1 byte = 8 bits) with a top loader, a supply voltage of 3.3 volts. Housing TSOP48. If you want to program a little, get a serious programmer and, most importantly, a socket for mikruha. Here is the contents of the flash drive version 2.05w (thanks for the help ok®). This project is under development. Many thanks to everyone who helps with advice and material (m / s content, etc.). As information is processed, amendments and additions will be made. For questions and suggestions, please contact here ICQ 194896038 Send all kinds of dumps for processing here ICQ 315355834 Wish: if you are going to send a dump, be sure to include a description (Brand-model-fax/no fax, S/N, all counters: printed, scanned, toner -%, software version). Dumps from 93AA46B (U934460, etc.), please additionally include dumps from 24C16. We are also interested in software files (abvgd-version number.fwf) that are different from those posted. In addition, I'm interested in soft switch cards (you can just scan a print) for Xerox-3100 analogs (Ricoh, OKI, Sagem, etc.). You can send photos related to other brands (OKI, Develop, Ricoh, Konica-Minolta, Sagem). Particularly interested in the element base of the formatter of similar devices. For example, Ricoh has flash memory with larger software (from this we conclude that the Xerox Phaser 3100MFP will never turn into a Ricoh SP1000S). The contents of S29AL016090TFI02 are very interesting (variants with analogues are possible). This is a 3 volt 16 megabit flash memory with a top loader. I can assume that the loader lives in the same place. If anyone has the opportunity to read this chip, please send the contents to specified addresses. If you have any of the above regarding copier analogues, feel free to send them. Interested in information even on blocked devices. Once again I repeat: accompany your parcel with as much detailed information as possible.
 How to customize your desktop
 Modern types of memory DDR, DDR2, DDR3 for desktop computers
 Smartphones, phones, tablets, laptops, registrars and other mobile electronic devices in assortment at affordable prices with delivery throughout Russia and the CIS
 Mobile earnings from the phone on Internet applications for Android and iOs (without attachments)
 Cool mouse cursors Christmas cursors for windows 10
 Auslogics Driver Updater and activation codes Advanced driver updater 2
 Autoclickers for mouse and keyboard How to enable autoclicker for mouse without downloading