How to set up a remote desktop. Download Internet connection to Remote Desktop from Official Microsoft Download Center How to work with Remote Desktop
Free programs For remote control computers
- System administration ,
- Network technologies ,
- Server administration
Remote computer control programs allow you to remotely control another computer via the Internet or local network. This is convenient when you need to help a not very experienced user, for example, a relative or friend who is poorly versed with a computer, do something on it without leaving your cozy chair and without wasting your nerves and time on telephone conversations. Such programs are also convenient to use for remote work, for example, from home to connect to the office and vice versa - to access your home PC, for system administration of an entire fleet of computers and servers.
Let's carry out comparative analysis remote control programs, we will highlight their advantages and disadvantages.
TeamViewer
One of the most popular programs for remote access, it can be quickly downloaded and installed or launched immediately, without installation, even a not very experienced user can handle it. When launched, the program displays a window with an ID and password to access this computer, and TeamViewer allows you to connect to another computer by specifying its ID and password.Advantages:
The program has several main modes of operation: remote control, file transfer, chat, demonstration of your desktop. The program allows you to set up 24/7 access to your computer, which will be convenient for system administration. The speed of operation is quite decent, there are versions for all mobile platforms, for various operating systems, which is very pleasing. A simple and completely understandable interface plus a number of additional utilities to expand the functionality of the program, will be useful for remote support services.
Flaws:
Although the program is free, it is only for non-commercial use, and when working with it for more than 5 minutes, a number of difficulties arise, for example, TV can block a remote connection session, recognizing it as commercial use. For 24/7 remote access or administration of multiple computers, computer network, you will have to pay for additional program modules. The cost of the program is high.
Result:
This program is ideal for a one-time remote connection or for using it for short periods of time. Convenient to use from mobile platforms, but not to administer a large number of computers. You will have to pay extra for additional modules.
LiteManager
A simple, but quite powerful program in terms of capabilities, consists of two parts, the first is Server, which needs to be installed or launched on a remote computer, and Viewer, which allows you to control another computer. To operate, the program requires a little more skills and experience from the manager, although working with the server is even simpler than in TeamViewer, the server can be installed once and no further actions are required from the user, the ID will always be constant, you can even set it yourself manually, which very convenient for memorization. The LiteManager Free version is free for personal and commercial use.
Advantages:
In addition to the main remote access modes: remote control, file transfer, chat, task manager, registry editor, the program also has unique functions, for example: inventory, screen recording, remote installation. The program is free for use on up to 30 computers, it can be used for round-the-clock access without any additional modules. There are no restrictions on operating time. It is possible to configure your own server ID for configuration corporate service support. The program does not have any restrictions on operating time or blocking.
Flaws:
There is not enough client for mobile platforms or other systems, there is a limit to 30 computers per free version, to administer more, you must purchase a license. Some specific operating modes are only available in the Pro version.
Result:
The Litemanager program is suitable for providing remote support, for administering several dozen computers absolutely free, for setting up your own remote support service. The cost of the program is the lowest in its segment and the license is not limited in time.
Ammy admin
The program is basically similar to TeamViewer, but a simpler option. There are only basic operating modes - viewing and control, file transfer, chat. The program can run without installation and is free for non-commercial use.
Advantages:
A simple and lightweight program, you can work both on the Internet and on a local network, has minimal settings and does not require any special skills. Compared to TeamViewer, the licensing policy is more lenient.
Flaws:
Minimum functions for remote management, it will be difficult to administer a large fleet of computers, with long-term use, more than 15 hours per month, the work session may be limited or blocked, paid for commercial use,
Result:
This program is more suitable for a one-time connection to a computer and not very complex manipulations, for example, to assist an inexperienced user in setting up a computer.
RAdmin
One of the first remote control programs and well-known in its circle, I could not help but mention it, more intended for system administration, the main emphasis is on security. The program consists of two: server and client components. Requires installation, it will not be easy for an inexperienced user to figure it out, the program is designed mainly to work using an IP address, which is not entirely convenient for providing technical support. Internet support. The program is paid, but has a free trial period.
Advantages:
The program has high operating speed, especially in a good network, thanks to the video driver for capturing the desktop, increased reliability and security. Intel AMT technology is built-in, which allows you to connect to the BIOS of a remote computer and configure it. Only the basic operating modes are implemented: remote control, file transfer, chat, etc.
Flaws:
There is almost no way to work without an IP address, i.e. connect by ID. There is no client for mobile systems. No free version, only test period 30 days. Skills required to use the program experienced user. When connecting the video driver may disable graphical shell Aero, sometimes the screen flashes.
Result:
The program is more suitable for system administrators for administering computers and servers on a local network. To work over the Internet, you may have to set up a VPN tunnel.
Reading time: 6 minutes. Views 411 Published 02/20/2017
Hello everyone, we continue to consider the topic about . Today we will look at the built-in Windows tool, allowing you to connect to a remote PC. This tool is called RDP ( Remote Desktop Protocol) client, if translated into Russian - remote desktop protocol. Using this protocol you can control remote computer, on which the terminal connection service is running. The RDP client appeared in Windows XP and is still supported in new versions of the operating system. Most likely, many of you don’t even know what this is, but with the help of this tool you can easily connect to a remote computer and control it. In this article I will tell you in detail how to connect to a remote desktop on a local network. Therefore, read the text in full.
Preparation before using the RDP client.
In most cases, an RDP client is used when working on the same local network. For example, in order to connect from one computer to another at home, they must be connected to the same router. It is also possible to connect to a remote computer via the Internet, but this is a more complex way of setting it up; I think we will discuss this topic in a separate article.
The first thing you need to do to connect via Remote Desktop Protocol is to know the IP address of the remote computer. As a rule, if network connection is configured automatically on your computers, then every time you restart the operating system, the IP addresses will change. Therefore, first of all, we set static addresses for all devices on your local network. But first, you need to see what addresses the computer receives automatically. For this . We enter the “ipconfig” command and see which ones: network mask, subnet mask and gateway receives LAN card at automatic settings.

Note! As a rule, on all routers the default network mask is (192.168.0. or 192.168.1.), respectively, we write all the lines as shown in the screenshot and save the changes.
That's it, now we have set a static IP address for our computer, this will allow us to easily use the RDP client.
How to grant permission to connect to a remote desktop.
After we have dealt with computer addresses. Let's move on to enabling the Remote Desktop Protocol function. These steps must be performed on the computer to which you want to connect. To make everything work, follow the steps:

We have completed all the preparatory steps so that the RDP client can work with us. Let us now move directly to the consideration of the connection process.
We connect to a remote computer via RDP.
In the previous paragraphs, we figured out the settings that need to be made to work using the remote desktop protocol. Now let's look at how to connect.
Note! We will use standard remedy Windows. Accordingly, we will not have to download any third party utilities, everything we need will be at our fingertips.
To launch the Remote Desktop Connection tool, open the Start menu - All Programs - Accessories - Windows. In the menu item that opens, we launch the RDP client and see a field called “Computer”. You must enter the address of the remote computer, i.e. the one on which we set a static IP address. After clicking the connect button, the program will ask you to enter your “Login and Password” to connect to the remote PC. 
You can also open additional settings; to do this, open the “Show options” item. Here you can immediately specify the user of the remote computer, configure local resources, as well as screen settings. But I think it’s better to leave everything by default and start managing the remote PC.
RDP client - pros and cons.
To be honest, I don’t have to use the RDP client very often, but sometimes it’s simply necessary. For myself, I have identified the following advantages:
- In order to connect to a remote PC, you do not need to search for or install any programs. Everything is provided by Microsoft developers and the tool is built into the operating system;
- Using Remote Desktop you can get full access to the computer. Which allows you to perform any actions on it;
- Unlimited access time to a remote PC.
This is where the pros end, let’s move on to the cons of using this utility:
- The program works correctly only on a local network; to set up a connection via the Internet, you need to go into the router settings to forward the port, which is a problem for many users;
- If you are using a VPN, then in order to connect to a remote computer using an RDP client, you need good Internet speed, otherwise you will watch a slide show;
- The program has a minimal set of functions, and also does not have a built-in file manager, so there is no way to transfer files;
Let's summarize.
Today we looked at the RDP client for Windows. This tool for remote connection to a computer can be considered as an alternative third party programs, such as , but RDP is unlikely to be able to replace them completely. Since the built-in tool does not even have all the necessary set of functions that are typical for remote access programs. The speed of operation leaves much to be desired, but it is perfect in cases where there is no opportunity or time to search for and install other programs and you urgently need to gain access to a remote PC.
Free solutions
Remote control involves connecting to another computer to gain access and manage resources. Thanks to this feature, the user can solve many additional tasks remotely: conduct consultations, diagnostics, and computer monitoring. Thus, tasks are simplified that are often impossible or irrational to perform at a distance.
As part of the review, 10 solutions (6 free and 4 paid) for remote management will be considered. The main attention will be paid to the following features of the software of the selected category:
- Contents: what components are included in the distribution, types of installation on the host and client computer
- Connection modes: supported protocols, working with RDP (see below)
- Presentation functions: this means the possibility of audio and video accompaniment, screen capture, availability additional tools(“pointer”, “drawing board”, etc.)
- Security: supported encryption technologies, storage of confidential data, types of authorization on local and remote computers, availability of necessary settings
- Platform support: mobile platforms and OS, online version available.
Standard ones will not be ignored Windows features, namely the Remote Desktop Protocol (RDP), which will be discussed first. At the end of the review there is a comparison table with detailed information about the presence of the necessary functions in the mentioned applications.
RDP - Windows Remote Desktop Protocol
Starting with Windows NT, support for the Remote Desktop Protocol (RDP) is provided. Accordingly, Windows 7 offers the user RDP 7 (an update is also available for Windows XP), Windows 8 - RDP 8 (also available for Windows 7 SP1). The capabilities of the current version, RDP 8, will be reviewed.
Connecting to a remote worker is carried out using the mstsc.exe application, after entering the name of the remote computer. Connection parameters are also available in this dialog.
In the “Screen” tab, the remote desktop resolution is indicated (with the ability to enable full screen mode), color depth (up to 32 bits).
In the “Local Resources” section, you can select the audio playback mode (on the remote or current computer), and enable audio recording from the remote desktop. This section also configures access to the printer, local disk, disk drive, PnP devices, ports.
The quality of data transmission is regulated in the “Interaction” tab. You can not only select a connection profile, but also independently determine the display parameters: desktop background, anti-aliasing, visual effects, image caching. All these options affect the speed of data transfer during remote access and can significantly optimize network traffic.
Security settings are available through the System component (System Properties in Control Panel). In the “Remote Access” tab, you can allow Remote Assistance connections, as well as remote connections to your computer. Authentication is performed at the network level. You can also limit access by specifying a list of allowed remote desktop users yourself.

Thus, Windows provides basic tools for working with the RDP protocol. But, as expected, advanced security settings, support for mobile platforms, and presentation functions are not offered to the user.
Teamviewer
TeamViewer is perhaps the most famous free remote control program. The toolkit allows you to set up remote access To home computer, manage the desktop from various platforms and devices, administer Windows server. In addition, developers highlight corporate TeamViewer features: The program can be used to organize conferences, consultations and help colleagues at work.
TeamViewer is available for Windows, Linux, Mac platforms (with restrictions), remote access from OS-based devices is possible. TeamViewer client full version distribution kit (“All in one”), as a system service (TeamViewer Host), in a portable format, on a terminal server and other options. It is worth highlighting the TeamViewer QuickSupport module, which does not require installation and is optimal for performing urgent tasks.
The full version of the program has client and operator parts available. The TeamViewer interface is represented by a main window with two tabs - “Remote control” and “Conference”.

Remote control
The user receives a unique ID to identify the computer on the network, and A temporary password. Also, using the partner's ID (optional IP address) and knowing his password, you can establish a connection to a remote device.
Three connection modes are available:
- Remote control: remote control of a device or collaboration on the same computer
All actions are performed on another computer through the remote control window. At the same time, it is possible to change the resolution and scaling, switch between active monitors and other options. - File Transfer: Share files during a session
To exchange data in TeamViewer, a two-panel file manager is used, in which host and client resources and basic file operations for working with them are available, such as creating folders, deleting, copying, etc. - VPN: virtual network mode
You can set up a virtual private network between computers to provide public access to devices (printers, removable media and etc.).
Conferences
In this TeamViewer tab you can create a blitz conference or connect to an existing one. Among the available tools are voice and video communication, screen sharing, and session recording with the ability to convert to AVI. Whiteboard is used as a canvas for drawing, sketching, and commenting.

One of the undeniable conveniences of TeamViewer is the “Computers and Contacts” list, which provides fast access to devices. In addition, here you can monitor the network status of computers and exchange messages (group chat options are available). Looking ahead, it should be noted that not every review participant offers an address book for quickly connecting to other devices.
For security purposes, the program uses encryption of sessions (AES 256 bit) and traffic (RSA key exchange). Files transferred during the session are signed by VeriSign, end user must give consent to receive it. Through the TeamViewer settings, it is possible to restrict access: setting access to all operations only after confirmation or prohibiting outgoing sessions.
Summary
TeamViewer is a universal solution with the ability to choose a remote control method. Thanks to its wide range of multimedia functions and convenient organization of contacts, the program is optimal for holding conferences.
[+] Wide functionality of the free version
[+] Conference tools
[+] Security
[+] Presentation capabilities
[−] Remote session limit (5 minutes in free version)
Ammyy Admin
Ammyy Admin does not require installation and combines a simple interface and flexible functionality. The program is free and has no restrictions for home use. Distributed for Windows, Linux/FreeBSD platforms, mobile devices are not supported.

Client and operator modules are available in the main window. The user receives an ID that is generated in connection with the equipment. Optionally, you can use IP when connecting.
The client part can be activated or stopped, thereby prohibiting connections; By default, Ammyy Admin works in standby mode. You can track the connection status using indicators, the explanation of which is in.
There is an address book, contacts can be combined into groups, the order of contacts can be changed, and new addresses can be manually added. The network status of computers, however, cannot be monitored.
The main connection modes include Desktop (remote desktop), File manager ( File manager) and Microsoft RDP. RDP allows you to connect to a remote desktop; standard Windows functions are provided.
Other modes include Voice Chat and Speed Test. Obviously, the multimedia capabilities here are not as fully presented as in TeamViewer: Ammyy Admin is not positioned as a kind of corporate solution. You can note the screen sharing function, which in combination with voice chat makes Ammyy Admin program, suitable for remote assistance.
By going to “Ammyy → Settings → Operator”, you can specify RDP parameters, select the encryption type and codec profiles, thereby reducing the load on the network. More importantly, the “Network” tab allows you to configure the Ammyy Admin connection, manually specify routers, enable or disable data transfer via global network Ammyy (Ammyy Worldwide Network).
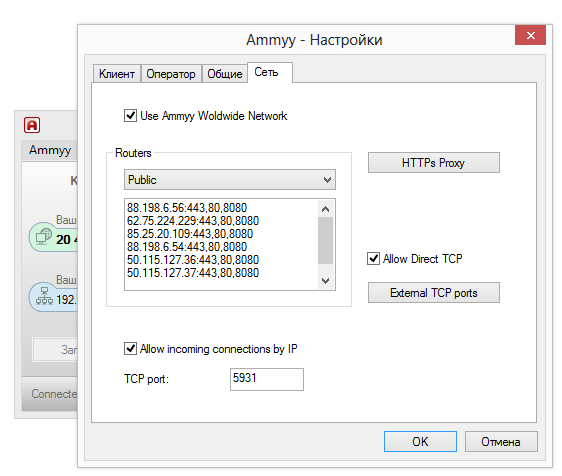
The file manager is a two-panel one, through which standard file operations between the client and the operator are available.
In the access rights settings (“Client → Access Rights”), you can set separate parameters for each ID. The authentication mode (connection to a PC) is available to choose from: by Hardware ID, password or user permission. Thus, you can minimally protect your computer from unauthorized remote connections.
Summary
The main advantages of Ammyy Admin are its speed, simple and fast interface, relative independence from Ammyy servers and free of charge. This is probably not the best for team work. optimal solution, but for individual use, with several computers at disposal, it’s fine.
[+] Speed
[+] Easy to set up
[+] RDP support
[−] No support for mobile devices
Supremo Remote Desktop
Supremo Remote Desktop is a convenient portable tool for remote control and remote assistance to other users. Works under Windows control XP and higher, mobile devices are not supported.
The program starts without installation; to start working, the host and client must download Supremo Remote Desktop from the developer’s website. Traditionally, two operating modes are supported: using a computer as an access point and connecting to a remote device. In the first case, access is opened by pressing the Start button. In the Your credentials section, the data required for connection is available: ID and password generated at the beginning of the session. The client requests authorization when logging in (Ask authorization option), thereby preventing unauthorized access attempts to the computer.

To connect to the host, use the Your partner field; you can also select an address from the Address Book. The list of active connections is displayed in the Connections section of the main program window.
During transmission, the HTTPS (SSL) protocol is used, the data is encrypted. The security settings are poorly disclosed: you can set a password to launch the program and specify the IDs allowed for the connection.
Other tools available in Supremo Remote Desktop include multiple connections of users to one machine. To transfer files, a manager is used that is similar to the classic two-panel one; uploading and downloading files is available. There are no presentation or multimedia functions provided. This certainly limits the use of Supremo as a remote assistant.
Summary
Supremo Remote Desktop is an easy-to-use program that has a standard set of tools for remote control. Users who do not need multimedia functions may pay attention to it.
[+] No router setup required
[+] Simple interface
[−] Few settings
[−] Slow screen rendering
mRemoteNG
Speaking about universal tools that allow you to work with several protocols simultaneously, it is worth mentioning mRemoteNG. The program provides access to VNC, ICA, SSH, Telnet, RAW, Rlogin and HTTP/S, and also has RDP support. Distributed in portable and standard version installer for the Windows platform.

The mRemoteNG interface is presented in several sections, there are panels, tabs - as a result, it is easy for the user to configure appearance programs in your own way. Basic options are available in the “Configuration” section. Here you can specify the protocol required for connection and related parameters: connection settings, protocol, gateway, appearance, resources and others. “Configuration” displays the host connection status.
Connection to devices is carried out through the quick connection panel - here it is easy to create several configurations, which, in the case of multiple protocols, is very convenient. Connections can be grouped and configurations can be easily imported/exported.
File transfer is carried out using the SSH protocol - which is not very familiar to the average user and at the same time, more reliable in terms of security. TO additional functions includes a port scanner, you can add external tools to the list.
The vagueness of mRemoteNG is striking. This is manifested in an unusual interface: it is not so convenient to work and configure with each specific protocol. In the connection configuration, many parameters are reduced beyond recognition - this can be attributed to the quality of localization. When trying to find a description of the functions, the documentation is silent, its sections are empty.
Summary
A notable feature of mRemoteNG is the combination of popular protocols into a single graphical shell. By setting up multiple connections, there is no need to use multiple specialized solutions. This plus to some extent compensates for the unintuitiveness of the program and the lack of documentation.
[−] Unintuitiveness
[+] Support for multiple protocols
[+] Transferring files via SSH
[−] Lack of documentation
TightVNC
Homepage: http://www.tightvnc.com/
TightVNC Software develops several products: TightProjector, RFB Player, VNC Reflector and TightVNC. TightVNC is a program for remote control; it can be used to solve computer problems, educational purposes, and administration.
TightVNC is a cross-platform solution. For Linux, however, at the time of writing this review is only available old version programs, Mac OS is not supported. However, there is a version of TightVNC available on the Java platform, which allows for remote control via a web server. On Windows platform, TightVNC installs as a regular application or as a system service. “Silent” mode is supported, it is quite easy to transfer the configuration to other computers or update servers remotely.
The TightVNC toolkit is divided into two modules: WinVNC - a server part installed on a remote machine, and a Viewer application designed to view the contents of the remote server's screen. In the Viewer connection settings, the VNS server address and transmission speed are set.

It should be noted that TightVNC does not generate an access password; you need to define it yourself in the settings. The connection status can be recognized by the icon displayed in the notification area: if at least one user is connected to the computer, the colors of the icon change.
The developers hint that data transfer via VNC, despite the original DES password protection, is imperfect. For security reasons, it is recommended to use SSH tunneling. At the same time, TightVNC settings reduce the likelihood of unauthorized access to zero. In future versions of the program it is also planned to introduce more reliable protection methods.
Summary
TightVNC surprises big amount settings related to connection and security. This a good choice for the administrator, but in terms of transfer to the server and further maintenance - not the best option for an inexperienced user.
[+] Flexible setup
[+] Java version
[−] Non-operative setting
[−] Unintuitive interface
Remote Utilities
Remote Utilities is a solution, according to the developer, intended for small and medium-sized businesses. Remote control is possible directly, via a local network or the Internet. When working with a set of utilities, no firewall adjustments or preliminary configuration are required.

The complex works only under Windows; for Linux it is suggested to install the Wine emulator - but only for working with RUT-Viewer. mobile version absent.
Remote Utilities consists of three modules: viewer - installed on local computer, host - to remote, agent - module for user support. The agent, it should be noted, is optimal for quickly establishing communication between the client and the host. Remote installation, as well as updating, is simple, thanks to the Remote installation tool.
A connection in one of the above modes is made using the New connection dialog (Connection → Add Computer), you can specify an IP address, Internet ID or DNS as an access point. The connected computer is added to the list address book, from which the necessary devices are subsequently selected.
Standard tools for remote control are provided, such as a remote device manager, registry viewer, terminal and file manager. The manager is two-panel, with the ability to copy and move data, launch and open applications and documents on a remote host. Also available is terminal support and power control.
Text chat is quite simple, but be aware that Remote Utilities also offers audio/video chat for users. Here it is worth mentioning the ability to capture video and adjust the transmission quality - from 24-bit color transmission to an optimized “picture” for a network with limited transmission (in addition, there is a Network usage mode parameter in the Properties settings of the remote computer). In a word, there are those features that have been repeatedly listed in similar programs with RDP support.
Remote Utilities provides 3 types of authorization, AES encryption with a 256-bit key, and a 2048-bit public key. Incoming connections are filtered by IP, and you can also create a list of trusted users with different access rights. The security subsystem is optional: you can choose RUT or WinNT. Both modes allow you to flexibly configure access to certain functions for each user; there are no significant differences between them.
Summary
A simple set of utilities for remote connection, without selecting a connection protocol, but extremely easy to install and configure. Essentially, it lacks cross-platform functionality and a user-friendly interface for working with multiple devices simultaneously.
[+] Remote installation and update in remote mode
[+] Availability basic settings for RDP
[+] Work via local and Internet
[+] Free (for non-commercial use)
The Windows system has been providing the ability to implement remote access via the RDP protocol for a long time. This standard tool appeared in the version of Windows NT 4.0, released in 1996. It was more or less functionally modified in the Windows XP version, and found its completeness already as part of Windows 7. Versions of Windows 8/8.1 and 10 inherited remote access via the RDP protocol from Windows 7 without functional changes.
Below we will take a closer look at how remote access works via the RDP protocol in versions of Windows 7, 8.1 and 10.
1. Remote access via RDP protocol
Connection using the RDP protocol is carried out between computers located on the same local network. This type of connection is intended primarily for IT specialists who maintain company computers integrated into their production network. Without leaving their workplace, connecting remotely to the computers of enterprise employees, system specialists can solve problems that do not require intervention in the hardware of the machines and carry out preventive measures.
Connecting to a remote computer using the RDP protocol is also possible outside the local network, over the Internet. But this will require additional steps - either forwarding port 3389 on the router, or combining it with a remote computer into a single VPN network. In view of this, connecting to a remote computer over the Internet is much easier using other software tools that do not require unnecessary actions. This is, for example, standard Windows utility“Remote Assistance” for providing computer assistance over the Internet. It works on the principle of sending an invitation file to the user who will provide computer help. Its more functional analogues on the Windows software market are programs like .
The RDP protocol is also used to connect to virtual machines. A remote connection via RDP can offer more opportunities than the standard connection window of a standard hypervisor. The Hyper-V connection window does not provide sound playback in the guest OS, does not see connected USB storage devices, and cannot offer more connection with a physical computer than pasting text copied into it. While an RDP connection can provide visibility virtual machine various devices, connected to a physical computer, better image quality of the guest OS desktop, work with sound, etc.
To connect via RDP, the remote computer must meet the following requirements:
- It must have a password-protected account;
- The system must allow remote connections;
- If you do not want to change your access data every time you connect with a constantly changing dynamic IP address, you must assign a static IP address in the network settings.
Remote access is only possible on computers with Windows Pro, Enterprise or Ultimate editions installed. Home versions of Windows (Home) do not provide remote access via RDP.
2. Password on the remote computer
If you are working on a remote computer using a Microsoft account, and using a short PIN code instead of a long password, when connecting via RDP, you must enter that same long password, and not a four-digit PIN code.
If an unpassworded local account is used on the remote computer, and there is no special need for a password, such as when connecting to Hyper-V virtual machines, at least simplest password something like “777” or “qwerty” will have to be created.
3. IP address of the remote computer
When connecting via RDP, you will need to enter the IP address of the remote computer. The internal IP address is visible in network parameters systems. But in versions of Windows 7, 8.1 and 10 these are three different paths. In Windows 7, this is a section of the Control Panel, and in Windows 8.1 and 10 it is the Settings application, with its own organization inherent in each version. Therefore, we will recognize the internal IP address in a universal way suitable for each of these systems - through command line. The shortcut to launch Command Prompt in Windows 7 is available in the Start menu. In Windows 8.1 and 10, the command line is launched from context menu on the Start button.

In the command line window, enter:
After pressing Enter, we will get a summary of the data, where the internal IP address will be visible.

4. Allowing remote connections
Permission to remote connection V Windows systems initially, as a rule, disabled. In any case, this definitely applies to licensed assemblies. The ability to connect via RDP on a remote computer is activated in the system settings. We need the "System" section. In the Windows 7 version, it can be accessed by searching the Start menu. And in Windows 8.1 and 10, you can get to the “System” section from the context menu on the “Start” button.

Click “Setting up remote access”.

In the system properties window, you must set the option to allow remote connections to active. There is no need to remove the authentication option. To apply the changes, click “Apply” below.

Such settings will open the path to a remote connection, but only for the administrator account. Regular account users are not allowed to provide their own computer for remote control. The administrator can give them this right.
Below the option to allow remote connections there is a “Select users” button. Let's press it.


In the field below, enter the name of the user who is allowed to connect to him via the RDP protocol. For local accounts this is their name, and for Microsoft accounts this is email address, with the help of which authorization occurs. Click "Ok".

That’s it – now this user’s account will be accessible from any computer within the local network.
5. Connect to a remote computer
All necessary actions done on the remote computer, go to the main computer from which connection and control will be carried out. You can launch the standard RDP connection utility by finding its shortcut using a search within the system. In Windows 7, this is a search in the Start menu.

In versions of Windows 8.1 and 10, press the Win+Q keys.

A small connection window will appear. In the future, it will be possible to connect to remote computers using exactly this abbreviated form. But for now, click “Show Options”.

In the “Computer” field, enter the IP address of the remote computer. In the field below - “User” - accordingly, enter the user name. If an account is connected to the remote computer Microsoft entry, enter your email address.

If you work on the computer using a regular local account, the user name must be entered in the format:
Computer\User
For example, DESKTOP-R71R8AM\Vasya, Where DESKTOP-R71R8AM is the name of the computer, and Vasya– username of the local account.

Below the username there is an option to save authorization data on a remote computer. Connection parameters - IP address, username and password - can be saved as a separate RDP file and used to open it on another computer. Click “Connect”, and then “Connect” again in a new window.

Enter the password for the remote computer account.

Click “Yes” in the certificate error window.


We will get more settings for connecting via the RDP protocol in the utility window initially, before establishing the connection.
6. Connect to another account on a remote computer
Below the column for filling in the user name of the remote computer, if the “Always request credentials” checkbox is not checked, options for deleting and changing access data are displayed. By clicking the “Change” option, in addition to the authorization form in an existing account on a remote computer, we will see the ability to connect to another account that is present on the same computer.

After entering a new username and password, the authorization data for a specific IP address will be overwritten.
7. Connection settings
In the opened window for connecting to a remote computer, we will find tabs with customizable parameters. The first two concern the convenience and functionality of remote access.
“Screen” – in this tab you can set the screen resolution of the remote computer; the utility window will open with this resolution after connection. If accessing from a weak computer, you can set the resolution to low and sacrifice color depth.

“Local resources” – here for the sake of economy system resources You can disable audio playback on the remote computer. Or, on the contrary, you can also install audio recording from a remote computer. In the column of local devices and resources, after clicking the “Details” button, we can, in addition to the active printer, select devices of the main computer that will work on the remote computer. These are smart cards, separate sections hard drive, flash drives, memory cards, external hard drives.

An obstacle to using the RDP protocol may be its blocking by antiviruses. In this case, the RDP protocol must be enabled in the settings antivirus programs.
Have a great day!
What is Remote Desktop
Using Windows Remote Desktop (rdp) can be a very useful and convenient solution to the issue remote computer access. When can remote desktop be useful? If you want to control your computer remotely (either from a local network or from anywhere in the world). Of course, third-party ones, such as and others, can be used for these purposes. But often these programs require access confirmation on the side of the remote computer, they are not suitable for simultaneous parallel use of the computer by several users, and still work slower than the remote desktop. Therefore, such programs are more suitable for remote assistance or maintenance, but not for everyday work.
It can be quite convenient to use Remote Desktop to allow users to work with certain programs. For example, if you need to demonstrate the operation of a program to a distant user (provide demo access for testing). Or, for example, you have only one in your office powerful computer, on which a demanding program is installed. On other weak computers it slows down, but everyone needs access. Then a good solution would be to use a remote desktop: everyone from their “dead” computers connects via rdp to a powerful one and uses the program on it, without interfering with each other.
Static IP address. What is needed for remote access via rdp
One of the important points regarding setting up and subsequently using the remote desktop is the need for a static IP address on the remote computer. If you are setting up a remote desktop that will only be used within the local network, then there is no problem. However, remote desktop is mainly used for external access. Most providers provide subscribers with dynamic IP addresses and for normal use this is quite enough. Static (“white”) IPs are usually provided for an additional fee.
Setting up Windows Remote Desktop
Well, we figured out why we need a remote desktop. Now let's start setting it up. The instructions discussed here are suitable for Windows 7, 8, 8.1, 10. In all of the listed operating systems, the settings are similar, the differences are minor and only in how to open some windows.
First we need to configure the computer to which we will connect.
Attention! Your account must have administrator rights.
1. Open Start - Control Panel .
In Windows 8.1 and 10 it is convenient to open Control Panel by right-clicking on the icon Start and selecting from the list Control Panel .

Next, select system and safety - System. (This window can also be opened in another way: click Start, then right-click on Computer and choose Properties ).


Setting up remote access .
3. In the section Remote Desktop choose:
- Allow connections only from computers running Remote Desktop with network level authentication . Suitable for clients running version 7.0 of Remote Desktop.
- . Suitable for connecting legacy versions of clients.
4. Click Apply .

5. By button Select users A window opens in which you can specify Accounts on the computer that will be allowed to connect remotely. (This procedure is also called adding a user to a group )

Users with administrative rights have remote worker access by default. However, in addition to actually connecting, any account must be password protected, even the administrator account.
6. Add to group Remote Desktop Users a new user with normal rights (not an administrator). To do this, press the button Add

In field Enter names of the selected objects, enter the name of our user. I have this Access1. Let's click Check names .

If everything is correct, the computer name will be added to the username. Click OK .

If we don’t remember the exact username or don’t want to enter it manually, click Additionally .

In the window that opens, click the button Search .
In field searching results All computer users and local groups will appear. Select the desired user and click OK .

When you have selected all the required users in the window Selection: Users press OK .
Now to the group Remote Desktop Users a user with a regular account will be added Access1. To apply the changes, click OK .

7. If you use a third-party one, you will need to configure it additionally, namely open TCP port 3389. If you only have the built-in Windows firewall running, then you don’t need to do anything, it will be configured automatically as soon as we have enabled the use of remote desktop on the computer.
This completes the basic setup of the remote computer.
Network settings, port forwarding
As mentioned above, for remote desktop access you need a static IP address.
If you do not have any routers and the Internet cable goes directly to the computer, then skip this section and move on to the next one. If you use a router, you need to make additional settings on it.
If you plan to use the remote desktop only on the local network, then it will be enough to just assign the local IP to the right computer(perform the first part, without port forwarding). If you need access from outside, then you also need . To open access to the remote desktop you need to forward TCP port 3389.
Setting up a remote desktop connection
Let's go directly to connecting to a remote desktop, that is, settings on the client side.
1. Let's launch .
You can do this in Windows 7 through the menu Start - All programs - Standard - Remote Desktop Connection .
In Windows 8 it is convenient to launch through search. Click Start, click on the magnifying glass icon in the upper right corner and start entering the word “deleted” in the search field. From the proposed search options, select Remote Desktop Connection .


On Windows 10: Start - All applications - Standard Windows - Remote Desktop Connection .
2. First of all, let’s check which protocol version is installed. To do this, click on the icon in the upper left corner and select the item About the program .

Checking the desktop protocol version. If 7.0 or higher, then everything is in order, you can connect.

If the protocol version is lower (this is possible on older versions of Windows), then you need to either update it or lower the security level in the settings of the remote computer (i.e. select Allow connections from computers running any version of Remote Desktop (more dangerous) ).
You can download Remote Desktop updates for legacy operating systems using the links below:
3. Specify connection parameters:
In field Computer We register the IP address of the remote computer to which we are going to connect. (Local - if we connect within the local network and real (the one given by the Internet provider) if the remote computer is located outside the local network). I have the first option.
Note. You can find out what external static IP address you have, for example, through the Yandex.Internetometer service.
4. Click To plug .

You will be prompted to enter your credentials. Enter the login and password of any user on the remote computer who has rights to use the remote desktop. In my example it's Admin or Access1. I remind you that accounts must be password protected.
Enter your username and password and check the box next to it Remember credentials , so as not to enter them the next time you connect. Of course, you can only remember your credentials if you are working from a personal computer that is not accessible to unauthorized persons.
Click OK .

A warning will pop up. Put a tick Don't ask for connections to this computer again and press Yes .

If everything is done correctly, you will see the remote desktop in front of you.
Note. I remind you that you cannot simultaneously connect via remote work from several computers under one user. That is, if it is planned that several people will work with the remote computer at the same time, then for each you will need to create a separate user and grant rights to use the remote desktop. This is done on a remote computer, as discussed at the beginning of the article.
Additional Remote Desktop Settings
Now a few words about additional settings connecting to a remote desktop.
To open the settings menu, click on Options .

General tab
Here you can change connection settings. By clicking on the edit link, you can edit the user name and connection password.
You can save the already configured connection settings. Click on the button Save as and choose a place, for example, Desktop . Now on Desktop A shortcut will appear that immediately launches a remote desktop connection without the need to specify parameters. This is very convenient, especially if you periodically work with several remote computers or if you don’t configure it for yourself and don’t want to confuse users.

Screen tab
On the tab Screen you can specify the size of the remote desktop (whether it will occupy the entire screen of your monitor or be displayed in a small separate window).
You can also choose the color depth. At slow speed It is recommended to choose a shallower Internet connection depth.

Local Resources tab
Here you can configure the sound parameters (play it on a remote computer or on a client computer, etc.), the order of using hotkey combinations Windows keys(such as Ctrl+Alt+Del, Ctrl+C, etc.) when working with a remote desktop.
One of the most useful sections here is Local devices and resources . By checking the box Printer, you get the ability to print documents from a remote desktop to your local printer. Check mark Clipboard activates a single clipboard between the remote desktop and your computer. That is, you can use normal copy and paste operations to transfer files, folders, etc. from a remote computer to yours and vice versa.

Clicking the button More details, you will be taken to the settings menu where you can connect additional devices on your computer to the remote desktop.
For example, you want to have access to your disk when working on a remote computer D. Then click on the plus sign opposite Devices to expand the list and tick the disk D. Click OK .

Now when you connect to a remote desktop, you will see and access your disk D through Conductor as if it were physically connected to the remote computer.
Advanced tab
Here you can choose the connection speed to achieve maximum performance, as well as set the display of the desktop background, visual effects, etc.

Removing a Remote Desktop Connection
Finally, let's consider how to delete a remote desktop connection. When is it needed? For example, you previously had remote access to your computer, but now there is no need for this, or you even need to prevent strangers from connecting to the remote desktop of your computer. It's very easy to do.
1. Open Control Panel - system and safety - System, as they did at the beginning of the article.
2. In the left column, click on Setting up remote access .
3. In the section Remote Desktop choose:
- Don't allow connections to this computer
Ready. Now no one will be able to connect to you via remote desktop.
 Order 343 mail. Order by Russian post. Consequences of failure to appear in court when summoned
 How to put a password on a folder on a Windows computer without and with programs
 Pluton – Free Bootstrap HTML5 One Page Template
 History of ZX Spectrum: Myths and reality New Spectrum
 Voice assistant Siri from Apple Siri functions on iPhone 6s
 How to roll back to a previous version of iOS?
 Unlock iPad in four days