Connecting a laptop to a TV with a vga cable. We connect the new video card to the old monitor. Connecting a laptop to a TV via HDMI
In this one we will connect the TV to desktop computer via HDMI and VGA.
Most modern video cards (including built-in ones) allow you to connect 2 or more monitors. This will make it possible to work at a computer using a monitor and watch movies on a large TV screen. Today, most TVs are equipped with matrices with FullHD resolution (1920×1080). They are convenient to use as a second monitor during work, and when the TV is not in use, then as the main source of displaying information. Still, it’s much more interesting to work and have fun behind large diagonals.
Article structure
Connecting a TV to a computer via HDMI
To do this, you must have HDMI connectors on your computer's video card.
In my home desktop PC, the video card is built into the processor.

It is also desirable to have an HDMI connector on the TV.

or from the side

After we are sure of the availability of connectors, we need to purchase an HDMI cable.

This can be done at your nearest computer store.

Everything is ready to connect your TV to your computer via HDMI.
Before connecting, we recommend turning off your computer and TV. This recommendation makes sense, but at work we hot-connected monitors to computers via VGA a thousand times, and everything was fine. At home I connected the monitor to the computer via DVI on the go and everything was fine too. Possible for HDMI is better turn off the devices.
Turn off the computer and TV.
Connect one end of the cable to the computer

the second one to the TV

We turn on the TV.
Press on the remote control INPUT several times and select the HDMI connector to which you connected the cable

Turn on the computer and proceed to setup.
Setting up a TV connection to a computer via HDMI
On the desktop, right-click and select

In the window that opens, in the section Screen you can select a monitor or TV from the drop-down list to configure Resolution and Orientation

In the section drop-down list you can select different display types

If we choose Duplicate, then on the TV it will be the same as on the computer monitor. Moreover, if the resolutions of the devices do not match, then the result will be nonsense.
If we choose Expand, then the TV will be a continuation of the monitor screen. In this case, you can swap monitors programmatically

There is a checkmark at the bottom of the window Make it the main monitor. You can select the TV, check this box and click Apply. The TV will now display a taskbar with a Start button and open windows by default.
Sound settings
Since we connected via HDMI, we can immediately transmit sound. Let's set up audio transmission to the TV.

In the window Sound We find the connected TV. Right-click on it and select Use as default

Now you can control the sound from the TV remote control.
Connecting a TV to a computer via VGA
The procedure is the same. Make sure that your TV and computer have VGA connectors.
In computer

on TV

We run to the computer store for a VGA cable if you don’t have any left of the monitor

At VGA connection I do not turn off the computer and TV using the cable.
We insert one end into the computer

the other on the TV

On the TV with the button INPUT select a channel VGA and the image should appear.
The image settings are the same as when connecting a computer to a TV via HDMI.
Connecting TV to PC via adapters
If your computer does not have an HDMI connector, but your TV does, then... Can be used DVI to HDMI adapter


We screw this to the DVI connector of the video card or motherboard (which has built-in video) and connect it with an HDMI to HDMI cable (the picture of which is shown at the beginning of the article). In this case, there will be no sound on the TV, but the image should be of high quality since it is transmitted in digital format without distortion.
It happens that the TV does not have an HDMI connector (for example), but has a VGA. On the contrary, a computer has everything except VGA. Let's take for example ASUS video card R9270

In this case, a DVI-VGA adapter will help out.


In this case, our image will be transmitted without sound and in analog format. In principle, nothing to worry about, but at long distances interference may occur and image quality may deteriorate.
Conclusion
This article looked at connecting TV to computer via HDMI and VGA cable. It is preferable via HDMI since in this case the data is not converted to analog format for transmission and then back to digital for playback on the TV. Due to this, it is preserved high quality. Plus you can transmit sound via HDMI. If you connect via VGA, you will have to connect the sound via a separate cable.
Regarding the adapters. It seems to me that it is better not to use them if there are identical connectors on the TV and on the computer. It is better to purchase the appropriate cable. If adapters are used, the quality decreases. For example, from HDMI to DVI you lose the ability to transmit sound to a TV via one cable. In the case of DVI-VGA, the signal is converted to an analog format, which reduces its quality. They say that the “dot to dot” does not hit the dot and the image may be slightly blurry.
In my case, for an unknown reason, the image via the HDMI cable was crooked (I’ll try to show it in the video below), unlike the analog VGA connection. For the experiments, a BENQ E24-5500 monitor-TV was used. Maybe I configured something wrong. Who knows and understands, please tell me in the comments.
Best regards, Anton Dyachenko
Hi all! Borrowed a netbook to use for a while Acer Aspire ONE D270 and decided to test it in conjunction with a TV. On the Internet, I have more than once met people who are interested in: “How to connect a netbook to a TV?” Actually, there are several ways to connect these digital devices with each other, but only some of them, in my opinion, are worthy of your attention. Why? I start from the advisability of using one interface or another, but if you have no alternative, then you don’t have to choose... However, here too you can try to beat the situation using one of the proposed methods.
For example, for reasons unknown to me, some netbooks do not have an HDMI interface on board, but are equipped with a VGA connector. As far as I know, all modern TVs still have a SCART connector on board. So, some people suggest connecting a TV and a netbook using a VGA-SCART cable. I haven't practiced it myself this method connection, and if you have such experience, then share it in the comments.
They claim that it is possible to connect devices to each other in this way, but to do this, the computer’s video card must support working with such an adapter. Most likely, this exotic connection method will not work and a special converter (scaler) will be needed, if this type of digital devices exists in the nature. Something tells me that this is not our method :-)
In a previous publication I talked about the types of editorial staff. So, if the TV supports DLNA technology and the Windows 7/8 operating system with Windows Media Center is installed on the computer, then you can transfer . You can also transfer using the “Home Media Server (UPnP, DLNA, HTTP)” program. I described all these methods earlier and I will not dwell on them.
You can very easily connect your computer to a TV or projector via a USB video card (USB to HDMI and DVI adapter). A fairly compact thing that works with USB 2.0/3.0 and is capable of transmitting video with a maximum resolution of 2048 x 1152 with color depths of 8, 16 and 32 bits. The configuration and demonstration of this device is described in the video.
This device supports split screen mode. This way you can transfer video with sound from a netbook via USB to a TV, projector or monitor with an HDMI or DVI interface.
Connecting a netbook to a TV via VGA and HDMI.
You can transfer a video signal with sound via the analog VGA (Video Graphics Array) interface to digital HDMI, but for this you will need a converter, which is popularly called a VGA-HDMI adapter. Using this adapter, you can connect any device with a VGA connector and without an HDMI interface. Split screen mode is supported. I won’t describe all the details, but I suggest watching the video.
I would also like to say a few words about the classic connection of a netbook and a TV to each other via an HDMI cable. are described in detail in one of the publications. As you understand, the first step is to connect digital devices with each other through an interface with the participation of HDMI cable.


You need to select the HDMI interface as the signal source on the TV, and on the netbook, right-click on an empty area of the desktop and select “Screen Resolution”.


By default, there are only two options available on the netbook: 800 x 600 and 1024 x 600, but once you connect a TV panel, these options will be expanded. Here I was asked to select a resolution in the range from 800 x 600 to 1280 x 1024. This page does not offer an abundance of functionality, but it will be difficult to get confused in them :-)


My Smart TV supports Full HD resolution (1920×1080) and, of course, I managed to stretch the image to the entire TV screen, but the playback quality, although it was acceptable, would still be desirable. I hope this short article will help you connect your netbook to your computer.
2017-01-23T20:00:14+00:00
Thank you very much for your answer!
2017-01-21T09:21:55+00:00
Everything should work without problems.
2017-01-21T01:27:33+00:00
Hello! I'm asking for advice. Can I connect a computer (VGA) to a TV (HDMI) with an HDMI-VGA cable (pictured)? Will there be a video? The sound in this case is not important, since the speakers are connected to the computer.
With today's article we are opening a new series of publications devoted to equipment for switching, transmitting, converting and converting high-definition signals. In this article we will look at 4 high-quality VGA-HDMI adapters and their features.
About HDMI and VGA briefly
HDMI is one of the most common digital interfaces designed for transmitting high-definition audio and video signals. Today, this connector is on board the vast majority of purely household and professional AV equipment, electronics, computers, laptops and other equipment. In general, this is a completely reliable, widespread and extremely promising interface, the development of which is supported by almost all the world's leading electronics brands, and there will probably be no alternative to it in the foreseeable future.
However, despite the rapidly developing digital era, old analog AV signal transmission interfaces are still common. Among them, the well-known VGA stands out. Video Graphics Array (“pixel array”) or Video Graphics Adapter (“video adapter”) – VGA for short – is an analog video interface developed back in 1987 by IBM for displaying images on computer monitors.
This 15-pin interface is also sometimes called PC-RGB, D-SUB 15 or DE-15. Before LCD displays became common, this connector was the most common connector in computer graphics cards and monitors. Oddly enough, it can still be seen on many video cards and motherboards, displays, TVs, projectors, game consoles, laptops and other AV equipment.
Despite its advanced age, according to the VGA specification, it can easily reach a resolution of up to 2048x1536 at a frequency of 85Hz! Agree, not a bad result for grandfather. However, you shouldn’t delude yourself, because... The image quality at high resolutions noticeably suffers (the picture will be blurry and unclear). In addition, certain restrictions are imposed on the cable length.
At the end of 2010, a number of large companies (including Intel, AMD, Samsung, LG, etc.) agreed to bury the VGA standard by 2015 and switch to modern digital interfaces HDMI and DisplayPort.
It would seem that everything is clear: the fate of VGA was predetermined 7 years ago.
However, you need to understand that there are still a huge number of devices with VGA connectors, albeit obsolete, but still quite functional. In addition, some manufacturers that did not participate in the above agreement still equip their devices with VGA connectors: laptops, monitors, TVs, projectors and a large number of professional equipment (medical, studio, etc.). So we come to the main question of our article today...
How to connect VGA devices to HDMI
Since we are talking about pairing, it is fundamentally different types signal (analog and digital), simple adapters are not enough here. A more complex device is needed - a VGA-HDMI adapter with signal conversion chips, power, protection, etc.
This class of devices is called converters or signal converters. If they have an HDMI interface at the input or output, then they are usually called HDMI converters / converters. As you understand, you can convert various signals, and we will definitely talk about them in detail, but in other publications. Today we will talk about VGA to HDMI converters.
4 high-quality VGA-HDMI adapters
In the course of writing this material, we became acquainted with a large number of similar devices. As a rule, the capabilities and characteristics of all VGA-HDMI cables are similar. However, there are still some differences, and we will definitely tell you about them.
Today on sale you can find such VGA-HDMI circuits for every taste and budget: from cheap Chinese crafts from Aliexpress to models from world-famous HDMI equipment manufacturers (for example, Kramer), for which you will have to pay a considerable amount. I would like to immediately warn you against buying cheap devices from Chinese online stores.
As a rule, they are built on cheap chips, which is why image and sound quality suffers, as well as the number of supported resolutions. In addition, they are sold without any warranty. If the device worked for you when you received the parcel, this does not mean at all that it will work properly in the future.
For private home use, such a VGA-HDMI connection may be suitable, but if you are professionally involved in switching equipment or are expected to use it 24/7, then I strongly recommend choosing a manufacturer with representation in your country, support and warranty.
For review, we will take several mid-price VGA-HDMI converters from a well-known and trusted manufacturer, which are not inferior in quality and characteristics to more expensive analogues. Let's focus on 4 VGA-HDMI adapters.
Using their example, we will talk about equipment of this class and its features.
Briefly about the manufacturer: the Dr.HD company has been known on the Russian market for more than 10 years. It has an official distributor in Moscow, a large dealer network, service center, technical support and provides a 2-year warranty.

Simple and reliable design, metal case, VGA input and 2xRCA for stereo sound - left and right channels, HDMI output. Input permissions:
- 640x480 @ 60Hz and 75Hz
- 800x600 @ 60Hz and 75Hz
- 1024x768 @ 60Hz and 75Hz
- 1280x960 @ 60Hz and 75Hz
- 1280x1024 @ 60Hz and 75Hz.
Output resolution: 1920×1080 and 1920×1200 at 60Hz. It is possible to enable/disable the content protection protocol - HDCP.
No one will have any difficulties connecting such an HDMI converter: the VGA cable is connected on one side, and HDMI and power on the other. None additional settings not required. The monitor (TV, panel, projector, etc.) will receive a signal from the source in 1-2 seconds.
Let's take a look inside the device.

As we said above, this is not just a jumper adapter. There are several signal conversion chips, power supply, fuses. The use of polymer capacitors indicates the reliability of the device. Everything is done efficiently and soundly.
Go ahead…

This model is similar to the previous one in its characteristics, but supports large quantity video resolutions:

This can be extremely useful if you plan to connect different equipment.
Some may not like the unpresentable plastic case. Agree, the first model in metal looked more interesting.
Please note that here audio output is implemented through a different interface - Jack 3.5mm. In terms of characteristics, it does not differ from the above-mentioned 2xRCA connectors: it has the same screen, the same division into 2 channels. The only difference is the shape of the connector. If you wish, you can easily find a Jack 3.5mm to 2xRCA adapter cable and vice versa.

The CV 123 VAH model was released much later than the Y0102H, so the circuit looks somewhat simpler due to the use of more advanced elements. In fact, it is in no way inferior to its predecessor, and in some ways even surpasses it.

This model is positioned as an accessory for the Sony Playstation Portable game console, but nothing prevents you from using this VGA-HDMI converter adapter with other devices. The input is the same VGA (the resolution provided by this console is 480p), the HDMI output (with a resolution of up to 1080p @ 60 Hz) and again a 3.5mm audio Jack for connecting an audio system or headphones.
A special feature of this model is the Upscale function, which allows you to increase the number of display lines to 1080 at the hardware level. Simply put, you can manually increase the resolution and quality of the digital image to Full HD.
Having disassembled the device, we again see separate chips for video and audio processing and other elements of the signal conversion circuit.

Judging by the fact that the PlayStation Portable console is long outdated (it was released in 2004, and support was discontinued in 2013), we can assume that this converter is also far from new.
Let's consider another model.

This is the latest model in the Dr.HD assortment. The device is made in the form factor of a conventional adapter. Compact metal body, low power consumption, USB powered and the most full list supported video resolutions:

Unfortunately, the case is tightly sealed, so we were unable to disassemble this device. But judging by the impressive characteristics, we can confidently talk about a decent “filling”.
Results
We looked at several converters that can be used to connect a VGA source to an HDMI consumer. There is no point in demonstrating the process of connection and operation, because... much depends on the type of source and destination, the cables used and their length, and the content itself. I can only assure you that all the VGA-HDMI converters listed above coped with the task without any problems. Which model to choose is up to you.
The quality of the resulting picture is good, although of course it differs from the results that can be seen when switching via HDMI and DisplayPort. It is still worth using an interface that is already 30 years old only if there are simply no other options.
The range of the brand in question also includes multi-format converters that convert several interfaces to HDMI (or from HDMI) (VGA, S-Video, YPbPr, SCART, YPbPr, etc.), but we will talk about them in the following publications.
Modern TVs can easily replace a computer display. But how does a computer connect to a TV?
We have collected various ways solutions to this common problem.
Connection selection

First, attention will be paid to the optimal options regarding image quality, with which you can easily make a connection. After this, several additional methods will be given.
There is a possibility that the user will need to buy a cable from the store. Usually it is not very expensive, but it can be purchased various devices You can go to a specialized radio store or a retail chain that sells consumer electronics.
Please note that the presence of gold plating on expensive cables does not in any way affect the quality of the displayed image.
So, here are a few options for how to connect your computer to your TV:
- HDMI- an ideal option, because to work with it you just need to connect the connectors. As a result, not only sound, but also image will be transmitted well. The only possible problem is that sometimes it may not work from a laptop.
- VGA- one of the easiest ways to connect television. To do this, you only need a cable, which is sold complete with monitors. There is a possibility that the user has a home unused device. If necessary, you can buy it at a specialty store.
- With cable from DVI the situation is the same - to work with it you only need to buy an adapter and cable.
- Alternatively, you can use a composite cable S-Video. You can work with it either through a cable or through an adapter. It’s just that he’s not considered the best way connections because the image may not be very clear. So such a connection is not used if modern technology is available. The connection occurs in the same way as when working with household players.
Connecting using HDMI

Surely many users have heard about this connector. It is on all modern TVs.
The HDMI cable has the same connectors on both ends.
You can buy a cheap cable. But if the user plans to work in 3D mode, it is better to use latest version HDMI cable.
Look carefully, a similar socket is located on the video card near the monitor connection.
If there is no discrete video card, the socket will be located on motherboard, that is, near the USB port. However, it will look similar.
With a laptop everything is much simpler - it has the same HDMI socket. But it’s located on different sides depending on the model the user is working with.
Sometimes the TV is hanging on the wall and it can be very difficult to insert the cables from the back. It is for this situation that a cable with plugs at right angles is sold.
Alternatively, buy a special HDMI corner.
VIDEO: How to connect a computer to a TV via HDMI
How to connect a computer to a TV via HDMI
Connecting a TV to a computer via a VGA connector
Video Graphics Array is an interface designed to receive and transmit analog video signals. There is no sound transmission in this option for connecting the TV to the computer.
Before connecting, make sure that both devices - the computer and the TV - are equipped with VGA connectors and have a special cable.

To make such a connection, your computer must be equipped with an operating system no lower than .
Connect the PC and TV with a VGA cable when turned off, then use the remote control remote control TV, press the SOURCE button (in some models this may be INPUT) and in the menu that appears on the screen, specify as an external signal VGA(in some models - PC or RGB).
After this, confirm the selected changes by clicking OK.

Right-click on an empty space on the desktop and go to menu in the list that opens.
IN this menu you are given the choice of using both a TV and a computer monitor, as well as setting the required resolution.
Additionally, you can choose to use multiple screens, which gives you the following options:
- Duplicate screens- a function that allows you to get the same image both on the monitor and on the TV screen;
- Expand screens- will allow you to simultaneously watch a video on the TV screen and, for example, type text on a computer;
- Show desktop 1 or 2 - this function operates only one of the available screens - either a monitor or a TV.
In general, the process of such connection is not difficult, however, it creates some inconveniences associated with the transmission of sound in this embodiment.
It will have to be connected with a separate cable or use an external cable for these purposes. sound system.
S-Video
Another option for connecting a TV to a computer is to connect using S-Video connectors.
This option is convenient because all televisions and computers (except very old ones) are equipped with an S-Video connector.
All you need to do is connect these devices with an “S-Video to S-Video” cable.

Before connecting, both the TV and the computer must be de-energized, after which you insert one end of the cable into the connector on the computer’s video card, which is a round black socket, and the other into the S-Video socket on the TV.
While downloading on your computer operating system the TV screen will blink, indicating that it has been detected external source signal.
The next step is to configure the video card. To do this, click on an empty space on the desktop and in the menu “ Properties» go to the tab « Options» .
Then select the item « Additionally» and in the window that opens, opposite the name of the video card, activate the item « Clone» .
After use this parameter click on the item « Display" and select the name of the TV from the available list.
Then, on the TV, search for the signal source and adjust the image.
Miracast

Miracast technology differs from DLNA in that this option for outputting multimedia information from a TV to a PC simplifies the task of viewing not only recorded files stored on the gadget’s hard drive, but also played online on one of the built-in ones.
But Miracast technology has the only drawback - it is very demanding on computer resources.
So it is supported only by certain computers, as well as tablets and laptops that have powerful hardware.
It is important to implement such modern technologies on the TV itself.
If the TV only optionally supports Miracast, then you will have to spend extra money on an adapter that easily connects to the HDMI port.
The technology of a wireless monitor is very simple - the displayed image is compressed using a special algorithm.
After this, it is mirrored via Wi-Fi to a large TV display.
In this case, there is no need to connect the TV to one of the local networks using a router.
Thanks to the receivers, a separate mini-network is organized, simplifying communication with a PC.
To successfully transfer the image, install the Wireless Display add-on on your computer and start broadcasting.
Make sure that the Miracast function is activated in the TV menu. This can be done in the settings if you go to the tab "Networks" and go to the Intel WiDi sub-item.
VIDEO: Connecting your smartphone to your TV via Miracast
Connecting your smartphone to your TV via Miracast
Connecting PC and Smart TV
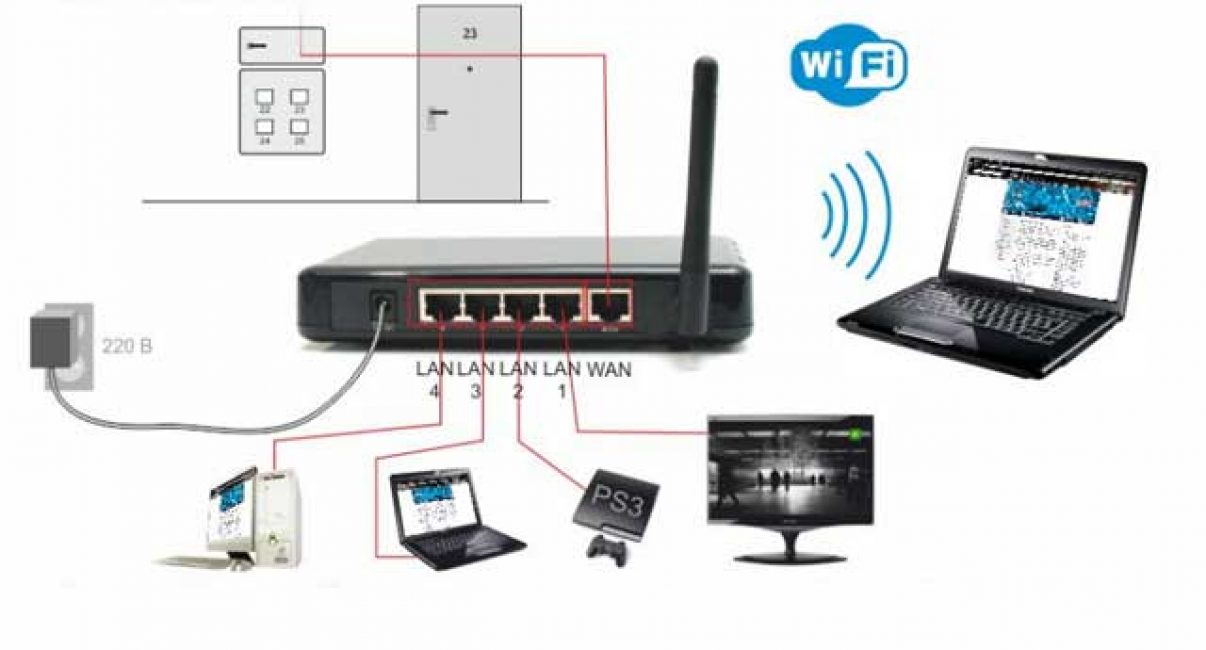
As many probably know, home network can be created without using a router. In this case, the role of the access point will be performed.
This is done in several ways:
- You can create a connection in one of the special management consoles;
- Alternatively, use ;
- Take advantage third party programs, For example, Virtual Router Plus.
Please note that distinguishing feature most built-in Windows tools– greater reliability and stability of operation.
In addition, users will no longer have to waste time searching for programs and installing them on Personal Computer. So the registry won't be too clogged.
This method is considered one of the simplest.
Once logged in as an administrator, proceed to launch the command line. To cope with this Windows 8 task, use the key combination Win+X.
When the menu appears, you must select " Command line" In the seventh version of the operating system, you need to press the combination Windows keys+ R in the window that opens, and also write CMD and press Enter.
Be sure to write the following command netsh wlan set
and after that press Enter.
Creation new network After this it will be completed and you can start launching it. For this purpose, write on the command line
Hostednetwork
It is important to say that you can create a virtual network only once.
However, after the module is rebooted, the user must enter a command to successfully launch the Internet.
As a result, the user will only have to connect to the computer by executing necessary actions, which have already been done when working with the router.
Control TV from PC wireless network Wi-Fi is possible using the same programs.
There are various add-ons that make it much easier to control your TV using a smartphone.
In this case, the telephone is used as control.
So, this article provides the basic ways to connect a computer to a TV.
It is very easy to cope with this task if you choose the appropriate option and follow the instructions given. Then the user will not have any difficulties connecting.
VIDEO: Connecting a Smart TV to a computer (Wi.Fi - Lan) - using WINDOWS
We connect the TV with Smart TV to the computer (Wi.Fi - Lan) - using WINDOWS
Image Settings
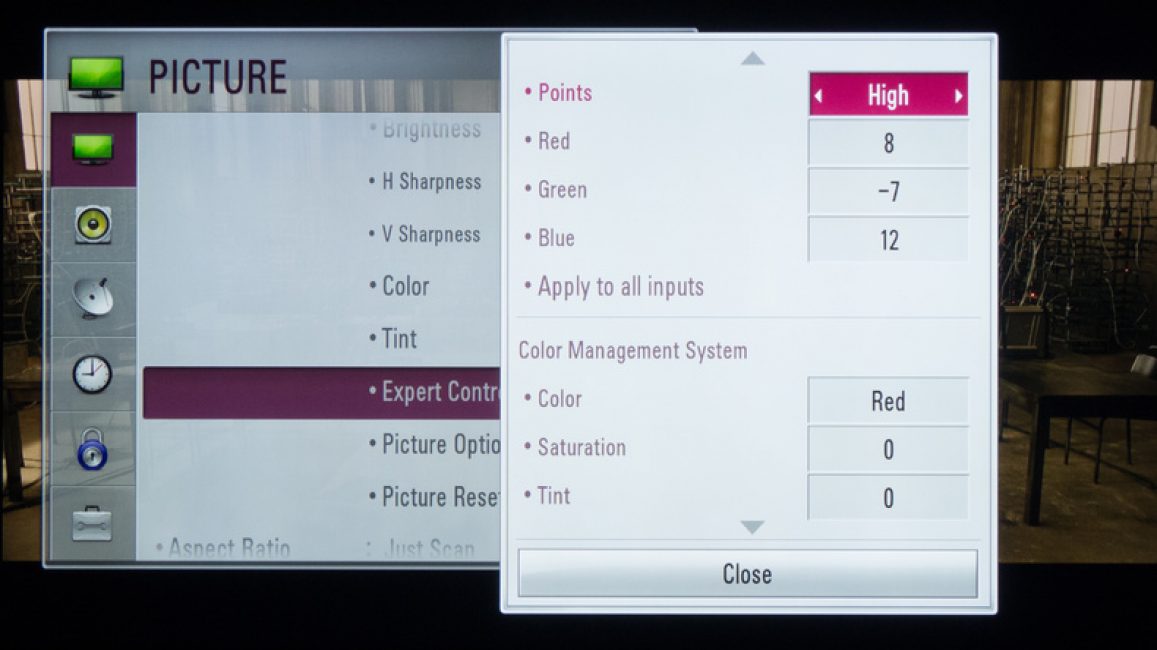
If the image is blurry, you should open system settings and find the section that is responsible for .
Here the user can set the required resolution to match the TV. If necessary, you can change the mode in which the video is displayed.
Most modern smart TVs can be connected to a PC wirelessly using local network wifi
This helps broadcast a variety of content - music, videos, and so on.
If necessary, you can easily duplicate images downloaded from your computer to your TV.
As a result, the latter will turn into high-quality analogue wireless monitor. In addition, when working with wi-fi you won’t need it.
As for the LG device, to activate this function you can use the service Smart Share
AllShare program
There are big differences in wireless connection settings between TV models from different manufacturers.
Most devices are capable of establishing a connection in automatic mode. To work with others, you need to install an additional software to connected .
So it may be difficult to formulate universal instructions, suitable for all users.
If you need to connect the TV to a PC via, you can find the necessary information by reading the instructions, or by going to the manufacturer’s official website.
There you can also find the answer to the question of what software is needed for this.
Combination of different outputs

Sometimes it happens that the equipment does not have the necessary connectors. It often happens that there is one port on the TV and another on the computer.
What to do in this case? It’s very simple – you just need to decide which connectors will be used and purchase the right cable.
Alternatively, use special converters that simplify the connection of different ports.
You can use a VGA converter that receives signals from the VGA output of the gadget.
After this, the signals are converted to the most common S-Video for TVs.
When turning off, follow this order:
- The TV and computer should be unplugged;
- Remember to disconnect the antenna and peripheral devices;
- You should connect the cables if you plan to use adapters;
- It is important to connect your computer as well as your TV to the network.
- Next, you need to turn off the computer and wait full load systems;
- Only after this can you start turning on the TV.
By clicking the right mouse button, the user will see context menu, in which you should find the item "Screen resolution" . For the system to connect the TV, you must press "Find" .
By selecting the item "Multiple Screens" , the user must configure the output of images:
- Screen duplication - in this case, the same information will appear on the TV as on the computer screen;
- When screens expand, the computer display and TV will form a common work area;
- Half desktop display means that the image will be displayed on either the TV or the computer.
| Connection method | How to do |
|---|---|
| Connecting a TV using a VGA connector | This connection option will require a separate audio signal output. |
| Connecting using the S-Video connector | Quite a simple and inexpensive way to connect. Due to the fact that most devices have an S-Video connector, it can be used as the main connection option. |
| Connecting a PC using HDMI | You can buy a cheap cable. But if the user plans to work in 3D mode, it is better to use the latest version of the HDMI cable. Next, you should find the HDMI socket, which is located behind the computer or TV. |
| Miracast technology | Miracast technology differs from DLNA in that this option for outputting multimedia information from a TV to a PC simplifies the task of viewing not only recorded files stored on the gadget’s hard drive, but also played online on one of the built-in web browsers. |
| Connecting a PC and Smart TV without a special router | Please note that a distinctive feature of most built-in Windows tools is greater reliability and stability. In addition, users will no longer have to waste time searching for programs and installing them on their personal computer. So the registry won't be too clogged. This method is considered one of the simplest. Further, this issue will be considered in more detail. |
 Order 343 mail. Order by Russian post. Consequences of failure to appear in court when summoned
 How to put a password on a folder on a Windows computer without and with programs
 Pluton – Free Bootstrap HTML5 One Page Template
 History of ZX Spectrum: Myths and reality New Spectrum
 Voice assistant Siri from Apple Siri functions on iPhone 6s
 How to roll back to a previous version of iOS?
 Unlock iPad in four days